Generic KAFKA Producer
About
Kafka is a distributed system consisting of servers and clients that communicate via a high-performance TCP network protocol. Kafka is run as a cluster of one or more servers that can span multiple data centers or cloud regions. Some of these servers form the storage layer; these are called the brokers. Producers are client applications that publish (i.e., write) events to Kafka, and consumers are those that subscribe (i.e., read and process) to these events. Producers and consumers are fully decoupled and agnostic of each other.
The Generic KAFKA Producer is a generic solution for sending alarms and parameter values to a specific topic in the broker, where DataMiner acts as a Producer.
Configuration
Connections
Virtual Connection
This connector uses a virtual connection, which does not require any input during element creation.
SNMP Connection
This connector uses a Simple Network Management Protocol (SNMP) connection, which requires the following input during element creation:
SNMP CONNECTION:
- IP address/host: The polling IP of the device.
SNMP Settings:
- Port number: The port of the connected device, by default 161.
- Get community string: By default public.
Initialization
On the General page of the element, you need to configure how the connector authenticates and connects to the Kafka broker.
The Security Protocol parameter determines which authentication mechanism is used:
- Sasl: SASL over SSL (
SASL_SSL). Authenticates using SASL/PLAIN (Simple Authentication Security Layer), a username/password mechanism used together with TLS for encryption. - Ssl: Mutual TLS (
SSL) using a keystore and CA certificate, without SASL credentials. - Sasl_Plain Text: SASL/PLAIN over an unencrypted connection (
SASL_PLAINTEXT). Use this only on trusted networks, as credentials are not encrypted in transit. - SASL OAuth Bearer: OAuth 2.0 / OIDC bearer-token authentication (
SASL_SSLwithOAUTHBEARER). The token settings are configured on the OAuth Configuration page.
In addition, the following parameters can be configured on the General page:
- Broker: The server's address.
- SASL User: The username for use with SASL/PLAIN (used with the Sasl and Sasl_Plain Text security protocols).
- SASL Password: The password for use with SASL/PLAIN.
- Keystore Location: The path to the client keystore, used with the Ssl security protocol for mutual TLS.
- Keystore Password: The password protecting the keystore.
- CA Certificate Location: The path to the CA certificate used to validate the broker's certificate.
- Idempotence: When enabled, the producer guarantees that messages are delivered exactly once and in order, preventing duplicate records.
- Connect: This button allows you to force the connection to a broker. By default, the connector tries to establish the connection by polling metadata from the broker in order to check the connectivity.
How to Use
General
For more information about the General page, see Initialization.
Alarms
On this page, you can define which information from the received SNMP informs/traps should be forwarded and where.
SNMP Manager Configuration
DataMiner receives the alarm information in the incoming SNMP inform messages/traps. Messages might be forwarded by any DataMiner Agent or by third-party software. In case a DataMiner Agent forwards them, the SNMP Manager (Apps > System Center > SNMP Forwarding) settings should be configured as follows:
- SNMP version: SNMPv2 or SNMPv3.
- Notification OID: Needs to match the Custom Bindings Object ID displayed when you click the More Configurations page button on the Alarms page. Otherwise, received inform messages/traps will not be processed.
- The custom bindings table should be filled in.
You can also select the "Send the extra starting ping notification during resend" and "Send the extra ending ping notification during resend" options. For more information, refer to Configuring an SNMP manager in DataMiner Cube.
Each message forwarded to the topic contains a key string and a JSON value, where the key is known as the partition key and the value as a JSON object containing bindings.
Alarms Configuration
On the Alarms page, the following parameters are available:
Alarms Topic: The alarms data is stored by the Kafka broker in a topic. This is similar to a folder in a file system, with the events/alarms being like the files in that folder.
Alarms Partition Key: If a partition key is defined, the data is always stored in the same partition. Otherwise, the data is spread over the partitions. The partition key definition is relevant for the consumer to know which partition to consume the data from.
Pending Alarms Range: Displays the range of pending alarms to be sent to an unreachable broker. An internal queue holds pending alarms and resends them once the broker's connection is established. The size of the queue is limited.
Bindings Configuration table: This table lists the inform/trap bindings that will be sent in a JSON-format message to the topic.
Keep in mind that the bindings/OIDs defined or imported must match the bindings/OIDs defined in the SNMP Manager configuration.
The following options are available via the right-click menu of the table:
Add New Row: Allows you to add a new row. You will need to specify the OID and the binding name. Because the OIDs present in the binding's discrete option match the binding's SNMP Forwarding configuration, when a new binding name is defined, the corresponding OID is automatically filled in and vice versa.
Delete Selected Row(s): Deletes the selected rows.
Clear Table: Clears the content from the entire table.
Partition Key: To define a partition key, right-click the binding name in the table and select this option. Multiple binding names can be concatenated. By default, an underscore is used for concatenation.
Clear Partition Key: Clears the existing partition key. The Alarms Partition Key parameter will have an empty value.
More Configurations Subpage
Via the More Configurations page button, you can access a subpage with the following settings:
Custom Bindings Object ID: This parameter value defines the inform/trap OID and should match the Notification OID in the SNMP Manager. If the OIDs do not match, the received alarm is not processed.
Send Messages To Broker: By default, this is disabled. When the configuration is complete, set this to enabled to allow forwarding of alarm messages to the Kafka broker.
Forward System Messages: If this is disabled, system messages are discarded and not sent to the topic. These include, for example, ping messages, messages after a DMA restart, or alarm storm events.
Resend Messages: If this is enabled, when alarms are manually resent by SNMP Manager with the "Resend" option, and the options "Send the extra starting ping notification during resend" and "Send the extra ending ping notification during resend" are enabled, each resent alarm will have the additional "Is Resent Alarm" binding name with the value "true". In all other cases, the flag is not sent.
Clear Pending Alarms: This button resets the queue containing the pending alarms.
Forward Alarms From File Subpage
The Forward Alarms From File page button opens a subpage with parameters related to the forwarding of alarms from the Alarm Console to the topic.
To use this feature, in the Cube Alarm Console, select the alarm rows to forward, right-click the selection and select Copy > Visible columns or All columns. Then paste the columns in an Excel document, remove the empty line and save the file as a CSV file. The first line (with the column names) will define JSON properties.
With the parameters on this subpage, you can then execute and monitor the import:
Forward Alarm Import Status: Displays the status of the file import.
Processing Forward Alarms: Displays the current processing type, i.e., Not Processing, Reading File or Filling Tables.
Console Alarms Folder Path: Indicates the folder path where the CSV file to import is located.
Console Alarms File: Lists all the files present in the Console Alarms Folder Path.
Console Alarms Partition Key: The partition key used for console alarms (should correspond with properties/first line in CSV file).
Forward Alarms: Click this button to import the CSV file with alarms and forward the alarms to the topic.
Import Bindings Subpage
Via the Import Bindings page button, you can import a CSV file with predefined OIDs and corresponding binding names into the Bindings Configuration table:
Alarms Folder Path: Indicates the folder path where the CSV file to import is located.
Alarms File: Lists all the files present in the Alarms Folder Path.
Alarm Import Status: Displays the status of the file import.
Processing Alarms: Displays the current processing type, i.e., Not Processing, Reading File or Filling Tables.
Import: Click this button to import the CSV file into the table.
Parameters
On this page, you can define which parameter values from which elements or enhanced services should be forwarded, where these should be forwarded, and how often this should happen.
The following parameters are available on this page:
Parameters Topic: The parameter values are stored by the Kafka broker in a topic. This is similar to a folder in a file system, with the parameter values being like the files in that folder.
Parameters Partition Key: If a partition key is defined, the data is always stored in the same partition. Otherwise, the records are spread over the partitions. The partition key definition is relevant for the consumer to know which partition to consume the data from. In case the Clear box is selected, the partition key is cleared.
Parameters Configuration: This table defines the parameters and values to be sent to the topic. You can find more information on this table below.
Parameters Configuration Table
Each configurable row in the table represents a Kafka message that contains a key as the partition key and a value as a JSON object, where the properties are the column values: DataMiner ID, Protocol Name, Element Name, Timestamp, Parameter ID, Parameter Name, and Parameter Value.
In addition to the fields used to select the source parameter, each row exposes the following behavioral columns:
- Forwarding Time: The polling interval (in seconds) at which the parameter value is retrieved and evaluated for forwarding.
- On Change: Determines whether the value is forwarded each it gets polled or only when it changes compared to the previous value.
- Send Data: Enables or disables forwarding for the row.
- Topic: The Kafka topic that this specific row is forwarded to. This allows different parameter rows to target different topics, independently of the global Parameters Topic setting.
- Send Value Only: When enabled, only the parameter value is sent instead of the full JSON object.
- Delete on Success: When enabled, the row is automatically removed from the table once its message has been successfully forwarded to the broker.
- Throughput: Displays the number of messages forwarded for the row.
Kafka message example:
Key:
Skyline DMP Replication_DMP testValue:
{"Timestamp":"2021-08-31T14:34:20.7669751+01:00","DataMiner ID":"404","Element Name":"DMP test","Parameter Name":"Total Amount of Active Elements","Parameter ID":1406,"Parameter Value":"24","Protocol Name":"Skyline DMP Replication"}
Row configuration example:

Based on the current configuration of the highlighted row, the Send Data column cell is set to Enabled, meaning that the polling cycle for the parameter with ID 2 is activated. The parameter value is polled from the element "Service test" at the interval defined by the Forwarding Time column, and the value is only forwarded to the topic if the value changes (as determined by the On Change column). The current value is different from the previous one.
It is possible to add parameters from all the elements with the same protocol name.

When you right-click the Parameters Configuration table, the following options are available:
Add New Row: Adds a default row with each cell value set to N/A except the Forwarding Time (with default value 30s), On Change (with default value If Value Changes) and Send Data (with default value Disabled). To properly set up a row, make sure to define the fields starting from the left-hand side: DataMiner ID first, then Protocol Name, and so on. This is because when you select the DataMiner ID, the discrete options for the Protocol Name are updated with the existing protocols on that DMA. The same occurs when you select a new Protocol Name: the discrete options for the Element Name are also updated.
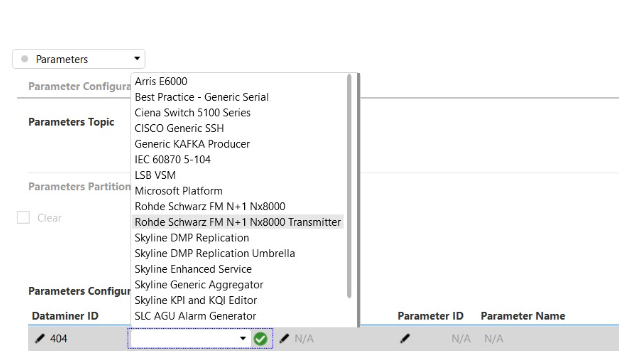
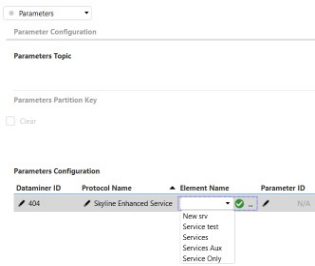
Enable Selected Row(s): The Send Data value will be set to Enabled, meaning that the parameter value will be sent to the parameter's topic in a Kafka message.
Disable Selected Row(s): The Send Data value will be set to Disabled, meaning that the selected parameter values will not be sent to the parameter's topic in a Kafka message.
Delete Selected Row(s): Deletes the selected rows.
Clear Table: Clears the content of the entire table.
More Table Options Subpage
On this subpage, you can update all rows in the Parameters Configuration table with the specified Forwarding Time value.
The Force all button can be used to force the polling and the sending of all the parameters to the topic.
Import Parameters Subpage
This subpage allows you to import a CSV file with parameters into the Parameters Configuration table.
To create a CSV template:
Manually add rows to the Parameters Configuration table.
Right-click the rows and select Other > Export table.
Select to include hidden columns, as there are hidden columns that are required for the import.
You can then use this template to create a file to import. The following parameters on the Import Parameters subpage can be used for this:
Parameters Folder Path: Indicates the folder path where the CSV file to import is located.
Parameters Files: Lists all the files present at the specified folder path.
Parameters Import Status: Displays the status of the file import.
Processing Parameters: Displays the current processing type, i.e., Not Processing, Reading File, or Filling Tables.
Import: Click this button to import the parameters CSV file into the table.
OAuth Configuration
When the Security Protocol on the General page is set to SASL OAuth Bearer, the broker connection authenticates with an OAuth 2.0 / OIDC access token instead of a username and password. The token settings are configured on the OAuth Configuration page.
The following core parameters are available:
- SASL OAuth Bearer Method: The token acquisition method, either Default or OIDC.
- SASL OAuth Bearer Token Endpoint URL: The OAuth 2.0 token endpoint from which access tokens are requested.
- SASL OAuth Bearer Client ID: The OAuth 2.0 client identifier.
- SASL OAuth Bearer Client Secret: The OAuth 2.0 client secret.
- SASL OAuth Bearer Scope: The requested OAuth scope.
- SASL OAuth Bearer Extensions: Optional comma-separated
key=valueextension pairs sent with the token request. - Enable SASL OAuth Bearer Unsecure JWT: When enabled, allows the use of unsecured JWTs (mainly for testing).
- SASL OAuth Bearer Grant Type: The OAuth grant type, either Client Credentials or JWT Bearer.
JWT Assertion
When the grant type requires a signed JWT assertion, the parameters in the JWT Assertion group define how the assertion is built and signed. These map directly to the corresponding librdkafka sasl.oauthbearer.assertion.* configuration properties:
- SASL OAuth Bearer Assertion Algorithm: The signing algorithm (RS256, RS384, RS512, ES256, ES384, or ES512).
- SASL OAuth Bearer Assertion Private Key File / Private Key PEM / Private Key Passphrase: The private key used to sign the assertion, provided either as a file path or inline PEM, with an optional passphrase.
- SASL OAuth Bearer Assertion File: A path to a pre-generated assertion, used instead of building one from the claims below.
- SASL OAuth Bearer Assertion JWT Template File: A JWT template file used as the basis for the assertion.
- SASL OAuth Bearer Assertion Claim Aud / Exp Seconds / Iss / JTI Include / Nbf Seconds / Sub: The individual JWT claims (audience, expiry, issuer, JTI inclusion, not-before, and subject) used when the assertion is generated by the connector.
- SASL OAuth Bearer Metadata Authentication Type: The metadata authentication method, either None or Azure IMDS.
Schema Registry
By default, Kafka messages are produced as JSON strings. On the Schema Registry page, you can instead serialize messages using AVRO via a Confluent Schema Registry, which enforces a schema on the produced records and enables schema evolution for consumers.
The following parameters are available:
- Schema Registry Enabled: Enables or disables the Schema Registry / AVRO serialization integration. When disabled, messages are produced as plain JSON strings.
- Serialization Format: The serialization format used when the integration is enabled. Currently AVRO.
- Schema Source: Defines where the AVRO schema definition is loaded from:
- Schema Registry: The schema is fetched from the configured Schema Registry.
- File: The schema is loaded from a local
.avscfile.
- Schema File Path: The full path to the local
.avscschema file, used when Schema Source is set to File. - Schema Registry URL: The URL of the Confluent Schema Registry.
- Auto Register Schemas: When enabled, schemas are automatically registered in the Schema Registry (
auto.register.schemas). - Use Latest Version: When enabled, the latest registered schema version is used instead of registering or looking up a new one (
use.latest.version).
Bearer Authentication
When the Schema Registry requires OAuth bearer authentication, the following parameters configure it (mapping to the Confluent bearer.auth.* settings):
- Bearer Credentials Source: The credentials source, e.g., OAUTHBEARER.
- Bearer Issuer Endpoint URL: The OAuth/OIDC issuer token endpoint URL.
- Bearer Client ID / Bearer Client Secret: The client credentials used to obtain a bearer token.
- Bearer Scope: The requested OAuth scope.
- Bearer Logical Cluster: The logical cluster ID.
- Bearer Identity Pool ID: The identity pool ID.
Notes
The forwarding alarms feature allows you to forward information about impacted services (e.g., OID 1.3.6.1.4.1.8813.1.1.2.5.1.2.1.1, 1.3.6.1.4.1.8813.1.1.2.5.1.2.1.2). While in an SNMP message the information is received in a table (in case the alarm affects more than 1 service), in the forwarded JSON message information will be concatenated with commas (per OID).