Generic OPC Data Access
This is a virtual protocol that is used to subscribe to several items on a remote server and to monitor the received updates.
About
This connector is used as an OPC DA (Data Access) client. You can specify the host address of one or more OPC servers. When the connection is established with a certain server, you can specify for which items you want to receive updates from the server. It is also possible to import or export the current subscription group.
Version Info
| Range | Description | DCF Integration | Cassandra Compliant |
|---|---|---|---|
| 1.0.0.x | Initial version | No | No |
| 1.0.1.x | Added Signal Name, Analog Value and Text Value to Subscription Table | No | No |
Installation and configuration
Creation
This connector uses a virtual connection and does not require any input during element creation.
Configuration of OPC server and client
In order to enable OPC communication between a client and a remote server, create a user on the client and remote server with exactly the same name and password.
To set up DCOM correctly, make the following changes on the computer running the OPC server:
Configuring the application:
Launch the Component Services by typing "dcomcnfg" in the Start menu.
Navigate to Console Root > Component Services > Computers > My Computer > DCOM Config and search for the OPC server. (This service might have a different name than "OPC Server"; a prefix of the vendor is likely to be added.) Then right-click Properties.
In the General tab, verify that the Authentication Level is set to Default.
In the Location tab, verify that the Run Application on this computer option is enabled.
Open the Security tab.
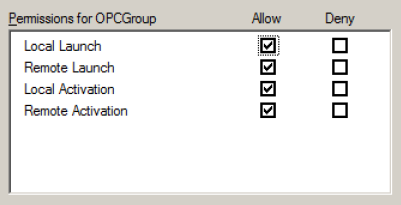
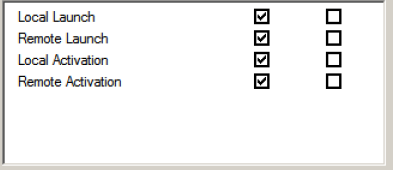
In Launch and Activation Permissions, select Customize and click Edit. This is necessary to grant permissions to users to start the OPC server. Add the same user (or group) as you created earlier. Use the Check Names button to check/select the correct user. Then make sure the Allow check boxes are checked for Local Launch, Remote Launch, Local Activation and Remote Activation:
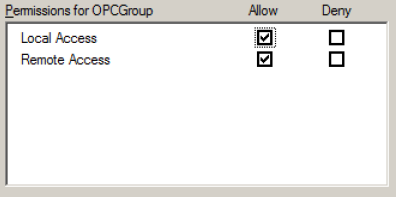
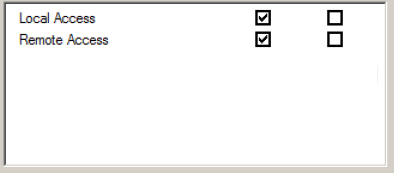
In Access Permissions, select Customize and click Edit. This is necessary to grant permission to users/groups to make calls to the OPC server. Add the same user (or group) as you created earlier. Use the Check Names button to check/select the correct user. Then make sure the Allow check boxes are checked for Local Access and Remote Access:
Configuring the Application Identity:
Launch the Component Services by typing "dcomcnfg" in the Start menu.
Navigate to Console Root > Component Services > Computers > My Computer > DCOM Config and search for the OPC server. (This service might have a different name than "OPC Server"; a prefix of the vendor is likely to be added). Then right-click Properties.
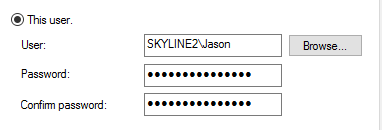
In the Identity tab, select This user. Then fill in the same user as you created earlier. Use the Check Names button to check/select the correct user.
See the example below:
Configuring the System:
Launch the Component Services by typing "dcomcnfg" in the Start menu.
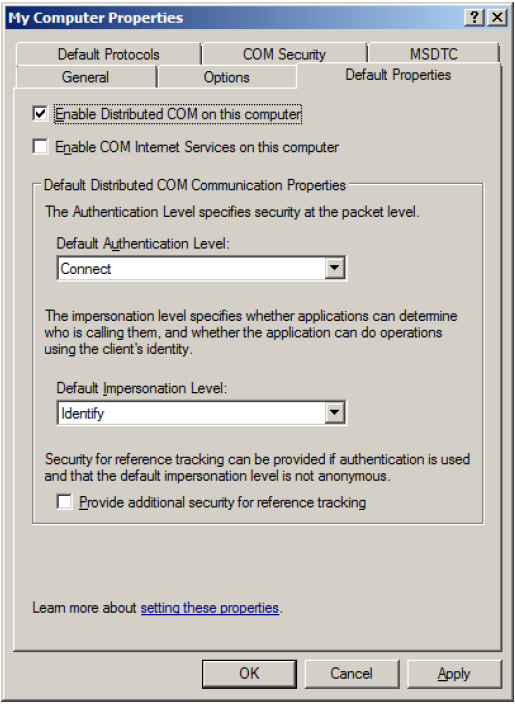
Navigate to Console Root > Component Services > Computers > My Computer and right-click Properties.
In the Default Properties tab, select the option Enable Distributed COM on this computer:
In the COM Security tab, select all the buttons one by one, each time adding the user you created earlier. Again you can use the Check Names button.
In Access Permissions, make sure all options are enabled, as illustrated below, for the created user and for the ANONYMOUS LOGON user.
In Launch and Activation Permissions, make sure all options are enabled, as illustrated below, for the created user and for the ANONYMOUS LOGON user.
Finally, you must validate the firewall on the client and server computer:
Client side:
Create an inbound exception that allows computers using TCP on all ports.

Create an outbound exception that allows computers using TCP on port 135. Note that this port number could be different.

Server side:
Create inbound exceptions as illustrated below. This should normally be fine because all ports are allowed.

Create an outbound exception that allows computers using TCP on port 135. Note that this port number could be different.

Usage [1.0.0.x]
OPC Data Access
This page contains the necessary parameters to establish a connection with a local or remote OPC server. It also contains a table where you can add the items for which you want to receive updates.
The page has the following parameters:
Host IP Address: This is the IP address of the local or remote host computer on which one or more OPC servers are available.
Refresh: When you click the refresh button, all the available OPC servers are listed in a drop-down list.
OPC Server: A drop-down list with all the available OPC servers.
Connection to Server: Specifies the connection status with the server.
Server State: Specifies the state of the server with the following possible values: Unknown, Running, Failed, No Config, Suspended, Test or Communication Fault.
Connection Established on: Specifies the time when the connection was established.
Last Update Time: Specifies the time when the client received the latest update from the server.
OPC Data Access Subscriptions: This is a table with all the items for which you will receive updates. It contains the following columns:
- Name[IDX]: The name of the item for which you will receive updates.
- Value: The value of the item.
- Quality: The quality of the value, which can be good or bad.
- Timestamp: The time when the client received the latest update for this item.
OPC Server page button: Extra information about the OPC server.
- Status Info: Detailed information about the server status.
- Product Version: Detailed information about the product version of the server.
- Start Time: The time when the server was started.
- Update Period: The minimum period in milliseconds to receive updates from the server.
User page button: Allows you to edit the user account that will be used for the OPC communication:
- Username: The username associated with the account you want to use.
- Password: The password for the specified user account.
- Domain: The domain name of the computer network.
- Logon Type: the logon type that will be used for the user account.
Usage [1.0.1.x]
OPC Connectivity Page
This page contains the necessary parameters to establish a connection with a local or remote OPC server.
The page has the following parameters:
Host IP Address: This is the IP address of the local or remote host computer on which one or more OPC servers are available.
Refresh: When you click the refresh button, all the available OPC servers are listed in a drop-down list.
OPC Server: A drop-down list with all the available OPC servers.
Connection to Server: Specifies the connection status with the server.
Server State: Specifies the state of the server with the following possible values: Unknown, Running, Failed, No Config, Suspended, Test or Communication Fault.
Connection Established on: Specifies the time when the connection was established.
Last Update Time: Specifies the time when the client received the latest update from the server.
OPC Server page button: Extra information about the OPC server.
- Status Info: Detailed information about the server status.
- Product Version: Detailed information about the product version of the server.
- Start Time: The time when the server was started.
- Update Period: The minimum period in milliseconds to receive updates from the server.
User page button: Allows you to edit the user account that will be used for the OPC communication:
- Username: The username associated with the account you want to use.
- Password: The password for the specified user account.
- Domain: The domain name of the computer network.
- Logon Type: The logon type that will be used for the user account.
OPC Connectivity Page
This page displays the OPC Data Access Subscriptions Table. You can Import, Export, Add, Remove or Clear the subscriptions in this table. This page also contains the Signal Name toggle button, which allows you to select if the Signal Name is Available or Not Available for the subscriptions.
The OPC Data Access Subscriptions Table contains the following columns:
- Index: The table index
- Key [IDX]: The OPC ID or signal name, if available.
- Name: The name of the subscription (OPC ID).
- Signal Name: The signal name, if available.
- Parameter Type: The type of the value (Status, Integer, Analog or Text).
- Status Value: The value of the status.
- Integer Value: The value as an integer.
- Analog Value: The value as an analog (float).
- Text Value: The value as a text.
- Quality: The quality of the value, which can be good or bad.
- Timestamp: The time when the client received the latest update for this item.
- Element Link: Custom column that allows you to manually specify an element name.