Generic Ping
This connector can be used to send ping commands to a number of IP addresses in the network. It serves as a utility to test connectivity and also calculates multiple metrics and statistics based on the results of the ping, e.g., round-trip time (RTT), ping success rate, jitter, etc.
The connector can perform multiple ping requests at once. The IP addresses/hostnames can be added manually or imported with a .csv file. For each IP address/hostname that has been added, ping requests will be performed if the status is enabled. The result of the ping commands and some other statistical data will be shown for each IP address/hostname.
About
Version Info
| Range | Description | DCF Integration | Cassandra Compliant |
|---|---|---|---|
| 3.1.2.x [SLC Main] | Based on 3.1.1.12. Jitter features of the Ping Table have been reworked to provide more accurate and detailed information and allow for a more intuitive user experience. | Yes | Yes |
| 3.1.1.x [Obsolete] | Based on 3.1.0.19. Ping Table now uses naming instead of displayColumn to make the database for this table Cassandra-compliant. Old trend data will be lost for this table. | Yes | Yes |
| 4.0.0.X [Obsolete] | Based on 3.1.0.18. Temporary removal of heatmaps. | Yes | No |
| 3.1.0.X [Obsolete] | Based on 2.1.0.8. Almost fully redeveloped: Dynamic tables and multi-threaded timers. Impact of going to this range from 2.x.x.x: Loss of all trend data, reconfigure all templates, Visio, etc. | Yes | No |
| 2.1.0.X [Obsolete] | Based on 2.0.0.1. Static tables and no multithreading. | No | No |
| 2.0.0.X [Obsolete] | New development. Static tables, initial version (2). | No | No |
| 1.0.0.X [Obsolete] | Static tables, initial version. | No | No |
Installation and configuration
Creation
Virtual connection
This connector uses a virtual connection and does not require any input during element creation.
Configuration
To perform ping requests, you must add IP addresses/hostnames to the Ping Table. To do so, click the Add Ping button or import a .csv file by clicking the Import page button and specifying the file path of the .csv file on the pop-up page.
Usage
Ping
This page contains a table with a list of all the IP addresses/hostnames configured to be pinged. These are configured using the column Destination Address. To enable the ping, set the Admin Status to Enabled. Based on the responses received, the connector will display several metrics.
In version 3.1.1.10 of the connector, you can also select the type of Protocol to perform the ping: ICMP (default) or TCP. If you select the TCP protocol, you also need to specify the Port. For the ICMP protocol, the Port field is disabled. Also, when the TCP protocol is selected, the Buffer Size and TTL options are disabled.
The number of ping requests per poll cycle can be specified in the Pings per Cycle column. With Set All Nr of Pings per Cycle, you can set all the Pings per Cycle to the specified value.
In the Jitter section of the table, you can configure the size (number of ping commands) and frequency intervals of ping bursts that will be used to measure jitter. There is also a separate Jitter Admin Status that can be used to enable or disable the measuring of jitter. This is because the measurement is done via a separate polling engine. In terms of configuration, jitter permits the modification of three key values that will modify the behavior of this separate polling engine. Jitter Interval and Jitter Ping Interval refer to the amount of time (in seconds and milliseconds respectively) that should pass between each burst of pings sent by the polling engine, as well as each individual ping in that burst. Jitter Pings per Cycle refers to the quantity of pings to be sent out as part of the jitter measurement.
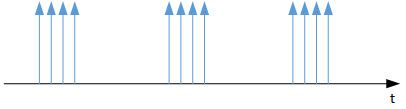
For example, the image below depicts a sequence of 3 ping bursts. The default settings use a Jitter Interval of 2 seconds, a Jitter Ping Interval of 15 milliseconds, and 4 Jitter Pings per Cycle.
 To calculate the jitter, the polling engine sends out a burst of pings in accordance with the Jitter Pings per Cycle value. The latency value of these pings is stored in a buffer, and the delta between consecutive latency values is calculated. The table will then display the minimum and maximum of these delta values, as well as the average delta value, which will represent the measured jitter of the burst of pings.
A key aspect of the jitter features is that the calculations can arrive at more or less precise measurements based on the input values. For example, if you want highly accurate information about the jitter in the communication with a device, you can configure the number of pings in a burst to be high and the intervals between each burst and its pings to be low. Alternatively, you can reduce the number of pings in a burst and raise the intervals to derive a less precise jitter measurement but not saturate a device with frequent communication.
Underneath the table, several buttons are available:
- Disable All: Disables all the rows in the Ping Table, so that no ping actions will be performed.
- Enable All: Enables all the rows in the Ping Table, so that all the specified IP addresses/hostnames will be pinged. Does not enable jitter measurement.
- Add Ping: Adds a new row to the Ping Table.
There are also two page buttons available:
- Import: Allows you to import a list of IP addresses, as described in the Configuration section above. This import function can be used to import a file that has been exported by another element running the Generic Ping protocol. To export a file, right-click the ping table and select to export the table.
- Add Custom Ping: Allows you to configure a new row and then add it to the Ping Table.
Underneath these buttons, a list box is available that allows you to select a row of the Ping Table and delete this row. If you select All, all the entries in the Ping Table will be removed.
General
On the right side of this page, general statistics regarding the ping actions are displayed. On the left side, you can configure the settings to configure the pings by default.
The Ping Statistics are:
- Maximum/Minimum/Average Success: The highest/lowest/current average success percentage for the enabled pings in the Ping Table.
- Maximum/Minimum/Average Ping Time: The min/max/average ping time for the enabled pings in the Ping Table.
- Current Responding Ping: The percentage of pings responding for the enabled pings in the Ping Table.
The AVG Window Size displays the number of poll cycles used to calculate the average ping statistics.
From version 3.1.1.4 of the connector onwards, this page also displays the Ping Availability:
- Daily/Weekly/Monthly Availability Average: The average availability per time range of the enabled ping processes in the Ping Table.
From version 2.1.0.11 onwards, a toggle button Element Timeout specifies whether the element goes in timeout state when a ping fails or a host is unreachable.
Notes
You can make this connector perform multiple actions by setting the hidden parameter Incoming JSON Message (PID = 10) with a JSON string.
There are currently 2 APIs for this. The old API, which is still supported, is detailed below. The new API is available as a package (Skyline.Protocol.GenericPing). This new API is extended to add, edit and remove pings. It also has additional functionality to specify whether you want to have duplicate rows in the Ping Table. This is only applicable on the rows that are added. You start with the PingBuilder, which will create a ping that represents the row. The next step is to use the MessageBuilder to create the message to add, edit or remove pings. You add the ping(s) to the message and create a JSON message based on this.
The older available operations are:
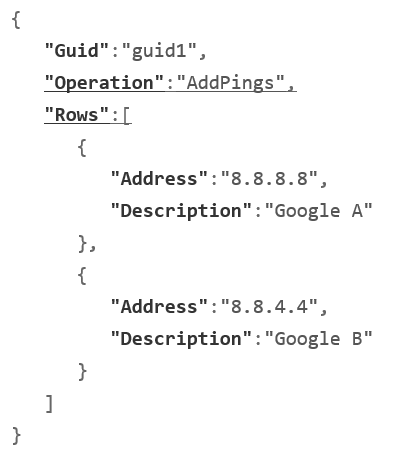
AddPings: This command sets the ping Add New Entry: Destination Address (PID = 200) and Add New Entry: Description (PID = 201) and adds one or more entries (pings) to the Ping Table, by triggering the "Add Ping with Options" QAction (ID = 11).
Example (underlined values are mandatory for this operation):
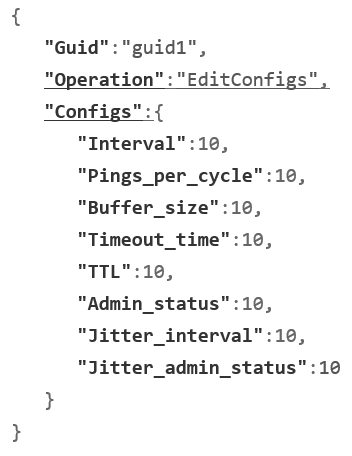
EditConfigs: This command can update the follow configuration:
Add New Entry: Interval (PID = 202)
Add New Entry: Pings per Cycle (PID = 212)
Add New Entry: Buffer Size (PID = 204)
Add New Entry: Timeout Time (PID = 205)
Add New Entry: TTL (PID = 206)
Add New Entry: Admin Status (PID = 207)
Add New Entry: Jitter Interval (PID = 208)
Add New Entry: Jitter Admin Status (PID = 210)
Example (underlined values are mandatory for this operation; configuration values must be within the specific parameter's range):