Starlink Enterprise
About
The purpose of this connector is to monitor Starlink devices through the Telemetry API and the Management API over HTTP using JSON files.
Starlink is an internet service that uses a satellite constellation in a low Earth orbit to deliver high-speed low-latency broadband internet. Because Starlink satellites are in a low orbit, at about 550 km from Earth, the round-trip data time between the user and a satellite is significantly lower compared to internet services that make use of single geostationary satellites.
The Starlink Telemetry API is a low-latency API for accessing the telemetry data from Starlink devices. This API is only available for enterprise accounts with an account manager. It is designed for users that have their own data infrastructure to monitor Starlink devices remotely. The API is stateless and will only respond with current telemetry data.
The Starlink Management API is used to activate, deactivate, and otherwise manage Starlink user terminals. Next to this, it can return paginated results containing data usage for the current and previous billing cycles for service lines on an account. Similar to the Telemetry API, this API is only available for enterprise accounts with an account manager.
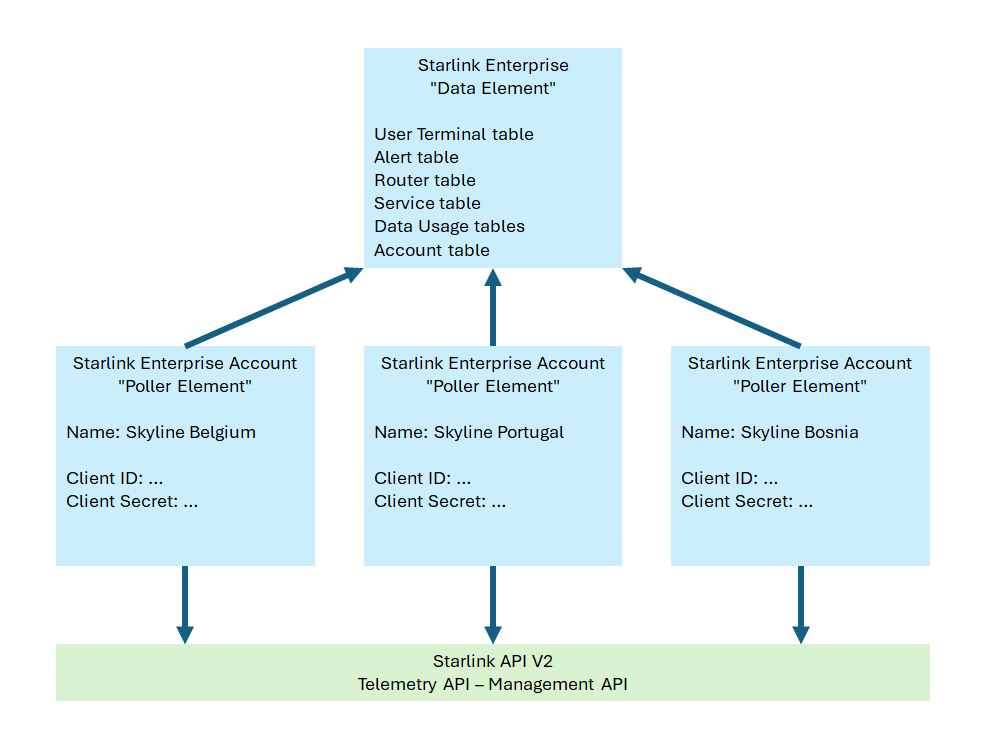
From version 1.1.0.1 onwards, the connector requires at least one Starlink Enterprise Account element in the DMS. This is because Starlink Enterprise elements are no longer able to poll the information on their own. Since the introduction of the Starlink API V2, a Starlink Enterprise element collaborates with one or more Starlink Enterprise Account elements to poll the information.
The Starlink Enterprise connector was previously known as the Starlink Telemetry API connector. The name was changed to Starlink Enterprise when calls towards the Management API were added. The Starlink Enterprise 1.0.0.1 is the same connector as the Starlink Telemetry API 1.0.0.4. If you have any elements that are still using the Starlink Telemetry API, we recommend upgrading these to the latest version of the Starlink Enterprise connector. This means that a Starlink Enterprise Account element has to be created for every account that was polled before.
Note
LEGAL NOTE: This connector (or package) is intended solely for use in production with Skyline's usage-based services model. Any other use is prohibited. For more detailed information, see Usage-based services. For inquiries regarding commercial production usage, contact Skyline Sales at sales@skyline.be.
Tip
To optimize your use of this connector, we recommend deploying our Standard Product Solution Starlink Enterprise via the Catalog. This way, you will also be able to use the complementary low-code app and standard available dashboards.
Product Info
| Range | Supported Firmware |
|---|---|
| 1.0.0.x | API V1 |
| 1.0.1.x | API V1 |
| 1.0.2.x | API V1 |
| 1.0.3.x | API V1 |
| 1.1.0.x | API V2 |
System Info
| Range | DCF Integration | Cassandra Compliant | Linked Components | Exported Components |
|---|---|---|---|---|
| 1.0.0.x | No | Yes | - | Starlink Enterprise - User Terminal |
| 1.0.1.x | No | Yes | - | Starlink Enterprise - User Terminal |
| 1.0.2.x | No | Yes | - | Starlink Enterprise - User Terminal |
| 1.0.3.x | No | Yes | - | Starlink Enterprise - User Terminal |
| 1.1.0.x | No | Yes | Starlink Enterprise Account | Starlink Enterprise - User Terminal |
Configuration
Since the introduction of the Starlink API V2, credentials are required per account. These credentials have to be entered in a Starlink Enterprise Account element of which the name equals Starlink Account [account name]. The name of the Starlink Enterprise element has to be specified there as well.
If the Starlink Enterprise Account element is available with valid credentials but the tables of the Starlink Enterprise element are still empty after several minutes, please check the Starlink Enterprise Element Name parameter of the Starlink Enterprise Account element. The element log file will show the name of the data element it tried to reach.
If changing one of the parameters does not seem to work (like topping up a service line), compare the name of the accounts on the Starlink web interface with the name of the Starlink Enterprise Account elements. The name of each Starlink Enterprise Account element has to be Starlink Account [account name] for the parameter set logic to work.
Initialization
Upon element creation, the Demo Mode of the element is enabled by default. This means that a simulation becomes active that utilizes built-in logic based on mock accounts and user terminals to replicate real-world scenarios. It uses history simulation data for the demo terminal "Skyline demo cruise_UT*74d101" to allow location tracking.
The simulation will run until you enter the Client ID and Client Secret on the Configuration page of one or more Starlink Enterprise Account elements. After that, Demo Mode gets disabled, which stops the simulation. At this point, the Starlink Enterprise Account elements start polling real data.
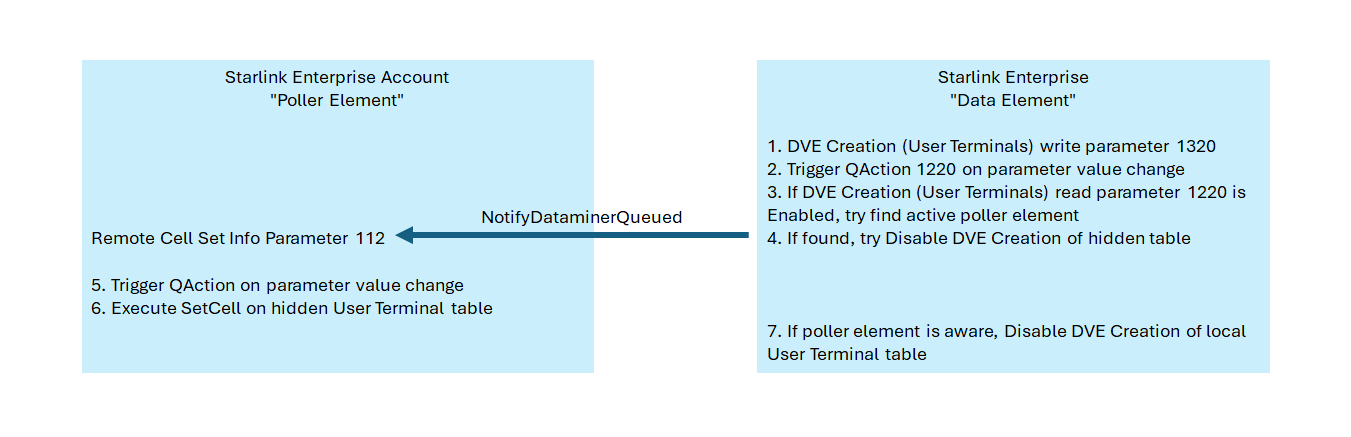
The Starlink Enterprise Account elements offload their information by setting the raw response content on a hidden parameter of the Starlink Enterprise element. Writing to these hidden parameters saves the content in a buffer, which is part of the SLScripting process. Every minute, the Starlink Enterprise element checks the buffer and pushes the received content to the correct tables.
Because of this buffer mechanism, after you start a Starlink Enterprise Account element with valid credentials, it can take a minute or two for the tables of the Starlink Enterprise element to show information.
How to Use
Communication Logging
To see the actual traffic between the Starlink Enterprise element and a Starlink Enterprise Account element, please check the element log file. You can open the element log file by right-clicking the element in the Surveyor and selecting View > Log.
User Terminals Page
The User Terminals page contains the User Terminals table. This table shows the Starlink terminals that are linked to the accounts for which a Starlink Enterprise Account element is actively querying the Starlink API.
The columns Device ID, Account Number, and Service Line Number in this table are hidden by default. You can show them by right-clicking the table column header, selecting Columns, and then selecting the columns you want to show.
The Telemetry API provides the current user terminals. Telemetry is polled every minute. The content is stored using history sets for accurate backpolling. If a terminal is removed or no longer present in the API response, the connector will retain it in the table for up to one day to ensure data continuity. When the Info Logging Level of the element log file is raised to Level 1 or higher, you will see a line in the log file when one or more terminals are still in the table but were not returned by the API.
Terminals that are no longer returned by the API for more than one day will be removed from the table. This action can also be logged in the element log file. The Timestamp column is used to determine the latest timestamp of when a row was updated.
User terminals for which the Timestamp column shows N/A are returned by the Management API and not by the Telemetry API. This means no telemetry (Signal Quality, Downlink Throughput, etc.) can be shown for these.
The Device Name column will show the service nickname if a service is active on the user terminal. The device ID is used as device name if no service is active. Changing the device name from the User Terminals table is currently not possible. To change it, you will need to use the Starlink web interface instead. The new name will then appear in the table after the next poll cycle.
The Latitude and Longitude combination represents a coordinate near the user terminal, but this is not the exact location. The longitude is calculated based on the H3 cell that is returned by the API (H3 geospatial indexing system). This H3 cell ID represents the center point of a hexagonal area, not the exact coordinates of a specific location within that area. If the exact location of the terminal is somewhere else within the hexagon, the latitude and longitude will differ.
When the Info Logging Level of the element log file is raised to Level 1 or higher, you will see a line in the log file when no terminals are assigned to a specific account.
User Terminal DVEs
User terminals can be converted to dynamic virtual elements (DVEs). To generate a DVE, enable the DVE Creation toggle button for a specific terminal in the User Terminals table.
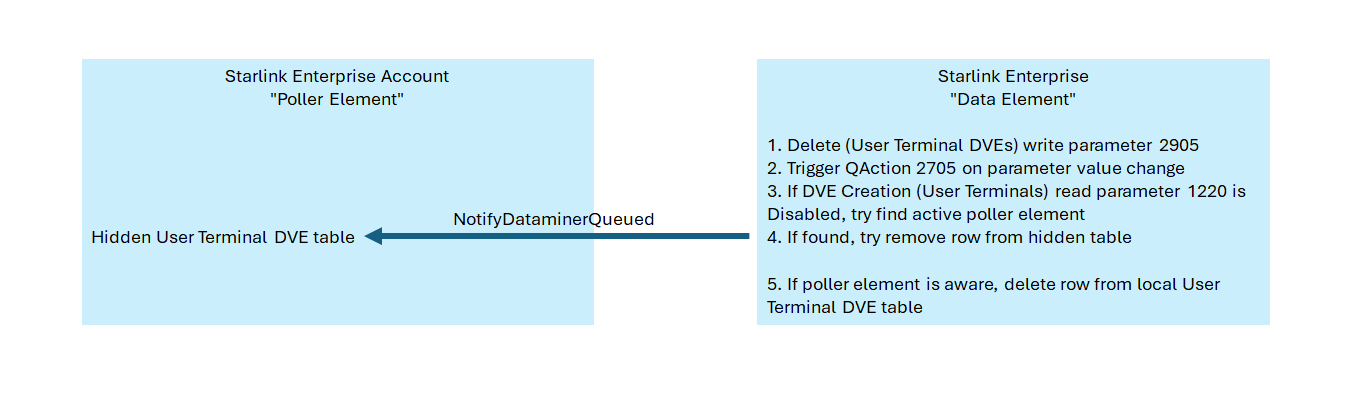
To remove a DVE:
- Make sure that the DVE Creation toggle button for the corresponding terminal is set to Disabled in the User Terminals table.
- Navigate to the User Terminal DVEs Configuration page via the page button on the Configuration page or by clicking the downwards arrow next to Configuration.
- Click the Delete button for the corresponding terminal.
- Read the warning message carefully.
- If you are sure that the DVE can be removed, click Yes to confirm.
User terminal DVEs can only be removed if the DVE Creation column contains a value other than Enabled. User terminals for which a dynamic virtual element was created will not be removed automatically if they are no longer returned by the API for more than one day and have DVE Creation set to Enabled.
Service Line Statistics
Each row in the Service Line Statistics table represents aggregated KPI data for the terminals that belong to that service line.
Alerts Page
Each row in the Alerts table represents an alert that comes from a user terminal or from a router. Alerts will persist for as long as they are active.
The User Terminal Device ID column in this table is hidden by default. You can show it by right-clicking the table column header, selecting Columns, and then selecting this column.
Routers Page
Information related to routers is stored in the Routers table.
The Account Number column in this table is hidden by default. You can show it by right-clicking the table column header, selecting Columns, and then selecting this column.
The Telemetry API provides the current routers. If a router is removed or no longer present in the API response, the connector will retain it in the table for up to one day to ensure data continuity. When the Info Logging Level of the element log file is raised to Level 1 or higher, you will see a line in the log file when one or more routers are still in the table but were not returned by the API.
Routers that are no longer returned by the API for more than one day will be removed from the table. This action can also be logged in the element log file. The Timestamp column is used to determine the latest timestamp of when a row was updated.
IP Allocations Page
Information related to IP allocations is stored in the IP Allocations table.
The IP Allocation Device ID column in this table is hidden by default. You can show it by right-clicking the table column header, selecting Columns, and then selecting this column.
Services Page
The rows in the Services table represent the active service plans of the accounts.
The Account Number column in this table is hidden by default. You can show it by right-clicking the table column header, selecting Columns, and then selecting this column.
When the Info Logging Level of the element log file is raised to Level 1 or higher, you will see a line in the log file when no services are active for a specific account.
Triggering a Top-Up
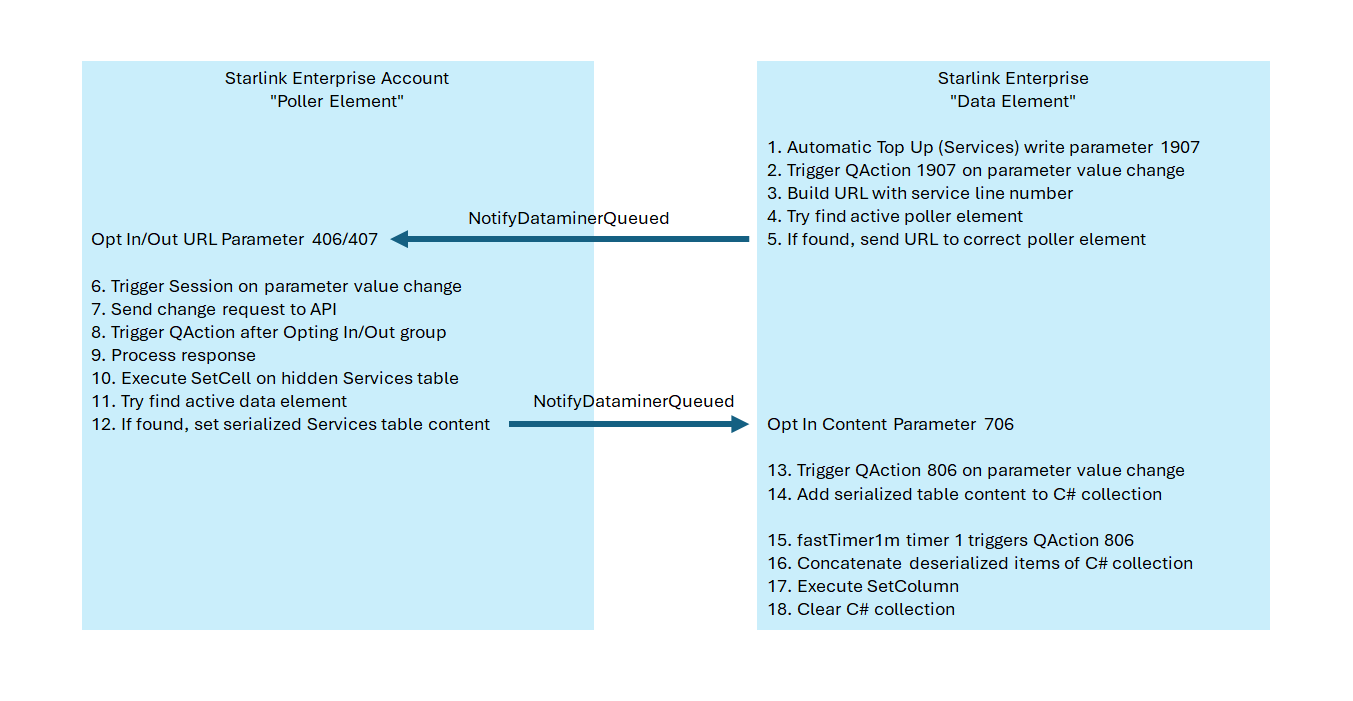
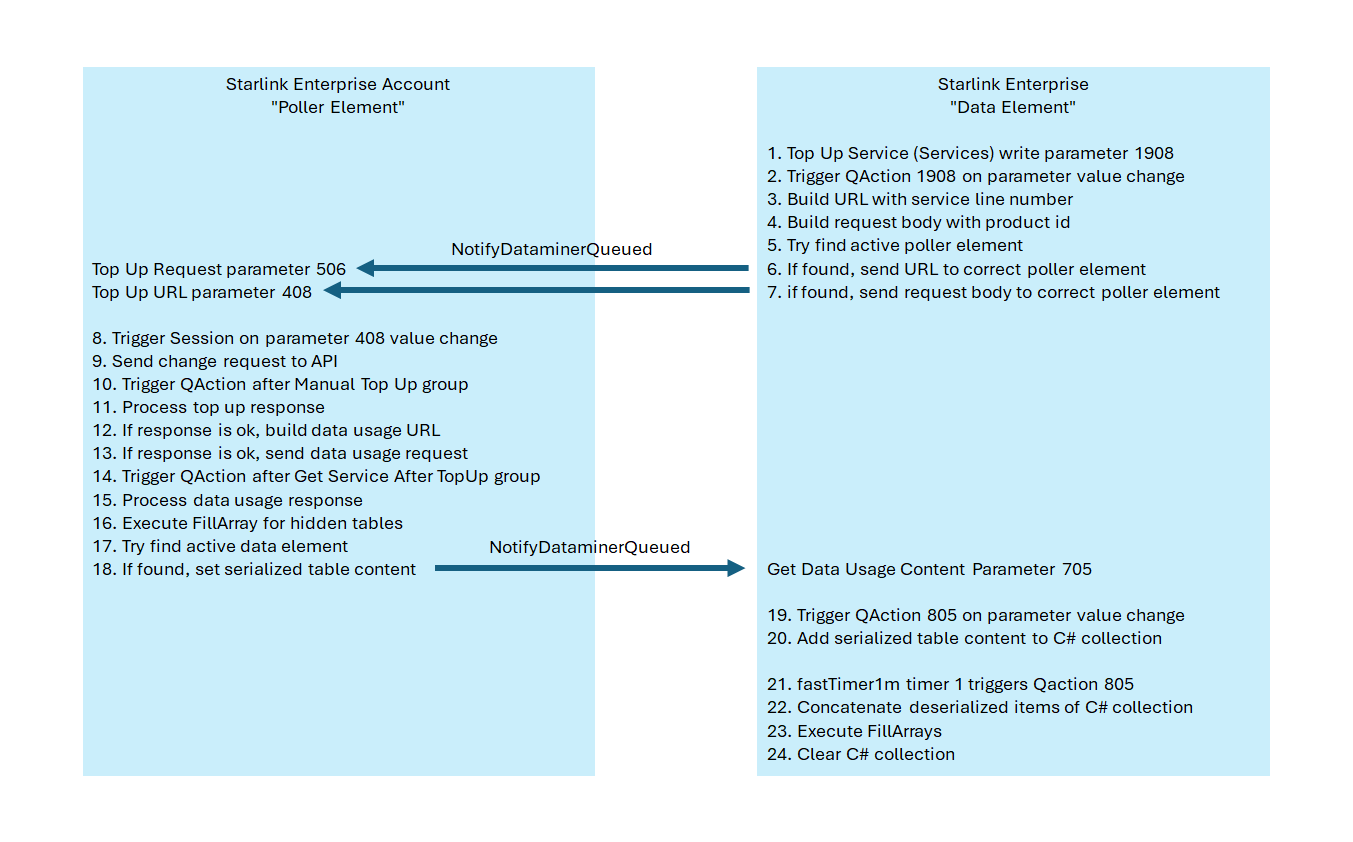
If you need to purchase additional data beyond the included monthly allocation, you can can trigger a top-up from within the Services table.
To do so, specify the number of data blocks you want to top up for a specific account in the Data Blocks to Add column of the Services table, and then click the Top Up button in the row. This will execute a one-time top-up request via the Starlink Management API. The connector will validate the product availability and confirm whether the top-up succeeded or failed.
Because the Starlink Enterprise element relies on a Starlink Enterprise Account element to send the Opt In/Out request to the Starlink API, it may take a minute or two for the Automatic Top Up toggle button to update after it is used. This is due to the buffer mechanism that was added to allow inter-element communication. Please keep these background actions in mind when toggling that button.
Overage Lines Page
This table shows the overages, which are additional services or data consumed beyond the limit.
The Service column in the Overage Lines table is hidden by default. You can show it by right-clicking the table column header, selecting Columns, and then selecting this column.
Monthly Data Usage Page
On this page, you can review and monitor your data usage per month by type of data consumed (Fixed or Mobile, Priority or Standard).
The Service column in the Monthly Data Usage table is hidden by default. You can show it by right-clicking the table column header, selecting Columns, and then selecting this column.
The data in the Monthly Data Usage table is retained for 12 months.
Daily Data Usage Page
On this page, you can review and monitor your data usage per day by type of data consumed (Fixed or Mobile, Priority or Standard).
The Service column in the Daily Data Usage table is hidden by default. You can show it by right-clicking the table column header, selecting Columns, and then selecting this column.
Accounts Page
All known accounts are listed in the Accounts table. Each row in this table contains a Polling toggle button. Switching the toggle button to Disabled does not impact the polling behavior.
Configuration Page
In case the element does not show any data, and traffic inside the element log file seems minimal, check if the Authentication parameters of the Starlink Enterprise Account elements all indicate Successful. If one of them instead indicates Failed, most likely the client ID or the client secret is not correct.
User Terminal DVEs Configuration page
Every row in the User Terminal DVEs table represents a DVE.
If the table is empty, this means no DVEs have been generated yet.
When a user generates a DVE by enabling the DVE Creation toggle button in the User Terminals table, a new row will appear in this table.
Removing a DVE is only possibly via the Delete button in the User Terminal DVEs table. See User Terminal DVEs.
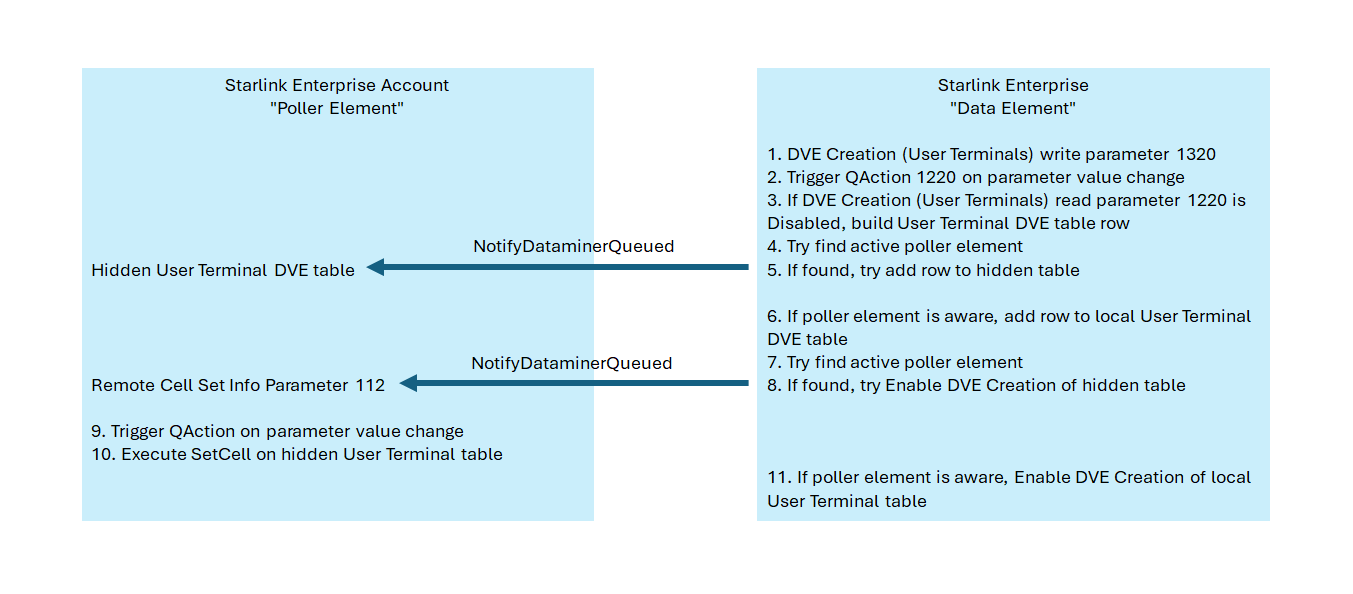
Table Cleanup Mechanism
The table cleanup mechanism can be triggered per table.
