Fine-tuning alarm grouping in your system
The alarm grouping (a.k.a. incident tracking) functionality automatically groups alarms related to the same root cause. This automatic grouping is governed by a set of rules or grouping strategies. In this tutorial, you will learn how to enable and disable certain rules, tweak them, and even add your own custom rules to the alarm grouping engine.
The content and screenshots for this tutorial have been created in DataMiner 10.5.12.
Estimated duration: 30 minutes.
Tip
See also: Kata #43: Grouping alarms like a pro on DataMiner Dojo 
Prerequisites
DataMiner 10.2.0/10.1.4 or higher with Storage as a Service (STaaS) (recommended) or a self-managed Cassandra database.
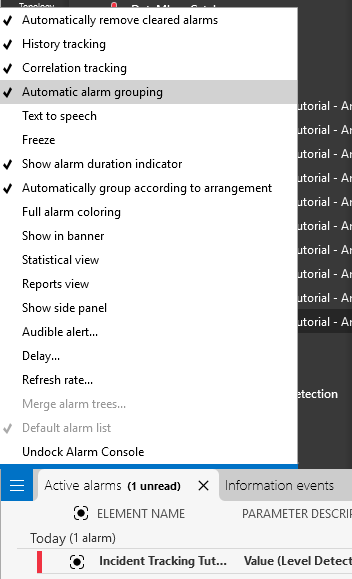
Automatic alarm grouping is enabled in DataMiner Cube: System Center > System settings > analytics config > Automatic alarm grouping.
Automatic alarm grouping is enabled in the Alarm Console: To check if this is enabled, check if Automatic alarm grouping is selected in the Alarm Console hamburger menu.
Overview
The tutorial consists of the following steps:
- Step 1: Install the example package from the Catalog
- Step 2: Find the advanced configuration file
- Step 3: Explore the default alarm grouping rules
- Step 4: Switch off parameter and view grouping
- Step 5: Add your own rules to the alarm grouping engine
- Step 6: Group on a custom element property
- Step 7: Clean up your system
Step 1: Install the example package from the Catalog
Go to https://catalog.dataminer.services/details/5b989f43-bdab-4774-ae00-228b097363b1.
Deploy the Catalog item to your DataMiner Agent by clicking the Deploy button.
This will create 13 elements under the DataMiner Catalog > Augmented Operations > Incident Tracking Tutorial view. It will also create four automation scripts. The names of all added elements and scripts starts with Incident Tracking Tutorial.
Note
If the package has been fully deployed, but not everything mentioned above is visible in Cube, close and reopen Cube.
Step 2: Find the advanced configuration file
Automatic alarm grouping groups alarms according to a set of rules, which are listed in a configuration file. To locate the file in your system:
Go to Apps > System Center > System settings > analytics config.
Under Automatic Alarm Grouping, check which ID is mentioned in the box Leader DataMiner ID.
This is the ID of the DataMiner Agent within your DMS that is in charge of running the alarm grouping algorithm for the entire DMS.
On the server running the leader DMA, go to the folder
C:\Skyline DataMiner\Analytics.Within this folder, you will find the configuration.xml file.
Take a backup of the current configuration.xml file so that you can revert to this version of the file when you finish this tutorial.
Note
If you are unable to access this file (e.g., because you are using DaaS), you can use the automation scripts that were included in the package instead in order to follow this tutorial. To get an idea of what the configuration.xml file looks like, we recommend taking a look at the file on a system that you have access to.
Step 3: Explore the default alarm grouping rules
By default, a new alarm can only be added to an existing alarm group if it occurs within 10 minutes of another alarm that is already in the group. You can customize this 10-minute interval in DataMiner Cube via System Center > System settings > analytics config > Automatic Alarm Grouping > Maximum time interval. Once alarms occur within this interval, the rules in the configuration.xml will determine whether or not they are grouped.
Open the configuration.xml file, and take a look at the different rules.
You should be able to spot the following rules:
The ServiceProperty rule, which determines whether alarms will be automatically grouped on parameters from the same service. The corresponding XML item in configuration.xml looks like this:

Tip
See also: Enabling or disabling service-based alarm grouping
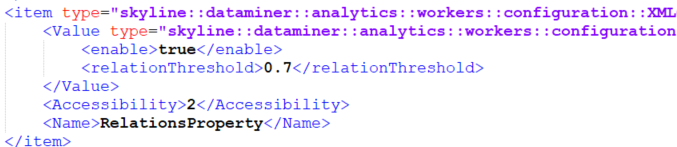
The RelationsProperty rule, which refers to parameter and alarm relationship data.
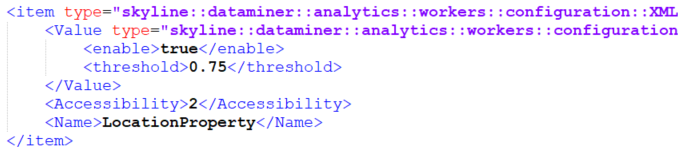
The LocationProperty rule, which requires DataMiner IDP and determines whether alarms are grouped based on location.
Tip
The ParameterProperty rule, which determines the grouping of alarms for the same parameter of a specific protocol.
For example, when multiple elements using the Microsoft Platform protocol have an alarm on their Total Processor Load parameter, then those alarms are grouped.
The ElementProperty rule, which determines whether alarms on the same element are grouped.
The PollingProperty rule, which determines whether timeout alarms polling from the same IP are grouped.
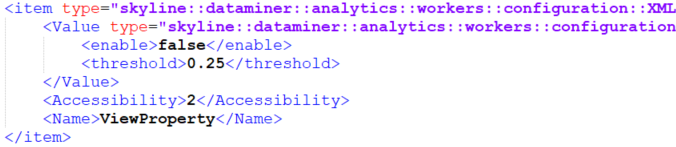
The ViewProperty rule, which determines whether alarms on elements within the same view are grouped.
The GenericProperties rule, which allows you to define custom properties.
You will find out more about this rule in step 5.
Test the ParameterProperty rule:
Open the Incident Tracking Tutorial Amplifier1_Node1 element in DataMiner Cube.
Go to the Forward Path > Level Detector page of the element.
Click the Toggle Alarm button in the upper-right corner.
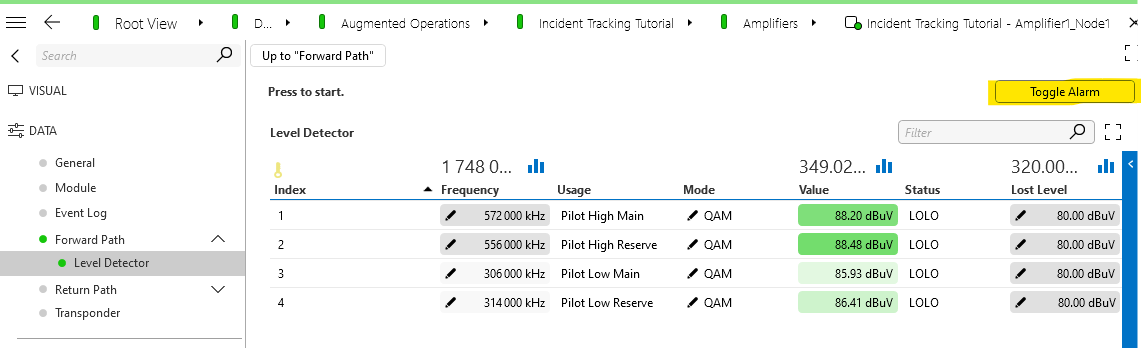
This will add an alarm for this element in the Alarm Console.
Do the same for the Incident Tracking Tutorial Amplifier2_Node1 element.
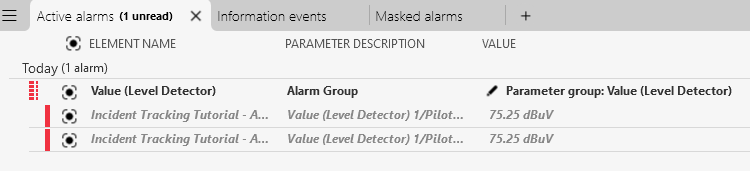
This way, you will add an alarm for the same parameter of an element using the same protocol. You should see that the new alarm is automatically grouped with the previously created alarm.
Note
If no alarm group is formed, check whether Automatic alarm grouping is enabled in the Alarm Console and whether you have triggered the alarm for the correct element. Not all of the elements added for this tutorial use the same protocol, so if you used a different element than mentioned above, the rule may not be triggered.
In both elements, click the Toggle Alarm button again to clear the alarms again.
Test the ViewProperty rule:
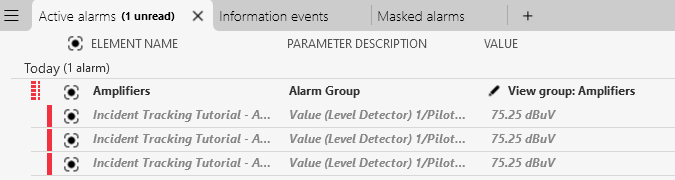
In the same way as before, trigger an alarm on the elements Incident Tracking Tutorial - Amplifier1_Node1, Incident Tracking Tutorial - Amplifier1_Node2, and Incident Tracking Tutorial - Amplifier1_Node3.
As the threshold in configuration.xml is by default set to 0.25 for this property, and the view containing the amplifier elements contains 10 elements, this will make the fraction of devices in alarm within the view exceed the configured threshold value. The three amplifier elements mentioned above use different protocols, so that the ParameterProperty rule does not get triggered here.
The resulting group should look like this:
Clear the alarms again using the Toggle Alarm button for each element.
Step 4: Switch off parameter and view grouping
To make it easier to see the effect of the next steps, temporarily switch off parameter and view grouping. There are two ways you can do this:
The easiest way (and the only way in case you are using DaaS) is by running the automation script Incident Tracking Tutorial Scripts - Script 1 Disable View and Parameter Grouping .
This script is included in the package you installed in step 1.
Alternatively, if you are not using DaaS and you want to get familiar with making manual changes to the configuration, you can edit the configuration.xml file:
- Open the configuration.xml file, after locating it as described in step 2.
- Set the
<enable>tag of the ParameterProperty rule and the ViewProperty rule to false. - Save the file.
- Restart the SLAnalytics.exe process on the leader Agent.
Step 5: Add your own rules to the alarm grouping engine
When you deployed the Catalog package earlier, elements were added in a Nodes and an Amplifiers view. This is inspired by EPM setups where a node sends out a signal to a group of amplifiers which in turn amplify and forward the signal to households. In this step, you will add a rule to automatically group alarms on amplifiers under the same node.
In the current setup, there are three nodes, named Incident Tracking Tutorial - TELESTE_NODE_x, where "x" is 1, 2, or 3. Each node sends a signal to the amplifiers with the name ending in the same number. For example, Incident Tracking Tutorial - TELESTE_NODE_1 sends a signal to Incident Tracking Tutorial - Amplifier1_Node1, Incident Tracking Tutorial - Amplifier2_Node1, Incident Tracking Tutorial - Amplifier3_Node1, and Incident Tracking Tutorial - Amplifier4_Node1.
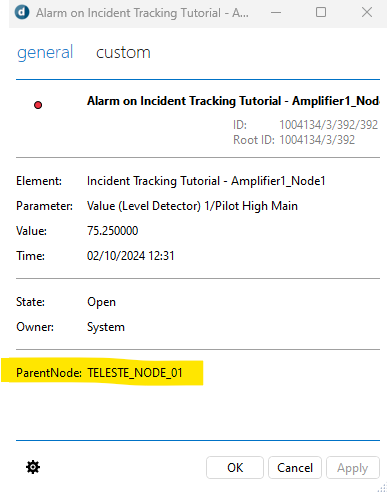
The package was configured so that an alarm on any of the amplifiers will have a custom property called ParentNode, referring to the parent node. To see this property, you can generate an alarm on one of the amplifiers, and then right-click the alarm in the Alarm Console and select Properties.
With this in mind, create a rule to group alarms of which the ParentNode property has the same value:
Open the configuration.xml file.
Scroll down to the GenericProperties property.

Within the
<Value>tags for this property, paste the following snippet:<item type="skyline::dataminer::analytics::workers::configuration::GenericAlarmPropertyVisitorConfiguration"> <enable>true</enable> <name>[PROPERTY_NAME]</name> </item>The result should look like this:
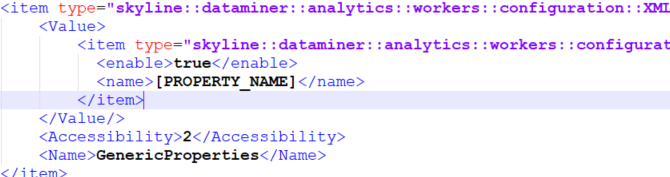
In the name tag of the pasted snippet, fill in the property name on which you want to group, i.e., ParentNode.
Save the file.
Restart SLAnalytics.exe (e.g., through the task manager).
Note
If you do not have access to the configuration.xml file, instead run the automation script Incident Tracking Tutorial Scripts - Script 2 Enable Custom Alarm Property Grouping to apply the same configuration.
Tip
For more detailed information about adding custom rules, see Defining custom properties for grouping.
On the amplifier elements ending in Node1, go to the Forward Path > Level Detector page and click Toggle Alarm to generate alarms.
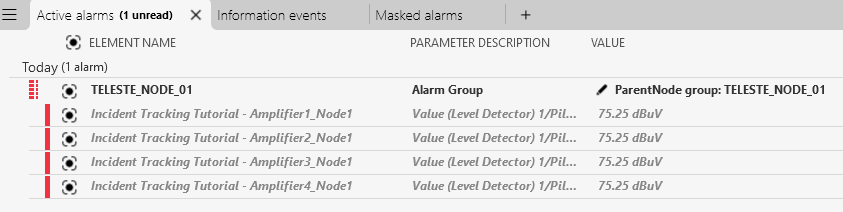
In the Alarm Console, check whether an alarm group has been created.
The resulting alarm group should look like this:
Clear the created alarms by clicking the Toggle Alarm buttons again.
Step 6: Group on a custom element property
In this step, you will create a rule to group alarms for amplifiers under the same node, but only if at least 75% of the amplifiers under that node are in alarm.
It is not possible to use the ParentNode alarm property from the previous step to achieve this. Instead, a custom element property will be needed that links each amplifier element to its parent node. For example, imagine that DataMiner detects 50 alarms on amplifiers under a single node. To determine if 75% of the amplifiers are in alarm, DataMiner would need to compare this number (50) to the total number of amplifiers under that node. However, since healthy amplifiers do not trigger alarms, this total number is not available when solely looking at alarms and their properties.
Create an element property called ElementParentNode.
Make sure you enable the option Update alarms on value changed for this property, as this is required to correctly update alarm groups based on properties.
Tip
For more info on creating element properties, see Adding a custom property to an item.
For each of the amplifiers, fill in the value of the ElementParentNode property.
You can do so in the Properties window, available via the Surveyor right-click menu for each of the elements.
Make sure that the value is the same for all amplifiers under the same node. For example, for all the amplifiers under TELESTE_NODE_1, you could use the value
Node1.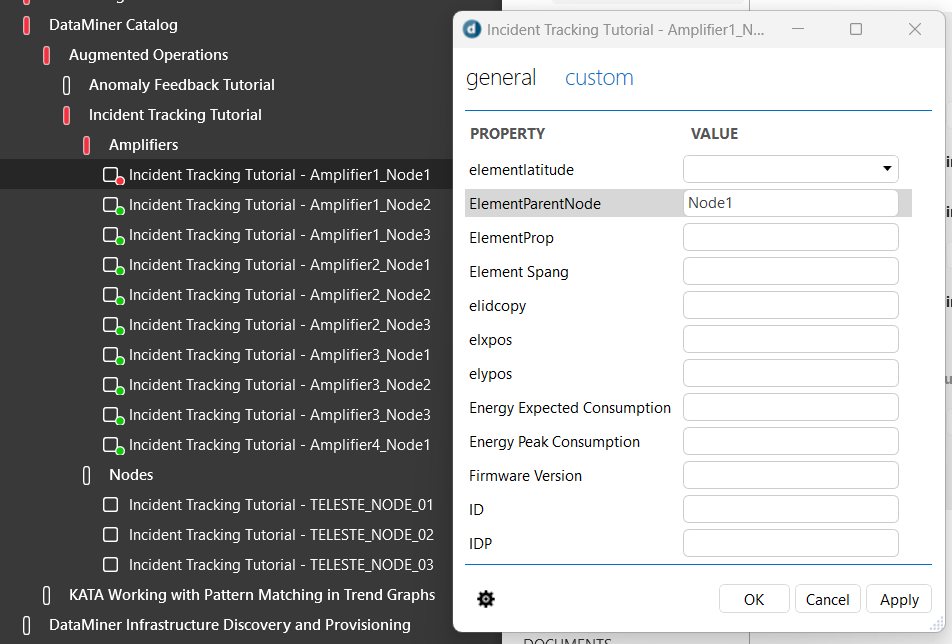
If you have access to the configuration.xml file, configure the file as follows:
Open the configuration.xml file.
Make sure that parameter and view grouping is disabled as explained in step 4.
Scroll down to the GenericProperties property.
Within the
<Value>tags for this property, paste the following snippet:<item type="skyline::dataminer::analytics::workers::configuration::GenericElementPropertyVisitorConfiguration"> <enable>true</enable> <threshold>[THRESHOLD]</threshold> <name>[PROPERTY_NAME]</name> </item>The result should look like this:
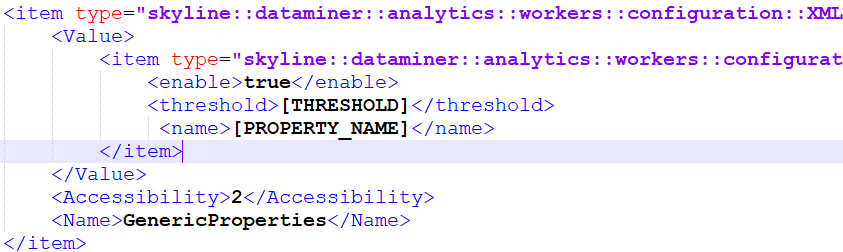
In the name tag of the pasted snippet, fill in the property name on which you want to group, i.e., ElementParentNode.
In the threshold tag, fill in the value 0.75, referring to the fact that you only want to group alarms if at least 75% of the amplifiers under a given node are in alarm.
Save the file.
Restart SLAnalytics.exe (e.g., through the task manager).
Tip
For more detailed information about adding custom rules, see Defining custom properties for grouping.
If you do not have access to the configuration.xml file, you will need to customize an automation script instead:
Open the Incident Tracking Tutorial Scripts - Script 3 Enable Custom Element Property Grouping automation script.
Look for the string variable called KataExercise.
Add the code snippet that should be added to the configuration.xml file to the KataExercise variable, but use escape characters before the quotes.
For example:
  <item type=\"skyline::dataminer::analytics::workers::configuration::GenericElementPropertyVisitorConfiguration\">
      <enable>true</enable>
      <threshold>0.75</threshold>
      <name>ElementParentNode</name>
  </item>
Save and run the automation script.
The script will copy the code snippet into your configuration.xml file and restart SLAnalytics.
Create some alarms on the amplifiers under node 1.
You should see that the alarms only get grouped if at least 3 out of the 4 amplifiers are in alarm.
To earn some devops points, take a screenshot of the alarm group you have created (including the alarms it contains) and send it to us as described below.
Important
Use the following email format to send us your screenshot:
- Subject: Tutorial - Fine-tune alarm grouping in your system
- To: ai@skyline.be
- Body:
- Dojo account: Clearly mention the email address you use to sign into your Dojo account, especially if you are using a different email address to send this email.
- Attachment: Add a screenshot of the alarm group and the amplifier alarms it contains.
Upon successful validation, you will be awarded 75 DevOps Points.
Step 7: Clean up your system
The automation scripts in this tutorial take a backup of the old version of configuration.xml before applying changes, and you can restore this backup with another script. However, if you have made manual changes before running any of the scripts, you will need to restore the file manually to get the original version again.
Clear the created alarms using the Toggle Alarm buttons of each element.
If you have done manual changes to configuration.xml before running any of the above-mentioned scripts, manually replace the modified file with the backup you took in step 2.
Alternatively, if you have not done any manual changes to configuration.xml before running one of the above-mentioned scripts, you can run the script Incident Tracking Tutorial Scripts - Script 4 Reset Configuration to revert to your original configuration.xml.