The Cube start window
When you open DataMiner Cube, initially the start window is displayed, which is also known as the "Cube launcher". The start window functions as a separate application that is used to connect to different DataMiner Systems. When you connect to a DataMiner System (DMS), this will open a new instance of DataMiner Cube using the appropriate Cube version.
These are the main components of the start window UI:
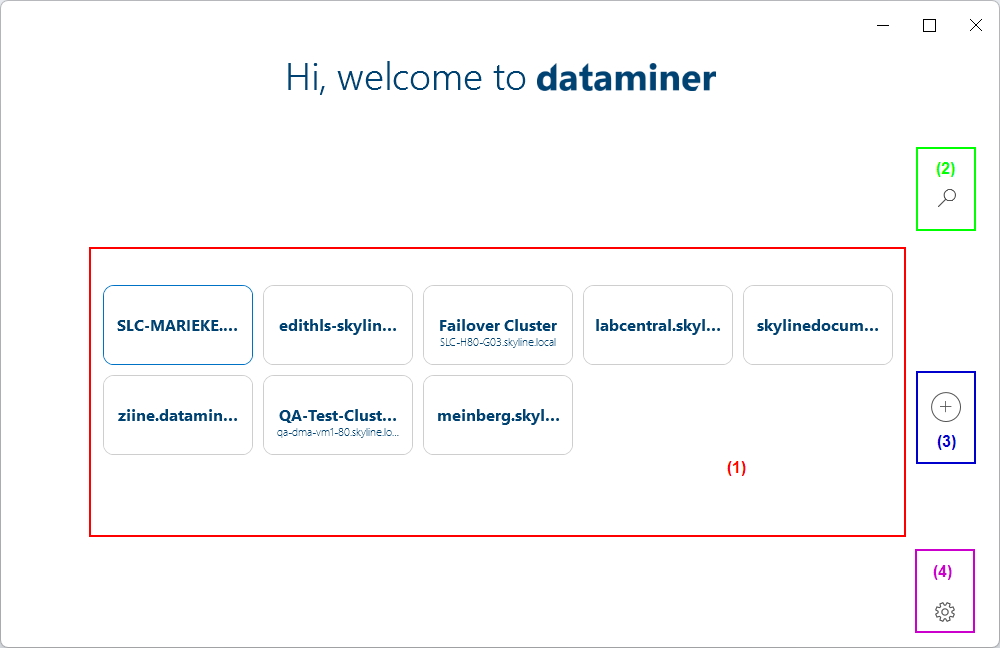
DataMiner Cube 10.5 start window UI
Tiles (1) representing DataMiner Systems: Each tile represents a different system. You can connect to a DMS with one click on a tile.
By dragging and dropping the tiles, you can change the order in which the tiles are displayed or sort the tiles in groups.
Hovering over a tile will show a "..." icon. Click this icon if you want to:
Filter (2): You can use this to filter the displayed tiles.
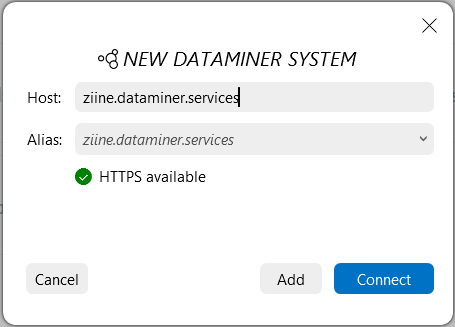
Button to add a DMS (3): After you click this "+" button, you will need to specify the host you want to connect to. Optionally, you can also customize the alias, to change which name is shown on the tile. You can then either click Add to only add the tile representing the DMS, or Connect to immediately connect to it.
DataMiner Cube 10.5 start window UI: Adding a new DMSCogwheel button (4): This button opens a menu with the following options:
Check for updates: Manually triggers an update of the software of the start window.
Cleanup: Allows you to clean up the DataMiner Cube cache.
Settings: Allows you to select your Cube update track.
View logging: Shows the logging for the DataMiner Cube start window.
The start window logging is also available in the following location on the client machine:
%LocalAppData%\Skyline\DataMiner\DataMinerCube\Logs\logYYYYMMDD.txtAbout: Shows version information for the start window.
Start with Windows: Allows you to select whether DataMiner Cube should start up when Windows starts up.
Sorting tiles in groups
You can sort the different tiles in the start window in groups:
If no groups have been created yet, all tiles will be considered to be part of the same group.
To create a new group, drag a tile out of its current group.
To name or rename a group, click above the group and enter the name.
To move a tile to another position or to another group, drag it to its new position.
From DataMiner 10.4.0 [CU14]/10.5.0 [CU2]/10.5.5 onwards, you can reorder groups by clicking the
 icon next to the group name and dragging it to its new position.
Removing a tile from the start window
To remove the tile representing a DMS from the start window:
Hover the mouse pointer over the tile and click "..." in the upper-right corner.
Click the garbage can icon in the pop-up window.
From DataMiner 10.4.0 [CU14]/10.5.0 [CU2]/10.5.5 onwards, you can also remove tiles by dragging them onto the garbage can icon. Additionally, you can remove all DMS tiles in a group by clicking the icon next to the group name and dragging it onto the garbage can icon.
Note
The garbage can icon becomes visible only after you grab a tile or group and begin dragging it.
Changing the name shown for a DMS
To change the name shown on a tile representing a DMS:
Hover the mouse pointer over the tile representing the DMS and click "..." in the upper-right corner.
In the Alias box, specify the name you want to see on the tile.
Click Save.
Setting a DMS as the default DMS
To set a DMS as the default DMS to connect to:
Hover the mouse pointer over the tile representing the DMS and click "..." in the upper-right corner.
Select Set as default in the pop-up window and click Save.
Changing which DMA in a DMS you connect to
To specify a different DMA in a DMS to connect to:
Hover the mouse pointer over the tile representing the DMS and click "..." in the upper-right corner.
Expand the Agent section, select the DMA and click Save.
Connecting to a DMS using arguments
To connect to a DMS using specific arguments:
Hover the mouse pointer over the tile representing the DMS and click "..." in the upper-right corner.
Expand the Advanced section, specify the arguments and click Save.
For more information on the possible arguments, see Arguments for DataMiner Cube.
Configuring whether to connect with HTTPS only
From DataMiner 10.2.6/10.3.0 onwards, you can configure whether Cube should connect to a specific DMS using HTTPS only or whether it can fall back to HTTP if HTTPS is not available:
Hover the mouse pointer over the tile representing this DMS and click "..." in the upper-right corner.
Expand the Advanced section.
In the Transport box, select HTTP or HTTPS or HTTPS only, depending on your preference.
Click Save.
Note
From DataMiner 10.4.0 [CU15]/10.5.0 [CU3]/10.5.6 onwards, if you select HTTP or HTTPS, Cube will send both an HTTP request and an HTTPS request in parallel, each with a timeout of 60 seconds. The first successful response will be used, and the other request will be canceled. If the first response is not successful, Cube will fall back on the other request. In earlier versions, Cube will first send an HTTP request with a default timeout of 100 seconds. If that request fails, it will then send an HTTPS request.
Filtering the displayed tiles
To filter the tiles in the start window:
Hover the mouse pointer over the looking glass and enter a search string in the search box.
Alternatively, simply start typing a search string, without going to the search box.
Note
When the filter does not yield any results, you can click the "+" button or press ENTER to immediately add the DMS you were looking for.