FAQ
Important
This section includes information that is only applicable to Skyline employees and/or links that are only accessible to Skyline employees.
In this section, you can find answers to a number of frequently asked questions.
Regarding protocol development:
How do I start the development of a new version in an existing range of an existing protocol?
How do I start the development of a new range of an existing protocol?
I finished development. How do I create a tag for the new version?
I realized I have been committing and pushing to the wrong branch. How do I fix this?
Regarding Gerrit code review:
I have finished development of a feature and want this to get reviewed. How do I do this?
I received an email stating that I should perform a code review. How do I do this?
I received an email notifying me that a code review failed. How do I continue?
I received an email notifying me that a code review failed. How do I continue?
How do I start the development of a brand-new protocol?
To start the development of a new protocol (version 1.0.0.1), perform the following steps:
As a Skyline employee, open the SLC SE Repo Manager tool.
Click the Create Repository button. Provide the name of the vendor and data source and click the Create button.
Note
The name of the data source should start with the name of the vendor.
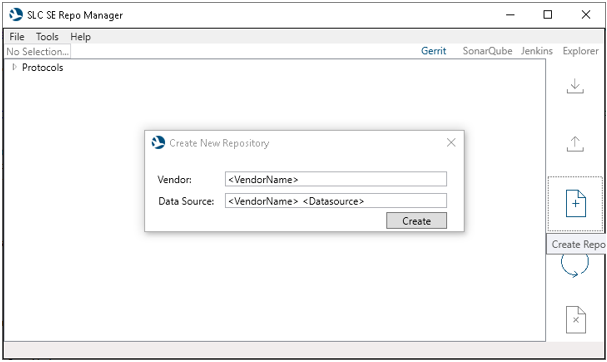
SLC SE Repo Manager: Creating a repositoryIn the confirmation box, click Yes.
The SLC SE Repo Manager tool will automatically clone the remote repository to your configured folder.
Create a new DataMiner protocol Visual Studio solution in the local repository folder.
Start Visual Studio and go to File > New > DataMiner Protocol Solution.
Specify the protocol name.
For the target location, specify the local Git repository folder that you created earlier.
Click OK.
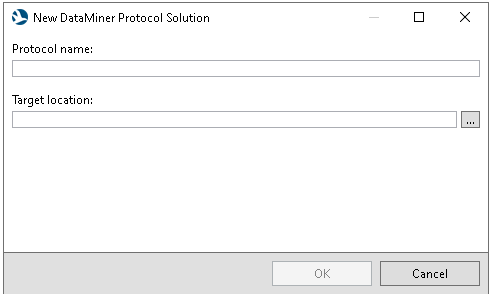
New DataMiner Protocol Solution windowSpecify the vendor in the protocol.xml file.
Open your local repository using SourceTree. You will see that the repository already has a 1.0.0.X branch. Now create a new local branch with the following name: gerrit/DCP<TaskID>_<Description> (e.g., DCP1234_FixLayout).
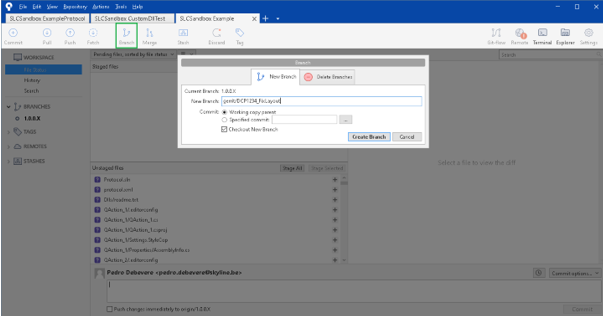
Creating a branch in SourceTreeNote
Normally, Sourcetree should automatically switch to this branch. If for some reason this does not happen, switch to this branch manually.
Perform an initial commit: Stage all the new files of the newly created Visual Studio solution and provide a commit message, then click Commit.
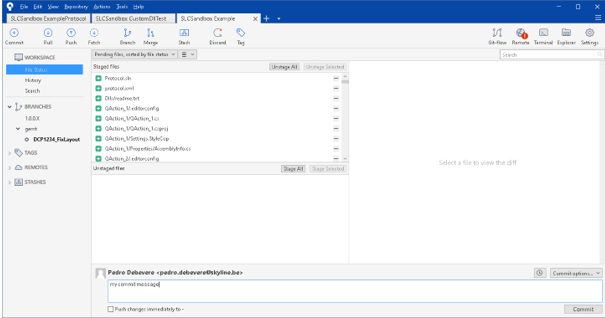
Initial commit in SourceTreeA new commit will be added to your new branch.
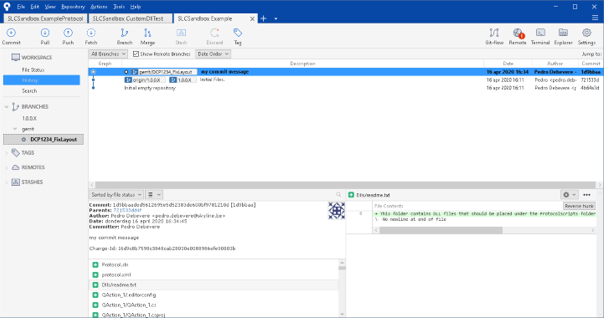
New commit added to new branch in SourceTreeImplement your work, performing as many commits as you want.
Note
Performing a commit only updates your local repository. In case you want to push your work in progress to Gerrit to have a backup on the server, see I am still busy developing but I want to push my work to the remote repository so I have a backup on Gerrit. How do I do this?.
Tip
See also: Learning path "System Dev - CI/CD, git, Gerrit" on LinkedIn Learning, Section "Tutorial Protocol Development": CI/CD HowTo - Start a new Protocol Development.
How do I start the development of a new version in an existing range of an existing protocol?
As a Skyline employee, open the SLC SE Repo Manager tool.
Navigate to the vendor in the tree control and verify whether your data source is already listed under that vendor.
If the data source is already listed under that vendor, the protocol has already been migrated to Git, and you can therefore skip to step 5.
If the data source you will work on was not yet listed, click the Create Repository button, specify the name of the vendor and data source and click Create.
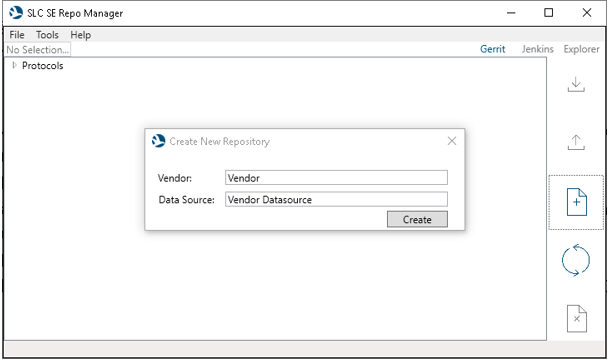
SLC SE Repo Manager: Creating a repositoryA confirmation message will be displayed, stating that the protocol was found on SVN and asking if you want to convert this into a Git repository. Click Yes to confirm.
The SLC SE Repo Manager tool will automatically clone the repository.
Open the repository in SourceTree.
Note
Always make sure your local repository is up to date.
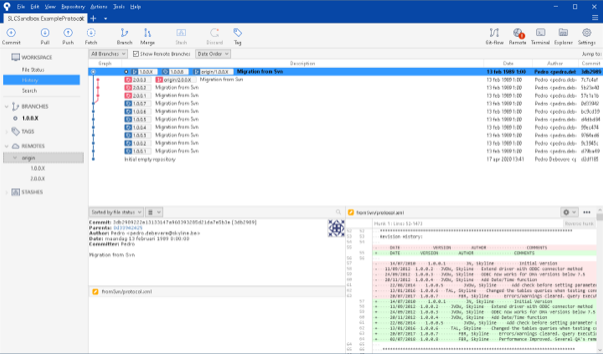
Repository in SourceTreeUnder REMOTES, you can see the branches that have been defined (in the example above, 1.0.0.X and 2.0.0.X) and in the Graph overview, you can see all the versions/tags of this protocol.
Check out the range you are going to work on. (By default, range 1.0.0.X is checked out).
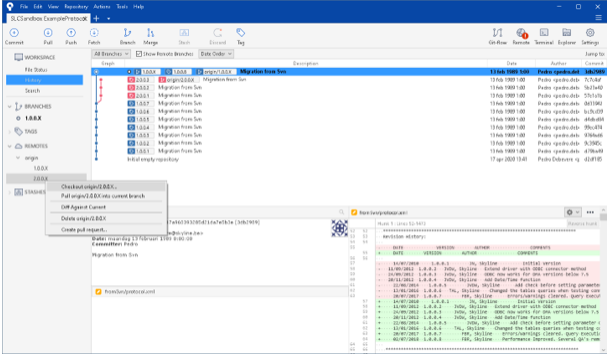
Checking out a range in SourceTreeNavigate to the repository folder in File Explorer and verify if the previous version already contains a DataMiner protocol Visual Studio solution. If it does, skip to step 11.
If the previous version contained no solution yet, in the fromSvn folder, you should find a protocol.xml file. Open this file in Visual Studio and convert it to a Visual Studio solution using DIS.
In Visual Studio, go to DIS > Protocol > Convert to Solution.

Convert to Solution in DISIn the pop-up window, specify the repository path as the target location and click Convert.
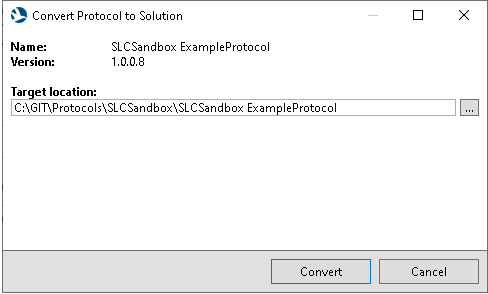
Convert Protocol to Solution window
In SourceTree, commit the solution you created in the previous step.
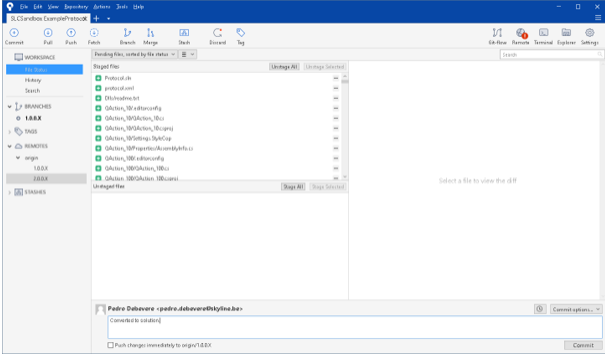
Committing a solution in SourceTreeIn Sourcetree, push the commit to the server
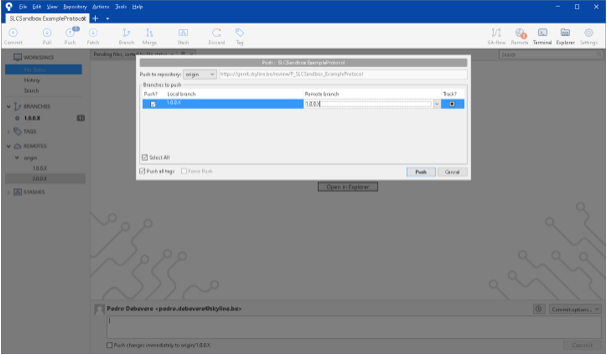
Pushing a commit to the server in SourceTreeCreate a new local branch with the following name: gerrit/DCP<TaskID>_<Description> (e.g., DCP1234_FixLayout).
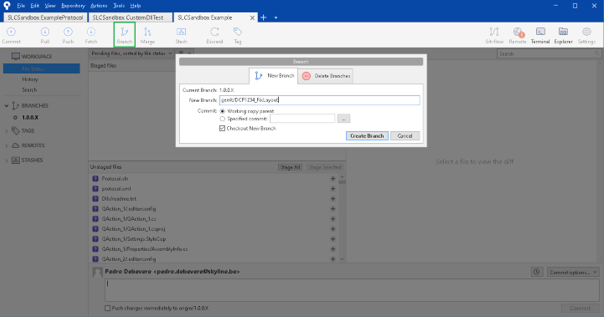
Creating a new local branch in SourceTreeNote
Normally, Sourcetree should automatically switch to this branch. If for some reason this does not happen, switch to this branch manually.
Start development on the new branch.
Tip
See also: Learning path "System Dev - CI/CD, git, Gerrit" on LinkedIn Learning, Section "Tutorial Protocol Development": CI/CD HowTo - Start a protocol from an existing one on SVN
How do I start the development of a new range of an existing protocol?
This is very similar to creating a new version in an existing range branch. Before you create your Gerrit task branch, perform the following steps:
As a Skyline employee, check out the range branch for which you want to create a new branch. For example, if you need to create a 2.0.1.X branch, first check out the 2.0.0.X range branch.
Create the new range branch, for example 2.0.1.X.
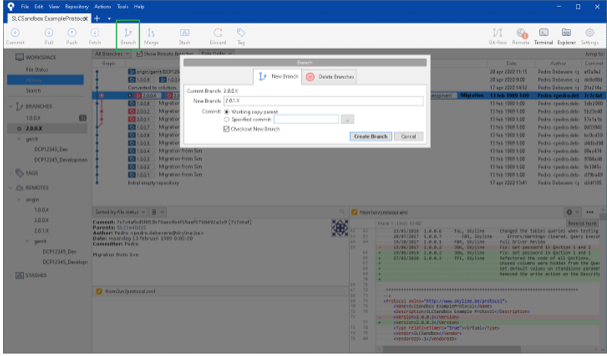
Creating a new range branch in SourceTreePush this branch to the server so the Git repository hosted by Gerrit is aware of this branch.
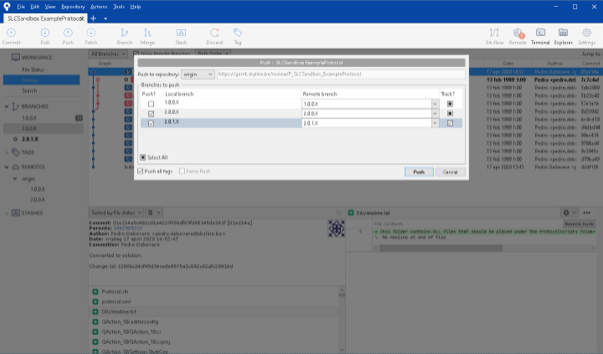
Pushing a new branch to the server in SourceTreeCreate your task branch based on the newly created range branch and start development.
I am still busy developing but I want to push my work to the remote repository so I have a backup on Gerrit. How do I do this?
For your development, as a Skyline employee, you will typically have created a branch with name DCP<TaskID>_<Description> (e.g., DCP1234_FixLayout).
To push this to the remote Git repository so you have a backup on the server (without initiating a code review), click the Push button in SourceTree. Select your task branch and click Push.
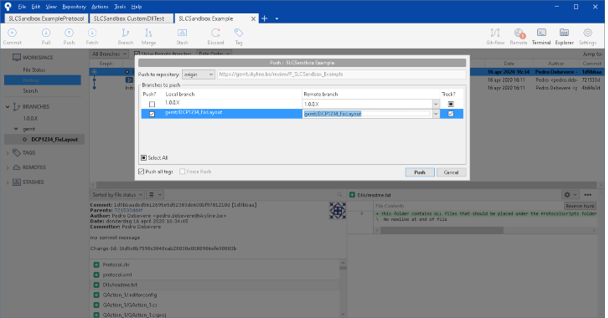
Pushing work to the remote repository using SourceTree
Alternatively, you can choose to push your work into Gerrit as work in progress, so that it will not introduce a code review. You can do this in the SLC SE Repo Manager tool. Select the repository in the tree control and click the Push button, then select the desired range and click the Push for Work in Progress button.
Note
Be aware that you when you push for work in progress, your commits will be squashed into a single commit. In case this is not something you want, for example because you may want to return to some specific commit, then push your work the remote Git repository using SourceTree.
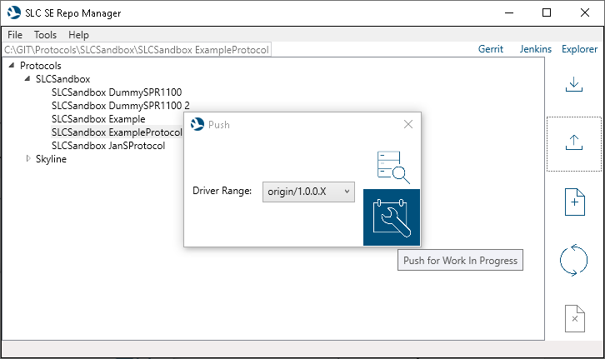
Pushing work into Gerrit as work in progress
I am still busy developing but I want to push my work to the remote repository to let the pipeline run. How do I this?
This means your development is still work in progress.
Because every push to the remote Git repository triggers a run of the pipeline in Jenkins, as a Skyline employee, you can perform the exact same steps as in I am still busy developing but I want to push my work to the remote repository so I have a backup on Gerrit. How do I do this?
Where do I provide the protocol development checklist?
As a Skyline employee, include the protocol development checklist next to the protocol Visual Studio solution in the Git repository.
Download the checklist from Dojo.
Fill in the checklist.
Commit the checklist to your local Git repository using SourceTree.
Push the commit. As the checklist itself does not require any code review, you can push the checklist immediately to the remote Git repository hosted by Gerrit using SourceTree.
Tip
See also: Learning path "System Dev - CI/CD, git, Gerrit" on LinkedIn Learning, Section "Tutorial Protocol Development": CI/CD HowTo - Development Checklist and DriverQA.
I only have a very small fix to perform and therefore I do not require it to go through code review. Is this possible?
As a Skyline employee, in Sourcetree, you can immediately push commits to a range branch in the remote Git repository.
However, be aware that in general a code review phase is required and therefore you will typically push to Gerrit via the SLC SE Repo Manager tool. Only push immediately to Git if you are sure no code review is required for the items you will push, for example when you want to push the checklist.
I finished development. How do I create a tag for the new version?
As a Skyline employee, in the commit overview in SourceTree, select the commit for which you would like to create a tag, right-click, and select Tag in the context menu.
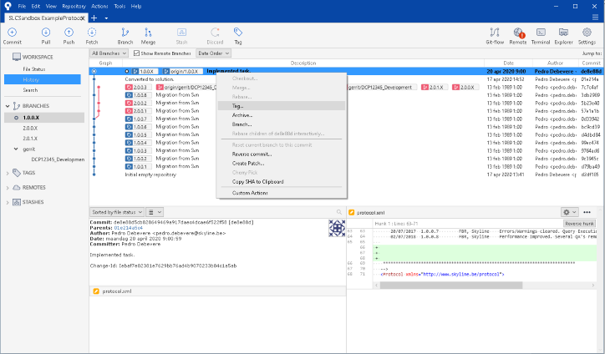
Creating a tag for a commit in SourceTreeSpecify the tag name (e.g., "1.0.0.9"), ensure that the Specified commit option is selected and select the checkbox Push tag, so that the tag also gets pushed to the remote repository.
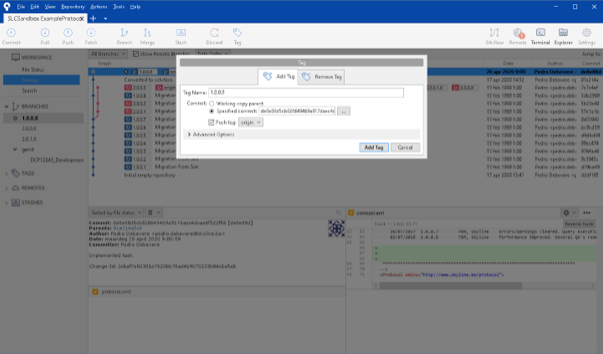
Creating a tag for a commit in SourceTreeClick Add Tag. This will make Jenkins perform a final execution of the pipeline for this newly created protocol version. It will detect that you provided a tag and will therefore publish this version on SVN.
Tip
See also: Learning path "System Dev - CI/CD, git, Gerrit" on LinkedIn Learning, Section "Tutorial Protocol Development": CI/CD HowTo - How to release a new version.
I started a new minor version but now it appears that my additional changes introduce a major change. How do I fix this?
As a Skyline employee, suppose you started development on a task and assumed that the new version was going to be a new minor version. After you have performed some commits and pushed these to the remote Git repository, the Jenkins pipeline suddenly indicates that a new commit pushed results in a major change. After you verify with the major change request team, they confirm that a new major range is indeed required.
How can you now fix your Git repository?
Suppose you were working on a new version 1.0.0.3 and now you realize that you need to create a new major range 1.0.1.X. The first thing to do is to introduce the new branch with the changes you have made so far:
The first step is to select your latest commit in the range you were working on (in this example 1.0.0.X) and select the branch icon in SourceTree to create the a new branch for the new major range.
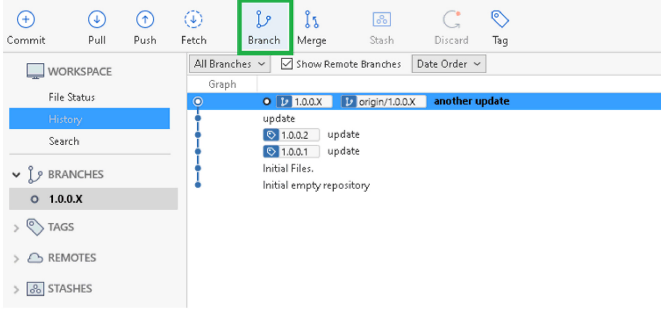
The branch icon in SourceTreeIn the pop-up window, provide the name of the new branch (in this example, 1.0.1.X) and click Create Branch.
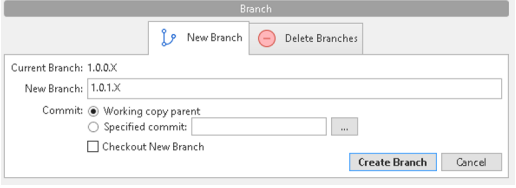
Creating a branch in SourceTreeYou should now see that the new range has been created locally:

New local rangeNow you also need to push this new range to the remote. To do this, click the Push button and, in the pop-up window, select the checkbox for the new branch and click Push.

Pushing a new range in SourceTreeYou should now see that the new range has been created on the remote as well:

New range on the remote
At this point, you have introduced the new branch with the changes you have made so far. What is left to do is to clean up the commits on the 1.0.0.X branch, so that it appears that development on your task started on the 1.0.1.X range from the outset.
Important
Before starting to clean up commits on the wrong branch, make sure that no one else has made commits to this branch in the meantime.
To remove the commits from the 1.0.0.X branch, first make sure this range is the one that is currently checked out.
Then select the commit that represents the latest valid commit. This should be the commit that represents the tag of the previous version (in this example, the commit for tag 1.0.0.2).
After selecting the commit in the graph overview, right-click and select Reset current branch to this commit in the context menu.
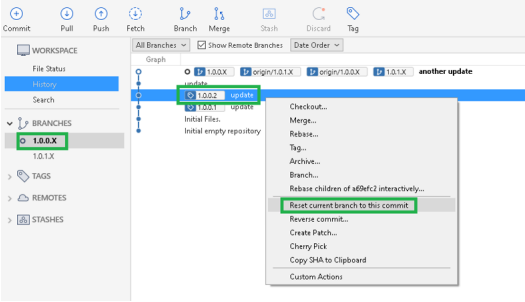
“Reset current branch to this commit” optionIn the pop-up window, select the mode Hard (this will discard all working copy changes) and click OK.
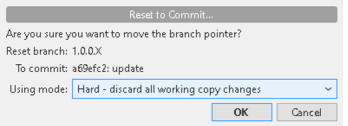
Hard reset mode selectionIn the pop-up window asking for confirmation, click Yes.

Confirmation window for hard reset modeAt this point, you should see that your head of the local 1.0.0.X branch is pointing to the commit for the 1.0.0.2 tag. However, the head of origin/1.0.0.X is not. This is because we first need to push.

1.0.0.X branch is pointing to the commit for the 1.0.0.2 tagNote
Pushing a reset is not allowed by default. To enable this, go to Tools > Options, select the Git tab and make sure the checkbox for the Enable Force Push option is checked.
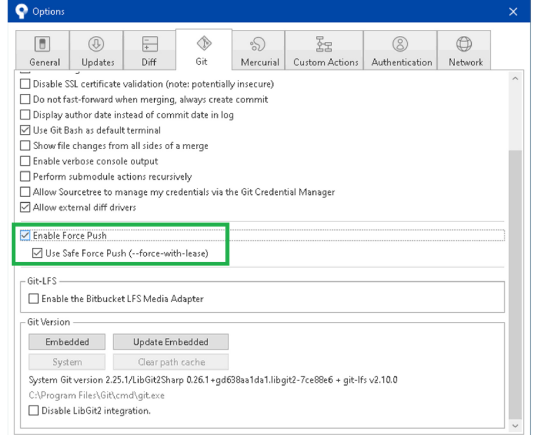
To push, click the Push button and make sure the Force Push checkbox is selected. Then click Push.
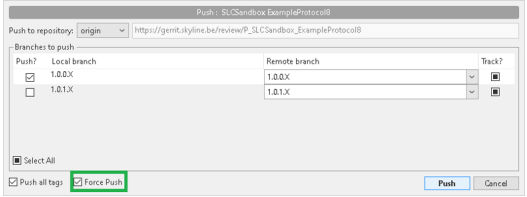
“Force Push” optionIn the confirmation box, click Yes.

Force Push confirmation boxAt this point, you should see that head of the origin/1.0.0.X branch is now also pointing to the desired commit.

1.0.0.X branch pointing to correct commit
Your Git repository is now in a correct state again. Now you can checkout the new branch (1.0.1.X) and update the version of the protocol (changing it from 1.0.0.3 to 1.0.1.1) using the protocol Version History editor.
Important
On DCP, a record may already exist for the minor version you were working on (1.0.0.3 in this example). This record should be removed. Contact IT to take care of this.
I realized I have been committing and pushing to the wrong branch. How do I fix this?
Suppose for example that you have committed and pushed changes to the 1.0.0.X range, but you really intended to be working on the 1.0.1.X range instead.

Changes pushed to 1.0.0.X range
As a Skyline employee, perform a checkout of the branch you want to work on (in this example 1.0.1.X) and make sure this is your active branch.
Now you need to apply the commits on the correct 1.0.1.X branch in the same order as you applied them on the 1.0.0.X branch. To do this, you will apply cherry-picking. Select the first commit (in the example feature 1) right-click and select Cherry Pick in the context menu:
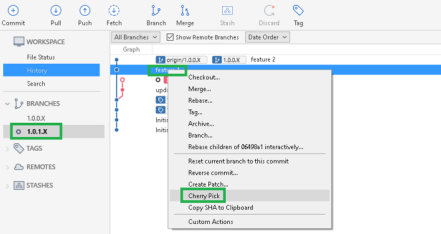
Cherry pick a commitIn the pop-up window, click OK.
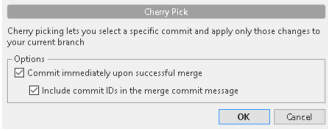
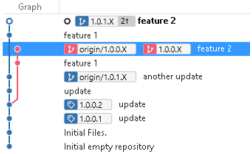
Confirm cherry-pickingRepeat this for all the commits you want to have on the current branch.
Repeat for the commits on the current branchPush the cherry-picked commits to the remote repository.
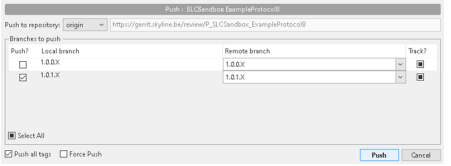
Push the cherry-picked commits to the remote repository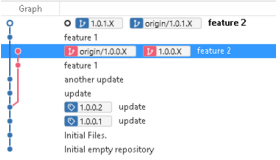
The cherry-picked commits in the remote repositoryNow you will still need to remove the commits on the branch you were originally working on (in this example, 1.0.0.X). To do this, check out the 1.0.0.X branch to make it the active one.
Important
Before you start to clean up commits on the wrong branch, make sure that no one else has made commits to this branch in the meantime.
To remove the commits from the 1.0.0.X branch, make sure this range is the one that is currently checked out. Then select the commit that represents the latest valid commit. This should be the commit that represents the tag of the previous version.
When you have selected the commit in the graph overview, right-click and select Reset current branch to this commit in the context menu.
In the pop-up window, select the mode Hard (this will discard all working copy changes) and click OK.
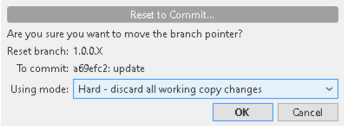
Hard reset mode selectionIn the pop-up window asking for confirmation, click Yes.

Confirmation window for hard reset modeAt this point, you should see that the head of your local 1.0.0.X branch is pointing to the commit for the 1.0.0.2 tag. However, the head of origin/1.0.0.X is not. This is because you first need to push. To push, select the Push button and make sure the Force Push checkbox is checked. Then click Push.
In the confirmation box, click Yes to confirm.

Force Push confirmation box
I want to apply a fix to multiple ranges. How do I do this?
Suppose you created a fix in a specific range that would also be useful in a number of other ranges. To apply a specific commit from a branch to other branches, you can use a technique referred to as cherry-picking.
For example, suppose you created a commit in range 1.0.1.X and you want to apply the same fix in 1.0.2.X.

Fix in range 1.0.1.X
As a Skyline employee, first perform a checkout of the branch where you want to include the commit (in this example 1.0.2.X).
Select the commit you want to cherry-pick, right-click and select Cherry Pick in the context menu.
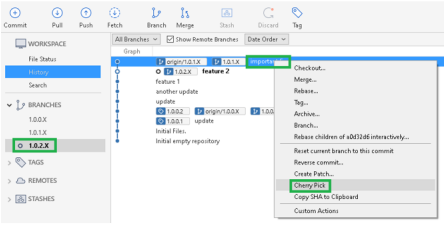
Cherry pick a fixIn the pop-up window, click OK.
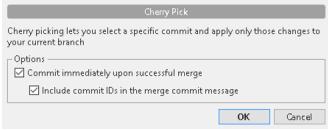
Confirm cherry-picking
Now you will see that the change has been committed to the 1.0.2.X branch.

Fix in range 1.0.2.X
At this point you can either cherry-pick another commit or continue development (e.g., create a new version on the 1.0.2.X range for this specific fix).
How can I work in parallel with other developers?
As a Skyline employee, in case you want to work on a protocol that is already being worked on by another developer, make sure to first communicate with the other developer to avoid merge conflicts later on as much as possible (e.g., agree upon different parameter ranges to use, different QActions, etc.).
Then create a new development branch for your development and push it so other developers are aware that you are working on that protocol.
I have finished development of a feature and want this to get reviewed. How do I do this?
Note
The procedure below explains how to get your code changes reviewed via Gerrit, which is optional. Today, there are other good alternatives, such as simply using the Visual Studio GIT Commits compare feature, etc.
This means you have some work committed and want this work to be reviewed.
As a Skyline employee, open the SLC SE Repo Manager tool, select the protocol you want to push for review in the tree control and select the Push Repository button.
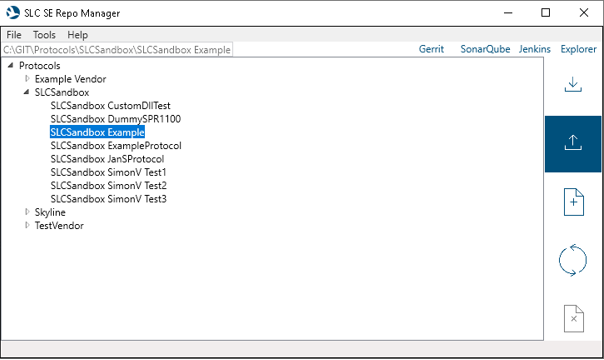
Pushing a repository in SLC SE Repo ManagerSelect the branch you will eventually merge your work into and click the Push for Gerrit Review button.
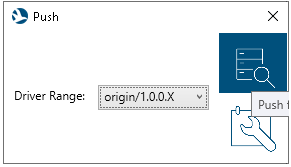
Push for Gerrit reviewNote
When you push for review, your commits will be squashed into a single commit. This is because each commit introduces a code review item in Gerrit Code Review. In order to only have one code review item when you perform the push for review, the commits get squashed into a single commit before they are pushed.
In Gerrit, select the new entry in the review dashboard in the Outgoing reviews section.
This will open a new page for this item.

Outgoing reviews in GerritIn the Assignee field, specify the name of the person who should perform the review.
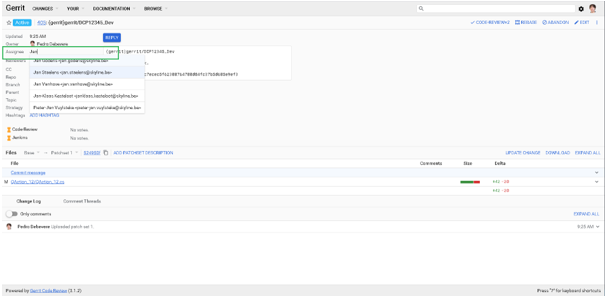
Specifying the name of the reviewer in GerritThe reviewer will now be notified by email.
Tip
See also: Learning path "System Dev - CI/CD, git, Gerrit" on LinkedIn Learning, Section "Tutorial Gerrit Code Review": CI/CD HowTo - Assign a Gerrit Code Review.
I received an email stating that I should perform a code review. How do I do this?
When someone has assigned a code review to you in Gerrit, you will receive an email to notify you. To do the code review, perform the following steps:
As a Skyline employee, in Gerrit, on the review dashboard page, select the new entry in the Incoming reviews section.
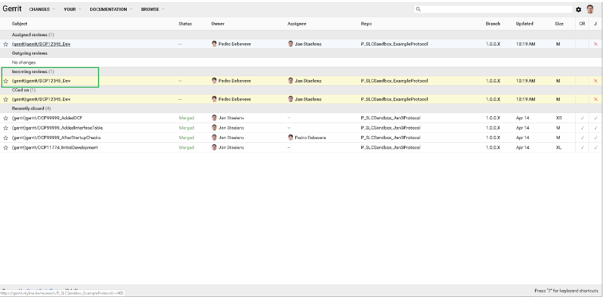
Incoming reviews in GerritOn the review page, you will see an overview of all the files that have been updated in the Files section.
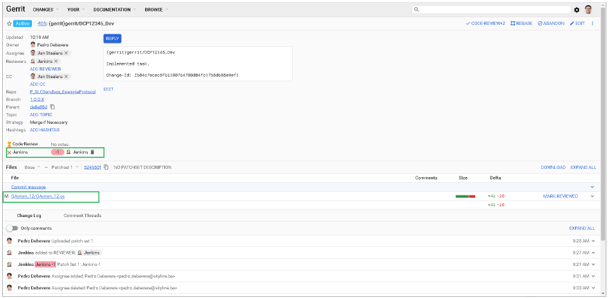
Overview of updated files in GerritNote
Jenkins will also automatically have executed the CI/CD pipeline. In case the pipeline failed, this will be marked by a -1 for the Jenkins tag. In this case, do not start a review, but notify the developer stating that the pipeline should succeed first.
Click on the files to see the details of the changes to these files and review those.
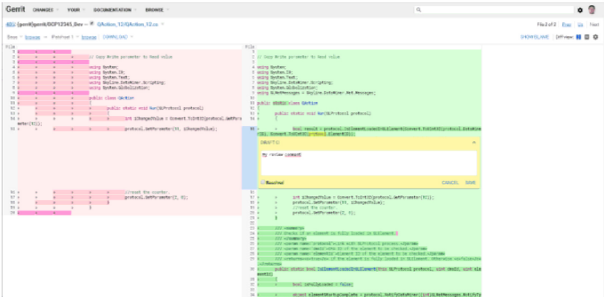
Code review in GerritProvide review comments where necessary by double-clicking the desired location in the code and selecting Provide comment (or use the c shortcut). When you have entered a comment, click save.
When you have reviewed all changed files, on the review page, click the reply button and provide the necessary feedback.
In case you noticed an issue, provide -2 for the Code Review tag.
In case everything was fine, provide +2 for the Code Review tag.
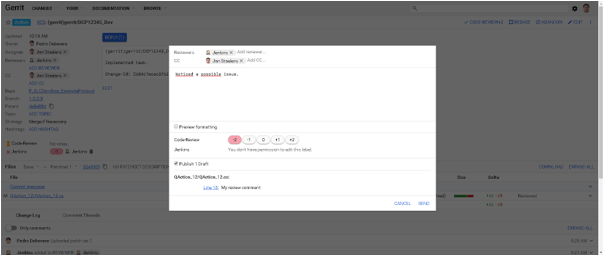
Code review in GerritThe Code Review values should be interpreted as follows (see also https://gerrit-review.googlesource.com/Documentation/config-labels.html):
-2: This will not be merged.
-1: I would prefer if this is not merged as is.
0: No score
+1: Looks good to me, but someone else must approve it.
+2: Looks good to me; approved.
Note
For an in-depth explanation of the Gerrit review UI, see https://gerrit.skyline.be/review/Documentation/user-review-ui.html.
Click Send. Now the developer will receive an email about this review.
Tip
See also: Learning path "System Dev - CI/CD, git, Gerrit" on LinkedIn Learning, Section "Tutorial Gerrit Code Review": CI/CD HowTo – Perform a Gerrit Code Review and CI/CD HowTo – Handle fixes sent to Gerrit.
I received an email notifying me that a code review failed. How do I continue?
As a Skyline employee, in Gerrit, on the review dashboard page, click the reviewed item.

Reviewed item in GerritIn the files section, you can see in the Comments column which files have comments. Select a file to see all the comments for that file.
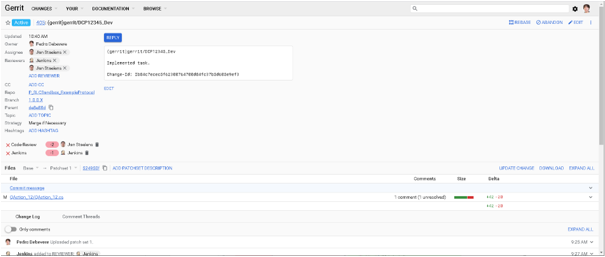
Comments on a file in Gerrit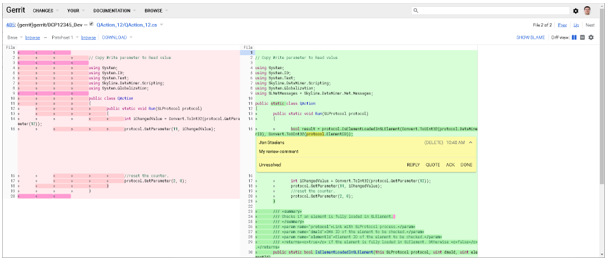
Comments on a file in GerritIn SourceTree, make sure you have checked out the corresponding branch and make sure it is up to date. In case you no longer have this branch locally, check it out from the remote repository.
Implement the required changes to address all code review remarks.
Commit your new changes in SourceTree.
Using the SLC SE Repository manager tool, send the new commit for code review.
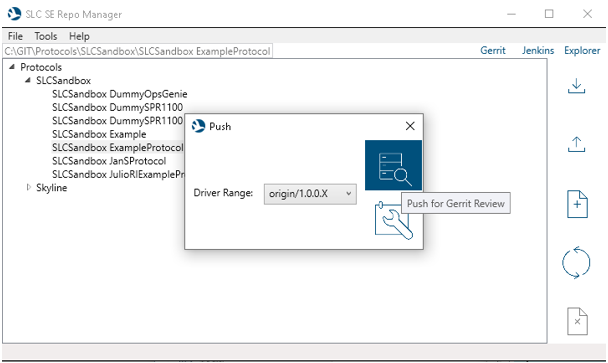
Sending a commit for code review in SLC SE Repo ManagerThis will now create a new patch set for the reviewer to review in Gerrit.
Tip
See also: Learning path "System Dev - CI/CD, git, Gerrit" on LinkedIn Learning, Section "Tutorial Gerrit Code Review": CI/CD HowTo – Fixing an issue reported through Gerrit.
I received an email notifying me that a code review succeeded. How do I continue?
As a Skyline employee, in Gerrit, on the review page of your item you will now see a Ready to submit notification. Click the SUBMIT button.
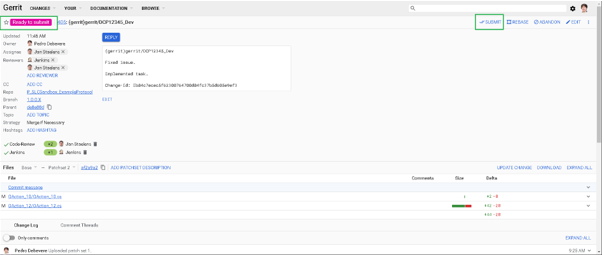
Ready to submit notification in GerritNow it should show a Merged notification.
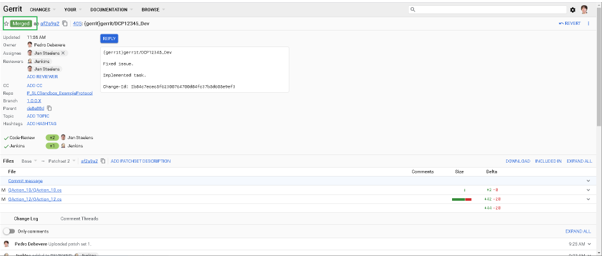
Merged notification in GerritIf you now fetch the branch you merged into, you will see that the origin now points to your merged commit.
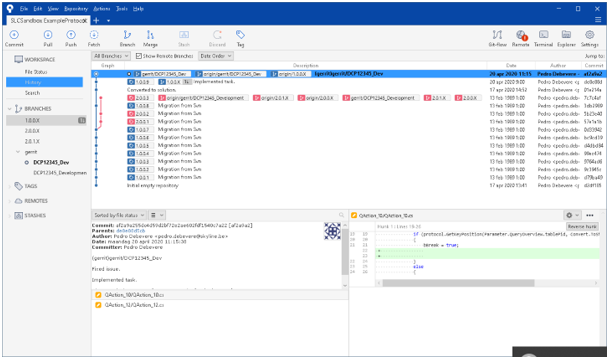
Merged commit in branchIn SourceTree, you can now delete your development branch:
Make sure you are currently on a branch other than the one you want to delete, as otherwise SourceTree will not allow this action.
Select the branch to delete, right-click, and select Delete in the context menu.
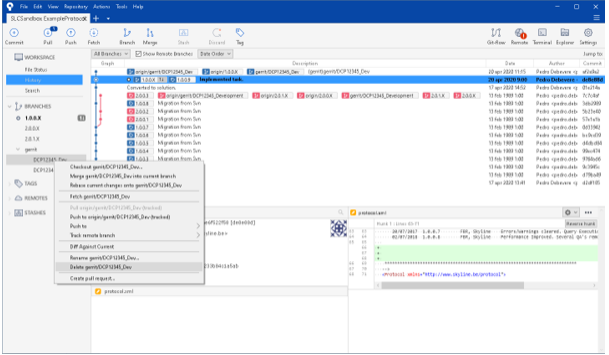
Deleting a development branch in SourceTreeThis will now show a pop-up window as illustrated below.
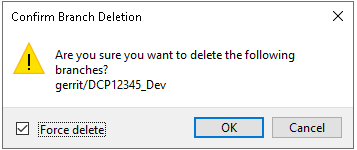
Confirm Branch Deletion window
Click OK to remove the branch.
Also remove the development branch in the remote repository:
Under REMOTES, select the branch to delete, right-click and then select Delete origin/…. in the context menu.
Click OK in the pop-up window.

Removing a development branch in the remote repositoryAt this point, you will typically will want to create a tag to define a new version of the protocol. For more information on how to do this, refer to I finished development. How do I create a tag for the new version?.
Tip
See also: Learning path "System Dev - CI/CD, git, Gerrit" on LinkedIn Learning, Section "Tutorial Gerrit Code Review": CI/CD HowTo – Finalize a Gerrit Code Review