Setting up basic CI/CD for connector deployment in Azure Devops
In this tutorial, you will learn how to develop, (pre-)release, and optionally deploy connectors with a CI/CD pipeline in Azure Devops, though this can be applied to any CI/CD technology. These processes do not necessarily follow the same quality standards that developers within Skyline Communications adhere to but can be tweaked and configured to your personal preferences.
This CI/CD pipeline provides you with the ability to deploy a connector automatically on a DMA.
Expected duration: 10 minutes.
Prerequisites
- A staging DataMiner Agent that is accessible from your pipeline and that uses DataMiner version 10.3.0/10.3.2 or higher
- An Azure DevOps organization and project
- Microsoft Visual Studio 2022
- DataMiner Integration Studio
Overview
- Step 1: Create a Visual Studio project
- Step 2: Create an Azure DevOps repository
- Step 3: Create a dataminer.services key
- Step 4: Create and run a workflow
- Step 5: Validation (optional)
Step 1: Create a Visual Studio project
Open Visual Studio, and select Create a new project.
Select the DataMiner Connector Solution template, and click Next.
Enter a solution name, for example SLC-C-MyDataSourceTest, and click Next.
Follow the wizard for any additional information requirements.
Click Create.
Step 2: Create an Azure DevOps repository
In the menu bar of Visual Studio, select GIT > Create GIT Repository.
Create a new Azure DevOps repository:
Select a name, and specify your Azure account, organization, and project.
When you have entered all the information, click Create and Push.
Go to the newly created Azure DevOps repository on https://dev.azure.com/.
Tip
In Visual Studio 2022, you can open the GIT menu and select Azure DevOps/View Pull Requests to quickly access the correct repository.
If your repository does not follow Skyline's naming conventions, specify the artifact type:
Go to the Code tab.
Click the cogwheel next to About.
Under Topics, add a topic called Connector
Tip
For more information, refer to the GitHubToCatalogYaml readme.
Step 3: Create a dataminer.services key
To securely upload and/or deploy a connector, you will need a secret key.
This means that you will need to create a system key token to authenticate the register version call from the Catalog API:
In the Admin app, under DataMiner Systems in the sidebar on the left, select the DMS to which you want to deploy connectors and go to the Keys page.
At the top of the page, click New Key.
Configure the key with a label of your choice and the permission Register catalog items.
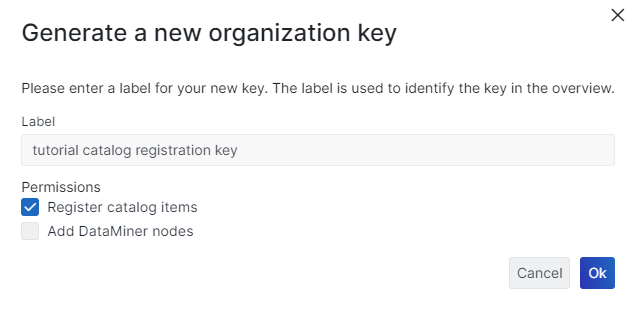
Copy the key so you can use it later.
Important
You need to have the Owner role in order to access/create system keys. See Changing the role of a dataminer.services user for information on how to change a role for a user.
Step 4: Create and run a workflow
On your Azure DevOps repository page, go to Pipelines and select Create Pipeline.
If you are asked Where is my code?, select Azure Repos Git.
Select the repository you have just added.
Select Starter pipeline.
Select, install, and run the required dotnet tools:
Go to Azure DevOps Example.
Copy the example and paste it into your new starter pipeline.
Configure secrets and variables:
Note
This step can be different for each CI/CD technology.
Select Variables in the upper-right corner.
Select New Variable, and configure the new variable as follows:
Specify the name DATAMINER_DEPLOY_KEY.
Select Keep this value secret.
Use the key you created in step 3.
Click + to add another variable, and configure it as follows:
Specify the name uploadOutput.
Select Let users override this value when running this pipeline.
Click Save and Run.
You should now see your new connector on your specified specific DataMiner Agent.
Step 5: Validation (optional)
You can now tweak and adjust your workflow using other validation steps such as static code analysis, running unit testing, or running the DataMiner Validator.
You can for example add our validator tool for XML syntax in connectors: Skyline.DataMiner.CICD.Tools.Validator. This tool allows the validation of a DataMiner protocol solution. This is the same validator as is included in DataMiner Integration Studio (DIS).
Note
The validator tool requires that the projects of the protocol solution are SDK-style projects.