Table editor
If you click Table Editor in the file tab header when editing a protocol XML file, the XML editor you are working in will be turned into a graphical table editor. This editor allows you to design the tables shown on the Data Display pages of the protocol using simple drag-and-drop operations.
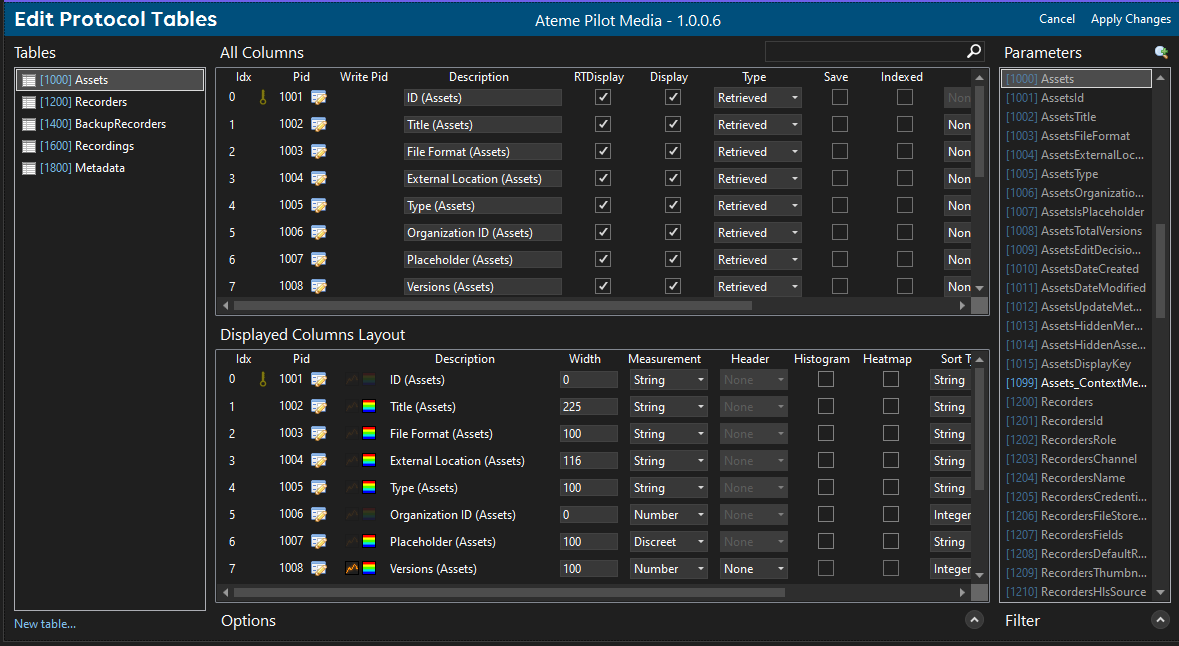
Tables
On the left, you can find the list of all tables defined in the protocol.
- If you click a table in the list, its current layout will appear in the All Columns and Displayed Columns Layout sections.
- If you right-click a table in the list, and select Go To XML (Apply Changes), then all changes you made will be saved, and you will return to the XML editor.
Note
Warning icons will appear next to table parameters with configuration errors.
To create a new table:
- Click the New Table button.
- Specify a parameter ID, a table name, and a table description, and click OK.
- In the Parameters list, select the parameters that you want to assign to the columns of the table, and drag them onto the All Columns or the Displayed Columns Layout section.
- Click Apply Changes.
When you open the table editor, DIS will check whether there are columns that are too narrow for their description to fit. If this is the case, then you can do the following:
- Click the dropdown button next to the warning sign at the top of the Tables section, and select Fix Column Widths to automatically adjust the widths of all columns that are too narrow.
- In the Displayed Columns Layout section, click the red Fix button in the Width column of a particular table column to automatically adjust the width of that column.
Note
Hidden columns, i.e., columns of which the width was set to 0, are ignored.
All Columns
In the All Columns section, every row represents a column of the selected table.
Modify the data inline. Notice, for example, that the state of each Display checkbox controls whether the column in question will appear in the Displayed Columns Layout section.
In the PID column, you can click the Edit icon to modify all properties of the column parameter in question.
In the Foreign Key column, you can select another table to which you want a particular table column to be linked. The table you select will be specified in the "foreignKey=" option of the <ColumnOption> tag in question.
The Extra Options column displays options that do not have a dedicated UI component in the table editor. When unknown options are defined, a warning will now be generated. In the protocol XML file, the options will be sorted as follows: save, foreignKey, indexColumn, header, histogram, heatmap, and then all other options. Note that these options must be separated by semicolons, and that the first character in each of these Extra Options boxes must be a semicolon.
When you right-click a row, a shortcut menu appears.
| Select... | in order to... |
|---|---|
| Index column, or No index column |
Indicate that the column in question is (not) the index column. |
| Display column, or No Display column |
Indicate that the column in question is (not) the display column. |
| RTDisplay > Enabled/Disabled | Enable or display the setting in question. |
| Display > Enabled/Disabled | Enable or display the setting in question. |
| Type > Enabled/Disabled | Enable or display the setting in question. |
| Save > Enabled/Disabled | Enable or display the setting in question. |
| Indexed > Enabled/Disabled | Enable or display the setting in question. |
| Go To XML (Apply Changes) |
Save all changes and return to the XML editor. |
| Remove column(s) | Delete the selected column(s). Alternatively, you can also press the DELETE key. |
To search for a particular piece of text among the table column definitions, use the search box at the top of the table editor.
Displayed Columns Layout
In the Displayed Columns Layout section, every row represents a column that will appear on the user interface, i.e., a column that has been marked as to be displayed in the All Columns section.
Modify the data inline.
In the PID column, you can click the Edit icon to modify all properties of the column parameter in question.
In the nameless column between the PID column and the Description column, you can click two icons:
- Click the first icon to enable trending for this column parameter.
- Click the second icon to enable alarm monitoring for this column parameter.
If you add a monitored parameter of Interprete type "double" and measurement type "number" or "analog", you can set three additional options:
- In the Header column, you can indicate the type of aggregated information you want to have displayed in the column header: "None", "Sum", "Avg", "Min" or "Max".
- In the Histogram column, you can disable or enable the histogram of all rows in the column header.
- In the Heatmap column, you can disable or enable the heatmap in all rows in the column header.
When you right-click a row, a shortcut menu appears.
| Select... | in order to... |
|---|---|
| Index column, or No index column |
Indicate that the column in question is (not) the index column. |
| Display column, or No Display column |
Indicate that the column in question is (not) the display column. |
| All selected | Set the Trending, Alarm, Measurement, or Sort Type fields of all column parameters to the same value. If, for example, you want to enable trending for all column parameters in one go, select All selected > Trending > Enabled. |
| Edit parameter | Modify all properties of the column parameter in question. Instead, you can also click the Edit icon. |
| Go To XML (Apply Changes) |
Save all changes and return to the XML editor. |
| Don’t display selected column(s) | Remove the selected column(s) from the Displayed Columns Layout section. Note: This has the same effect as clearing Display checkboxes in the All Columns section. |
To search for a particular piece of text among the table column definitions, use the search box at the top of the table editor.
Options
In the Options section (which you can expand and collapse), you can set the following options.
| Option | Description |
|---|---|
| RTDisplay | Select this checkbox if you want to enable the table-level RTDisplay setting of the selected table parameter. When you enable or disable the table-level RTDisplay setting of a table parameter, a pop-up window will appear, asking whether you also want to enable or disable the RTDisplay settings of all columns of that parameter. |
| Show filter | Select this checkbox if you want a search box to appear above the table. |
| Lines | In this box, enter the number of table rows that have to be displayed. |
Parameters
By default, the Parameters list shows the ID and the name of every parameter defined in the protocol.
If, however, you click the magnifying glass icon at the top of the Parameters list, the list will show the ID, the name, the description, the type and the RTDisplay value of every parameter defined in the protocol.
Notice that, in the default Parameters list, the font color indicates whether a parameter has already been used in one of the tables:
- Parameters in gray typeface have already been used in one of the tables.
- Parameters in normal (black) typeface have not yet been used in any of the tables.
Also notice that, when you select a table in the Tables list, the table parameter in question will automatically be selected in the Parameters list.
At the bottom of the Parameters list, you can find the list filter.
Apply changes / Cancel
If you want to save the changes you made and return to the XML editor, click Apply Changes. If you want to discard the changes you made, click Cancel.