DIS Tree
If you click Tool Windows > DIS Tree View, the DIS Tree tool window will appear.
This tool window acts as a table of contents, allowing you to easily navigate to a particular location in the connector or automation script you are working on.
By default, the DIS Tree window will open undocked. You can dock it like any other tool window in Visual Studio.
If you click an item in the DIS tree, two things will happen:
The cursor in the file tab containing the protocol code will jump to the tag that defines the item you clicked.
The lower list box will list all items that are in some way linked to the item selected in the DIS tree.
If, for example, you select a Trigger, then
the Outgoing list will show all items to which the selected Trigger contains a link,
the Incoming list will show all items that contain a link to the selected Trigger, and
the Conditions list will show all items referred to in the Trigger's Condition element.
Opening the tree node where the cursor is in
When working in the XML editor or the C# editor, you can do one of the following to move the cursor to the DIS Tree and select the DIS tree node representing the element you are editing:
Press a key combination (default: Ctrl+1), or
Click the following button, which is situated in the upper-left corner of the DIS Tree window:

See also: DIS keyboard shortcuts
Clicking or double-clicking items in the DIS Tree window
| If... | then... |
|---|---|
| you click an item in the DIS tree, | the lowest list box will list all items that are in some way linked to the item you selected in the DIS tree. Example: When you click a write parameter (marked with "[W]"), then the associated read parameter will appear in the lowest list box. Also, the cursor in the file tab containing the protocol code will jump to the tag that defines the item you clicked in the DIS tree. |
| you click the type of an item in the lowest list box (notice that the type turns into a hyperlink!), | the cursor in the file tab containing the protocol code will jump to the tag that defines the item you selected in the lowest list box. |
| you double-click an item in the lowest list box, | the item you double-clicked will be selected in the topmost list box. Also, the cursor in the file tab containing the protocol code will jump to the tag that defines the item you double-clicked in the lowest list box. |
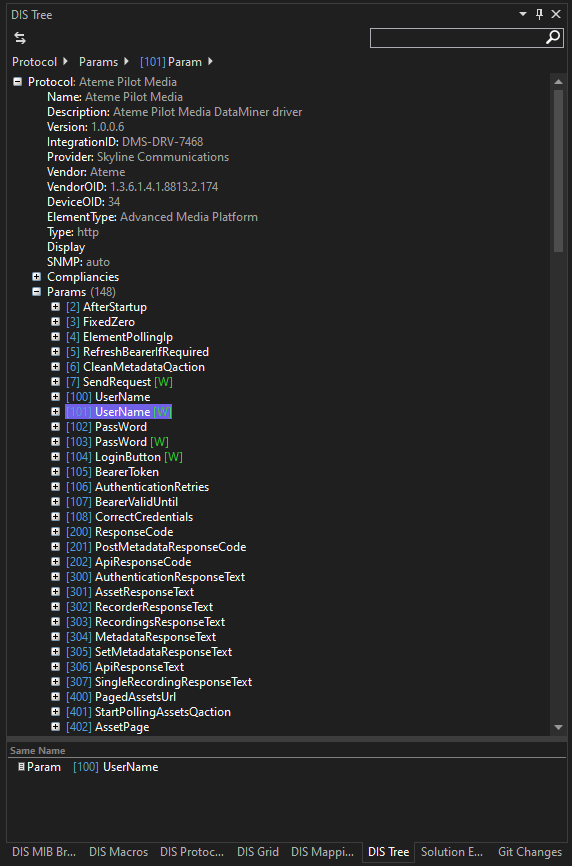
Working with the breadcrumb control
At the top of the DIS Tree tool window, there is a breadcrumb control that allows you to quickly navigate to a particular location inside a protocol.xml file. This control always shows the path towards the node that is currently selected in the tree view (i.e., Protocol > Params > Param).
If you click a breadcrumb (e.g., "Params"), the corresponding (parent) node will be selected in the tree view (e.g., "Params").
If you click an arrow next to a breadcrumb, a dropdown list will open, allowing you to immediately navigate to one of the child nodes.
Expanding, collapsing or pinning DIS tree nodes
When you right-click a tree node in the DIS Tree tool window, a shortcut menu appears containing the following commands.
| Select... | in order to... |
|---|---|
| Expand recursive | Expand the selected tree node and all its underlying child nodes. Note: If you perform this command on the root of the DIS tree, only its first-level child nodes (Params, Commands, Responses, Pairs, Groups, etc.) will be expanded. |
| Collapse recursive | Collapse the selected tree node. |
| Collapse parent | Collapse the node that contains the selected tree node. |
| Pin | Pin an XML node to the special pin section at the top of the DIS Tree tool window. |
| Unpin | Unpin a pinned node from the special pin section at the top of the DIS Tree tool window. |
Pinning XML nodes
It is possible to pin XML nodes to a special pin section at the top of the DIS Tree tool window.
To pin a node, right-click the node in the DIS Tree, and select Pin from the shortcut menu.
To unpin a pinned node, right-click the node either in the DIS Tree or the pin section, and select Unpin from the shortcut menu.
To unpin all pinned nodes, right-click a random node in the pin section, and select Unpin All from the shortcut menu.
When you hover over a pinned node in the pin section, a tooltip will appear, showing you more information about the node in question.
Types of parameters that have a special indication in the Params node
When you open the Params node, certain types of parameters have a special indication. See the following table.
| Type of parameter | Indication in DIS tree |
|---|---|
| <Type>array</Type> | [Table] |
| <Type>write</Type> | [W] |
| <Type>group</Type> | [Group] |
| <Type>read bit</Type> | [RB] |
| <Type>write bit</Type> | [WB] |