Getting started with the IAS Toolkit
About the IAS Toolkit
The Interactive Automation Script Toolkit (or “IAS Toolkit” in short) is a library that can be used to create interactive automation scripts. Its main purpose is to make developing interactive automation scripts easier.
Tip
For more information on its main features, and the different versions, see Interactive Automation Script Toolkit.
See also: Kata #10: Create a simple interactive script on DataMiner Dojo 
To choose your version of the IAS Toolkit, the first thing you need to know is the version of DataMiner where you want your script to run. As DataMiner keeps improving, so does its support for newer, more advanced IAS components.
Just like for protocol and regular automation script development, our IDE of choice is Visual Studio with the latest version of DIS. If you do not have DIS installed, you can find more information on how to do so under Installing and configuring the software.
Creating a new script
To start creating your script:
In Visual Studio, go to File > New > DataMiner Automation Script Solution to create a new DataMiner Automation Script Solution.
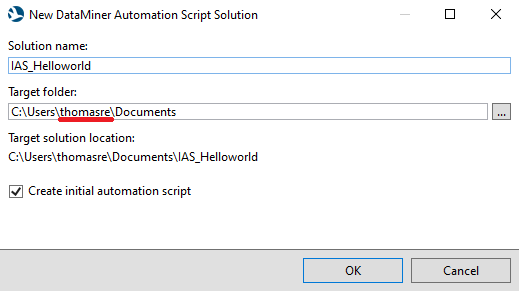
Fill in the solution name and specify a target folder. A folder will be created with the solution name in the target folder. This will contain your solution. Click OK.
Once your solution has been created, open the script XML file in the Solution Explorer and set the Interactivity tag to Always or Optional, depending on the types of execution the script can have.
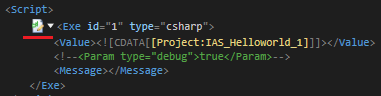
Then, open the first Exe block by clicking the icon next to it.
Installing the library
Open NuGet Package Manager in Visual Studio.
Search for Skyline.DataMiner.Utils.InteractiveAutomationScriptToolkit.
Select a version that is compatible with your DataMiner version.
Click Install.
Tip
For more information on using NuGet packages, see Consuming NuGet packages.
Defining an InteractiveController
With the steps above, you have created a regular automation script. But if you want this script to display something, you need to define an InteractiveController. This controller is used to display dialogs. It will also handle UI updates and trigger the events on the widgets. It is part of the following namespace:
Skyline.DataMiner.Utils.InteractiveAutomationScript
The script now looks like this:
using System;
using Skyline.DataMiner.Automation;
using Skyline.DataMiner.Utils.InteractiveAutomationScript;
/// <summary>
/// DataMiner Script Class.
/// </summary>
public class Script
{
    private InteractiveController controller;
    /// <summary>
    /// The Script entry point.
    /// </summary>
    /// <param name="engine">Link with SLAutomation process.</param>
    public void Run(Engine engine)
    {
        try
        {
            controller = new InteractiveController(engine);
        }
        catch(Exception e)
        {
            engine.ExitFail("Something went wrong: " + e);
        }
    }
}
Note
Prior to DataMiner 10.5.9/10.6.0, a comment containing the string .FindInteractiveClient( is required to mark the script as interactive. See How auto-detection determines interactivity for more details.
// DO NOT REMOVE THIS COMMENT OR THE SCRIPT WON'T RUN!
// DataMiner evaluates if the script needs to launch in interactive mode.
// This is determined by a simple string search looking for ".FindInteractiveClient(" in the source code.
// However, because of the toolkit NuGet package, this string cannot be found here.
// So this comment is here as a workaround.
Building the UI
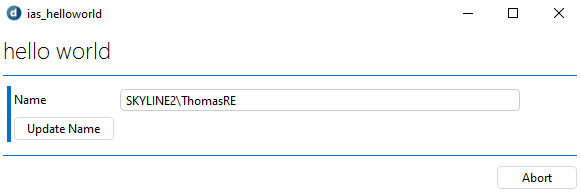
Now you can start to develop the first dialog. A dialog is a single page in an IAS that requires user input. For this example, we will make a dialog with the title “Hello World”, a label, a text box, and a button. Whenever this button is clicked, the username of the user who launched the script should be displayed in the text box.
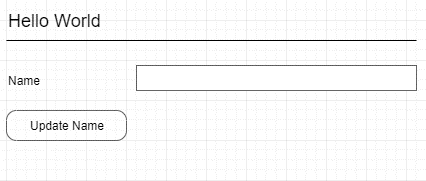
Before you start programming a dialog, it can be useful to create a mockup of the script. While this may be a bit redundant for this example, it can be very useful when you create bigger, more complex dialogs.
To create a dialog, you need to create a class that inherits the Dialog class. In this case, we will call it “HelloWorldDialog”. In the constructor of each dialog, you need to define an Engine parameter, which you need to pass to the dialog constructor using the base keyword.
public class HelloWorldDialog : Dialog
{
    public HelloWorldDialog(Engine engine) : base(engine)
    {
    }
}
Next, set the title of the dialog using the Title property, and define the different widgets used in the dialog. Ideally, you should always try to keep the background logic separated from the UI logic. This increases the maintainability of the script. In this use case, we are making the text box and the button publicly available as they will be used in the background logic.
Tip
See also: Model View Presenter
public class HelloWorldDialog : Dialog
{
    private Label label;
    public HelloWorldDialog(Engine engine) : base(engine)
    {
        // Set title
        Title = "Hello World";
        // Init widgets
        label = new Label("Name");
        TextBox = new TextBox();
        Button = new Button("Update Name");
    }
    public TextBox TextBox { get; private set; }
    public Button Button { get; private set; }
}
In order to display the widgets, you will need to add them to your dialog using the AddWidget method. With this method, you can link a widget to a cell in a grid layout, where cell 0;0 is in the upper-left corner of the dialog.
Tip
For more information on interactive automation script widgets, layouts, and event handlers, refer to the API reference.
public class HelloWorldDialog : Dialog
{
    private Label label;
    public HelloWorldDialog(Engine engine) : base(engine)
    {
        // Set title
        Title = "Hello World";
        // Init widgets
        label = new Label("Name");
        TextBox = new TextBox();
        Button = new Button("Update Name");
        // Define layout
        AddWidget(label, 0, 0);
        AddWidget(TextBox, 0, 1);
        AddWidget(Button, 1, 0);
    }
    public TextBox TextBox { get; private set; }
    public Button Button { get; private set; }
}
Note
If you do not add a button to the dialog, a default button will be added at position 0,0.
Once you have added the widgets, the dialog is done.
Displaying the dialog
Now it is time to do a test run of the script. Create a new instance of your HelloWorldDialog and use the InteractiveController.Run method to display it.
/// <summary>
/// DataMiner Script Class.
/// </summary>
public class Script
{
    private InteractiveController controller;
    /// <summary>
    /// The Script entry point.
    /// </summary>
    /// <param name="engine">Link with SLAutomation process.</param>
    public void Run(Engine engine)
    {
        try
        {
            controller = new InteractiveController(engine);
            HelloWorldDialog dialog = new HelloWorldDialog(engine);
            controller.Run(dialog);
        }
        catch(Exception e)
        {
            engine.ExitFail("Something went wrong: " + e);
        }
    }
}
You can now publish the script to your DMA, using either of the following ways:
Navigate to the IAS_Helloworld.xml file in Visual Studio and use the DIS Publish button (requires that your DMA is configured in the DIS settings).
Use a CI/CD workflow to publish the script to your DataMiner System.
Tip
For instructions on setting up a CI/CD workflow, see CI/CD using GitHub or CI/CD using GitLab.
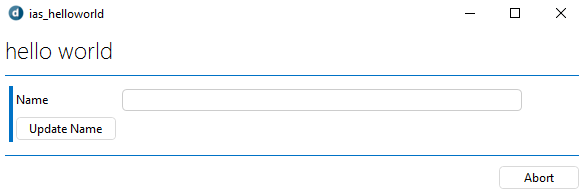
If everything goes well, you will see your script in the Automation module in DataMiner Cube.
To take a look at the script in action, click the Execute button in the lower-right corner and then click Execute now.
Handling events
To make sure something actually happens when a user clicks the button in the script, you need to use events. If you have ever worked with WPF or WinForms, this will feel very similar. Every interactive widget in the toolkit exposes one or more events depending on the possible actions on the widget. In the case of a button, it has an event that is triggered whenever it is pressed. For more information on events, check out this Microsoft article.
/// <summary>
/// DataMiner Script Class.
/// </summary>
public class Script
{
    private InteractiveController controller;
    /// <summary>
    /// The Script entry point.
    /// </summary>
    /// <param name="engine">Link with SLAutomation process.</param>
    public void Run(Engine engine)
    {
        try
        {
            controller = new InteractiveController(engine);
            HelloWorldDialog dialog = new HelloWorldDialog(engine);
            dialog.Button.Pressed += (sender, args) => dialog.TextBox.Text = engine.UserLoginName;
            controller.Run(dialog);
        }
        catch(Exception e)
        {
            engine.ExitFail("Something went wrong: " + e);
        }
    }
}
In this single line of code, we have subscribed to the OnPressed event of the button and will set the login name of the user as text in the text box.
If you update the script on your DMA, your username will be added in the text box whenever you click the button.
What is next?
Now that you have made a first script, play around with the toolkit some more: practice makes perfect! Check out the other types of widgets, experiment with the widget properties, try to span widgets across multiple columns, etc.
Or go follow our Automation script training!