Secure Shell
About SSH
Secure Shell (SSH) is a protocol for secure remote login and other secure network services over an insecure network. It replaces older protocols like Telnet or rlogin.
The specification of the SSH protocol (version 2) can be found in the following RFCs:
- RFC 4251: The Secure Shell (SSH) Protocol Architecture
- RFC 4252: The Secure Shell (SSH) Authentication Protocol
- RFC 4253: The Secure Shell (SSH) Transport Layer Protocol
- RFC 4254: The Secure Shell (SSH) Connection Protocol
Note
This list is not exhaustive.
Defining an SSH connection in a protocol
There are two methods of authentication when establishing an SSH connection:
Password Authentication:
The protocol provides a username and password to the remote SSH server for verification.
Public Key Authentication:
The protocol provides a digital signature created with a private key, and the server verifies it using the matching public key.
Note
Typically, both methods of authentication are implemented in a protocol to give the user the choice how to connect. When both methods are configured, public key authentication has precedence over password authentication, as this is considered more secure.
Important
Refer to Differences with serial communication for an overview of some differences between regular serial connections and SSH connections in DataMiner.
Password authentication
For this method, two parameters need to be created: one to hold the username and the other to hold the password. Accompanying write parameters can be added so the credentials can be entered from the element.
<Param id="1100" trending="false" save="true">
    <Name>Username</Name>
    <Description>Username</Description>
    <Type>read</Type>
    <Interprete>
        <RawType>other</RawType>
        <LengthType>next param</LengthType>
        <Type>string</Type>
    </Interprete>
    <Display>
        <RTDisplay>true</RTDisplay>
        <Positions>
            <Position>
                <Page>Authentication</Page>
                <Row>0</Row>
                <Column>0</Column>
            </Position>
        </Positions>
    </Display>
    <Measurement>
        <Type>string</Type>
    </Measurement>
</Param>
<Param id="1150" setter="true">
    <Name>Username</Name>
    <Description>Username</Description>
    <Type>write</Type>
    <Interprete>
        <RawType>other</RawType>
        <LengthType>next param</LengthType>
        <Type>string</Type>
    </Interprete>
    <Display>
        <RTDisplay>true</RTDisplay>
        <Positions>
            <Position>
                <Page>Authentication</Page>
                <Row>0</Row>
                <Column>0</Column>
            </Position>
        </Positions>
    </Display>
    <Measurement>
        <Type>string</Type>
    </Measurement>
</Param>
<Param id="1101" trending="false" save="true">
    <Name>Password</Name>
    <Description>Password</Description>
    <Type>read</Type>
    <Interprete>
        <RawType>other</RawType>
        <LengthType>next param</LengthType>
        <Type>string</Type>
    </Interprete>
    <Display>
        <RTDisplay>true</RTDisplay>
        <Positions>
            <Position>
                <Page>Authentication</Page>
                <Row>1</Row>
                <Column>0</Column>
            </Position>
        </Positions>
    </Display>
    <Measurement>
    <Type options="password">string</Type>
    </Measurement>
</Param>
<Param id="1151" setter="true">
    <Name>Password</Name>
    <Description>Password</Description>
    <Type>write</Type>
    <Interprete>
        <RawType>other</RawType>
        <LengthType>next param</LengthType>
        <Type>string</Type>
    </Interprete>
    <Display>
        <RTDisplay>true</RTDisplay>
        <Positions>
            <Position>
                <Page>Authentication</Page>
                <Row>1</Row>
                <Column>0</Column>
            </Position>
        </Positions>
    </Display>
    <Measurement>
        <Type options="password">string</Type>
    </Measurement>
</Param>
Important
Use the password option on the parameter holding the password. Using this option ensures greater security.
The two parameters also need to be defined in the port settings. Note that all connections should have a PortSettings tag, and they have to be placed in the same order as defined in the Protocol.Type advanced attribute.
<PortSettings name="SSH Connection">
    <IPport>
        <DefaultValue>22</DefaultValue>
    </IPport>
    <BusAddress>
        <Disabled>true</Disabled>
    </BusAddress>
    <PortTypeSerial>
        <Disabled>true</Disabled>
    </PortTypeSerial>
    <PortTypeUDP>
        <Disabled>true</Disabled>
    </PortTypeUDP>
    <SSH>
        <Credentials>
            <Username pid="1100"/>
            <Password pid="1101"/>
        </Credentials>
    </SSH>
</PortSettings>
The connection is then established by DataMiner, provided the correct username and password are filled in.
Public key authentication
For this method, a parameter needs to be created to hold the path to the private key file.
The content of this parameter should be formatted like this: key=C:\Users\User\.ssh\my_key_rsa
Note
If the private key is protected by a passphrase, it must be appended to the file path, separated by a semicolon. It should be formatted like this: key=C:\Users\User\.ssh\my_key_rsa;pass=passphrase
<Param id="1102" trending="false" save="true">
    <Name>PrivateKeyAndPassphrase</Name>
    <Description>Private Key and Passphrase</Description>
    <Type>read</Type>
    <Interprete>
        <RawType>other</RawType>
        <LengthType>next param</LengthType>
        <Type>string</Type>
    </Interprete>
</Param>
This parameter also needs to be defined in the port settings. Note that all connections should have a PortSettings tag, and they have to be placed in the same order as defined in the Protocol.Type advanced attribute. Note also that the Credentials/Username tag is present, as this will indicate the user for the connection.
<PortSettings name="SSH Connection">
    <IPport>
        <DefaultValue>22</DefaultValue>
    </IPport>
    <BusAddress>
        <Disabled>true</Disabled>
    </BusAddress>
    <PortTypeSerial>
        <Disabled>true</Disabled>
    </PortTypeSerial>
    <PortTypeUDP>
        <Disabled>true</Disabled>
    </PortTypeUDP>
    <SSH>
       <Identity pid="1102"/>
       <Credentials>
          <Username pid="1100"/>
       </Credentials>
    </SSH>
</PortSettings>
The connection is then established by DataMiner, provided the parameter holds the private key and passphrase.
To give the user the choice how to connect, both methods of authentication are typically implemented in a connector:
    <SSH>
       <Identity pid="1102"/>
       <Credentials>
            <Username pid="1100"/>
            <Password pid="1101"/>
        </Credentials>
    </SSH>
</PortSettings>
When both methods are configured, public key authentication has precedence over password authentication, as this is considered more secure.
Note
The approach where the parameter IDs are specified for the identity file and/or credentials supports having an SSH connection that is not the main (first) connection in the connector. There is another way to specify these parameters, which is now deprecated as it only supports connectors with a single SSH connection using the fixed port 22. This involves adding the following options to different parameters: ssh username, ssh password, and ssh options.
Remarks
Once authentication is successful, the socket timeout is set to zero (no timeout) to prevent the connection from being closed when no activity occurs on the SSH connection for timeoutTime ms (RN 3303).
Differences with serial communication
There are a number of differences between implementing serial communication and implementing serial communication using an SSH connection.
- Headers are not supported for SSH. Only trailers.
- For commands sent via SSH, you do not need to send the Carriage Return (0x0D) and New Line (0x0A) characters to indicate the end of the command. This is done automatically.
- Separating multiple SSH commands using ';' or 'enters' inside one DataMiner command is not supported.
- The first part of a response is the corresponding command that has been sent.
Selecting a local port
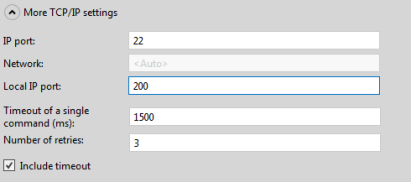
In legacy DataMiner versions prior to 7.0.3 (RN 3859), DataMiner uses the same SSH connection if the polling IP is the same, which can cause problems. Because of this, in older protocols, a workaround may be used that allows the user to specify a different local IP port in the element wizard, by defining the following in the protocol:
<PortSettings>
    <LocalIPport>
        <DefaultValue>200</DefaultValue>
        <Disabled>false</Disabled>
    </LocalIPport>
</PortSettings>
SSH logging
A dedicated log file is used for the SSH connections: "SLSsh.txt". Standard logging provides information about the following:
- Create Object
- Open 1.2.3.4
- Open Exception
- Open Completed
- Connect 1.2.3.4
- Connect Exception
- Connect Complete
- Close
- Close Exception
- Close Complete
- Set Timeout
- Set Timeout Exception
- Set RetryTime
- Trailer=<none>
- Trailer=<xxx> (x times)
- Read Exception
- Write Exception
- WriteLine Exception
Changes to the log configuration (see below) are also logged in the SLSsh.txt log file:
2026-03-30 08:30:57 - -1 - Log = Enabled / Extended = Disabled
The SSH log thread only checks every minute whether a log configuration has changed. Therefore, when, for example, extended logging has been enabled, it can take a minute before this is activated.
The SLSsh.txt log file can grow up to 20 MB. Once this size is reached, SLPort will remove the file, and it will get recreated as soon as another message is logged.
Disabling SSH logging
You can disable logging by creating an empty file with the name SLSshDisableLog.txt in the C:\Skyline DataMiner\Logging\ directory.
Activating extended logging
You can activate extended logging by creating an empty file with the name SLSSHExt.txt in the C:\Skyline DataMiner\Logging\ directory. Note that this file does not receive any logging itself, it only signals to DataMiner that extended logging is enabled, which is put in the SSH log file SLSsh.txt.
When extended logging is enabled, DataMiner writes additional information regarding the beginning and end of reads/writes and what data is written/read.
Caution
Extended logging uses a lot of memory, so do not keep this running if it is not needed.
SSH support in DataMiner
Key exchange algorithms
DataMiner will propose the following key exchange algorithms to the server in the following order:
- ecdh-sha2-nistp521
- ecdh-sha2-nistp384
- ecdh-sha2-nistp256
- diffie-hellman-group14-sha1
- diffie-hellman-group1-sha1
- diffie-hellman-group-exchange-sha1
Ciphers
DataMiner will propose the following ciphers to the server in the following order:
- aes256-ctr
- aes128-ctr
- aes128-cbc
- 3des-cbc
Hash-based Message Authentication Codes (HMAC)
DataMiner will propose the following hash-based message authentication algorithms (HMAC) to the server in the following order:
- HMAC-SHA2-512-etm@openssh.com (from DataMiner 10.3.0 [CU11]/10.4.2 onwards)
- HMAC-SHA2-256-etm@openssh.com (from DataMiner 10.3.0 [CU11]/10.4.2 onwards)
- HMAC-SHA2-512 (from DataMiner 10.2.5/10.3.0 onwards)
- HMAC-SHA2-256
- HMAC-SHA1
- HMAC-MD5
Host key types
- ecdsa-sha2-nistp521 (from DataMiner 10.2.6/10.3.0 onwards)
- ecdsa-sha2-nistp384 (from DataMiner 10.2.6/10.3.0 onwards)
- ecdsa-sha2-nistp256 (from DataMiner 10.2.6/10.3.0 onwards)
- ssh-rsa
- ssh-dss
User authentication methods
DataMiner supports the following user authentication methods:
When connecting to an SSH server, DataMiner first retrieves the supported user authentication methods from the server. If the server does not provide a list of supported methods, the methods mentioned above are assumed.
DataMiner will try each authentication method listed above until the SSH server responds that user authentication has succeeded. If the SSH server responds with partially successful authentication, DataMiner will continue with the remaining authentication methods, if any. In case none of the authentication methods results in successful user authentication, the connection attempt will fail.
Selecting the key exchange algorithm
To specify the key exchange algorithm to be used when connecting to an SSH server, define a serial connection that specifies the key exchange algorithm in the KexAlgorithms tag.
<Connection id="1" name="SSH Connection">
    <Type>serial</Type>
    <CommunicationOptions>
        <KexAlgorithms>
        <KexAlgorithm>diffie-hellman-group1-sha1</KexAlgorithm>
        <KexAlgorithm>diffie-hellman-group-exchange-sha1</KexAlgorithm>
        </KexAlgorithms>
    </CommunicationOptions>
</Connection>
SCP/SFTP
When you need to implement SCP or SFTP in a protocol, we recommend referencing the SSH.NET library in a QAction. See https://github.com/sshnet/SSH.NET.