How to handle XML and JSON data in QActions
Below, you can learn how to handle XML and JSON data in QActions. These are some of the most common data formats used when handling data through HTTP/HTTPS. You will find instructions on how to serialize/deserialize these formats while optimizing code readability and maintainability.
Note that these are instructions show you the recommended way to handle XML and JSON data based on DataMiner's compatible .NET Framework and shipped DLLs.
Prerequisites
You will need the following software for the procedures in this article:
The current minimum supported version of DataMiner or a later version.
Microsoft Visual Studio 2017 or later.
Note
Make sure to have the Windows Communication Foundation Individual Component Installed. See Modify Visual Studio workloads, components, and language packs.
Handling data formats
JSON and XML are two data formats commonly used when transferring data in many types of communication. These data formats allow APIs to structure data in a text format that makes the data readable to machines and developers.
In DataMiner connectors, it is advised to handle data through C# QActions, where typically two steps are necessary:
- Generating C# classes
- Serializing/deserializing text-based data into C# classes
One way to handle these formats in C# is to deserialize text-based data into object-oriented classes. Using the appropriate object-oriented classes to deserialize is key to being able to use DataMiner built-in DLLs like System.Xml.dll for XML serialization/deserialization and NewtonSoft.Json.dll for JSON serialization/deserialization, so that you can successfully transform text-based data into C# objects and vice versa.
Before you generate the object-oriented classes, we highly recommend going through the available documentation on each HTTP/HTTPS API reply, so that you understand key aspects of the reply content, such as which data formats are expected to be collected. These data formats should be aligned across API documentation, generated classes and DataMiner connector parameter data types.
The sections below will focus on the serialization and deserialization for XML and JSON formats, so XML-based and JSON-based data can be collected and stored in a DataMiner element.
Deserializing JSON data
In this example, we will go through the steps that allow a JSON string to be transformed and published in a DataMiner element. This example covers a JSON text that describes a list of virtual machine instances. The DataMiner connector will receive this JSON reply and deserialize it into a table.
Step 1: Generating classes
To generate C# classes from JSON text, you can rely on a built-in Visual Studio feature that allows you to copy a JSON-formatted text and simply paste the resulting C# classes.
Alternatively, there are many online converters to automatically convert JSON text into an object-oriented C# class. Here are a few examples:
The following code snippet describes a JSON-formatted text:
{
    "Instances":
    [{
        "Name": "DataMiner Main",
        "IPAddress": "10.10.10.1",
        "Id":74947982479,
        "CreatedFromTemplate": false,
        "Status": "ACTIVE"
        },
     {
        "Name": "DataMiner Backup",
        "IPAddress": "10.10.10.2",
        "Id":76428745692,
        "CreatedFromTemplate": true,
        "Status": "STANDBY"
        }
    ]
}
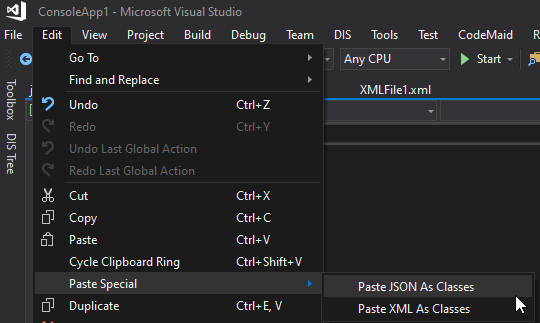
You can copy this JSON structure and use the Paste Special feature in Visual Studio, as illustrated below.
The resulting C# classes will be generated automatically:
public class Rootobject
{
    public Instance[] Instances { get; set; }
}
public class Instance
{
    public long Instance { get; set; }
    public string Name { get; set; }
    public string IPAddress { get; set; }
    public bool CreatedFromTemplate { get; set; }
    public string Status { get; set; }
}
Step 2: Deserializing JSON text into C# classes
Once the C# classes have been generated, you can use the NewtonSoft.Json.dll library to do the conversion from JSON text to C# class instances.
To convert the JSON text illustrated above, you will need this text in a string instance.
In DataMiner connectors, you can achieve this by using a GetParameter call that collects parameter data holding a string in JSON format. Once this string is available, you will need to do the following:
- Reference the NewtonSoft.JSON.dll in your QAction C# project.
- Add
using NewtonSoft.JSON; - Use the method
JSONConvert.DeserializeObject<T>(string source), where T is the Rootobject class and string source is the string that holds the text in JSON format.
The following code snippet represents an example of a QAction routine that deserializes parameter ID 3 (JSON data) and fills a table with all instances extracted from the deserialized JSON.
using System;
using System.Collections.Generic;
using Newtonsoft.Json;
using QAction_3.Json;
using Skyline.DataMiner.Scripting;
/// <summary>
/// The QAction entry point.
/// </summary>
/// <param name="protocol">Link with SLProtocol process.</param>
public static void Run(SLProtocol protocol)
{
    try
    {
        // Get Text based json data as a string.
        string source = Convert.ToString(protocol.GetParameter(Parameter.JSONdata_3));
        // Deserialize Json contents
        Rootobject rootObjects = JsonConvert.DeserializeObject<Rootobject>(source);
        List<object[]> instances = new List<object[]>();
        // Convert Generated class into Connector Row data.
        foreach (Instance instance in rootObjects.Instances)
        {
            instances.Add(new InstancesQActionRow
            {
                Instancesid_101 = instance.Id,
                Instancesname_102 = instance.Name,
                Instancesipaddress_103 = instance.IPAddress,
                Instancescreatedfromtemplate_104 = instance.CreatedFromTemplate
            }.ToObjectArray());
        }
        protocol.FillArray(Parameter.Instances.tablePid, instances, NotifyProtocol.SaveOption.Full);
    }
    catch (Exception ex)
    {
        protocol.Log("QA" + protocol.QActionID + "|" + protocol.GetTriggerParameter() + "|Run|Deserializing JSON text failed due to:" + Environment.NewLine + ex, LogType.Error, LogLevel.NoLogging);
    }
}
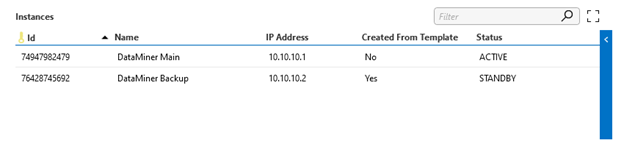
The following picture illustrates the resulting table data in a DataMiner element:
Note
By default, the Newtonsoft DLL is available in the C:\Skyline DataMiner\ProtocolScripts folder of any DataMiner Agent.
Serializing C# object data into JSON format
Another common use case is to build a JSON string based on a given object. In the example below, we will build the C# object instance and serialize it into a JSON object.
To achieve this, an instance of the intended object must be created, then the object must be serialized via the JsonConvert.SerializeObject(object o), where object "o" can be any kind of C# object.
Step 1: Creating an object instance
The following code snippet creates a custom Instance object:
Instance instance = new Instance()
{
    Name = "DataMiner Backup",
    Id = 74947982479,
    IPAddress = "10.10.10.2",
    CreatedFromTemplate = true,
    Status = "ACTIVE"
};
Step 2: Serializing the JSON object
The following code snippet serializes the previous instance object into a JSON string:
string serializedInstance = JsonConvert.SerializeObject(instance);
Printing the serialized instance results in the following output:
{
    "Name": "DataMiner Backup",
    "IPAddress": "10.10.10.2",
    "Id":76428745692,
    "CreatedFromTemplate": true,
    "Status": "ACTIVE"
}
Now that a string has been built based on a given object instance, the string can be set on the desired connector parameter and a protocol trigger can be triggered so that a DataMiner connector session can forward a Post call bearing the parameter's content.
Deserializing XML data
In this example, we will go through the steps that allow an XML string to be transformed and published in a table of a DataMiner element. This example covers an XML string that holds a list of virtual machine instances. The DataMiner connector will receive this XML data and deserialize it into a table.
Step 1: Generating classes
Generating classes for XML can be done in a similar way as the JSON-based class generation.
Here is an equivalent XML text:
<ListInstances>
    <Instance>
        <Name>DataMiner Main</Name>
        <IPAddress>10.10.10.1</IPAddress>
        <Id>74947982479</Id>
        <CreatedFromTemplate>false</CreatedFromTemplate>
        <Status>ACTIVE</Status>
    </Instance>
    <Instance>
        <Name>DataMiner Backup</Name>
        <IPAddress>10.10.10.2</IPAddress>
        <Id>76428745692</Id>
        <CreatedFromTemplate>true</CreatedFromTemplate>
        <Status>STANDBY</Status>
    </Instance>
</ListInstances>
If you copy the XML structure above and use the Paste Special feature in Visual Studio (see picture below) all required classes will be generated.
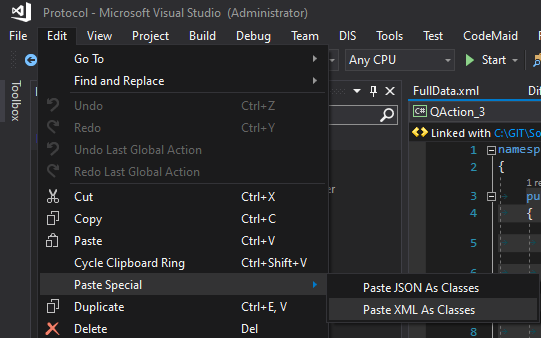
Note
If you cannot find the Paste XML As Classes option, double-check if the data is on the clipboard. If it is, make sure you have the Windows Communication Foundation component installed (as mentioned in the Prerequisites).
The resulting generated classes:
// NOTE: Generated code may require at least .NET Framework 4.5 or .NET Core/Standard 2.0.
/// <remarks/>
[System.SerializableAttribute()]
[System.ComponentModel.DesignerCategoryAttribute("code")]
[System.Xml.Serialization.XmlTypeAttribute(AnonymousType = true)]
[System.Xml.Serialization.XmlRootAttribute(Namespace = "", IsNullable = false)]
public partial class ListInstances
{
    private ListInstancesInstance[] instanceField;
    /// <remarks/>
    [System.Xml.Serialization.XmlElementAttribute("Instance")]
    public ListInstancesInstance[] Instance
    {
        get
        {
            return this.instanceField;
        }
        set
        {
            this.instanceField = value;
        }
    }
}
/// <remarks/>
[System.SerializableAttribute()]
[System.ComponentModel.DesignerCategoryAttribute("code")]
[System.Xml.Serialization.XmlTypeAttribute(AnonymousType = true)]
public partial class ListInstancesInstance
{
    private string nameField;
    private string iPAddressField;
    private ulong idField;
    private bool createdFromTemplateField;
    private string statusField;
    /// <remarks/>
    public string Name
    {
        get
        {
            return this.nameField;
        }
        set
        {
            this.nameField = value;
        }
    }
    /// <remarks/>
    public string IPAddress
    {
        get
        {
            return this.iPAddressField;
        }
        set
        {
            this.iPAddressField = value;
        }
    }
    /// <remarks/>
    public ulong Id
    {
        get
        {
            return this.idField;
        }
        set
        {
            this.idField = value;
        }
    }
    /// <remarks/>
    public bool CreatedFromTemplate
    {
        get
        {
            return this.createdFromTemplateField;
        }
        set
        {
            this.createdFromTemplateField = value;
        }
    }
    /// <remarks/>
    public string Status
    {
        get
        {
            return this.statusField;
        }
        set
        {
            this.statusField = value;
        }
    }
}
The generated classes based on XML are slightly more complex than JSON-based ones because of the many features XML provides.
Step 2: Deserializing XML text into C# classes
Once the C# classes are generated, you can use the System.Xml.dll library to do the conversion from XML text to C# object instances.
To convert the XML text illustrated above, you will need this text in a string.
In DataMiner connectors, you can achieve this by using a GetParameter call that holds the XML string as a value in a parameter. Once this string is available in the QAction, you will need to do the following:
- Reference the System.Xml.dll in your QAction C# project.
- Add
using System.Xml.Serialization; - Add
using System.IO; - Create a TextReader reference from the XML-format string.
- Create an XmlSerializer instance referencing the targeted root class.
- Call XmlSerializer.Deserialize and cast the object to the correct class.
This procedure can be summarized with the following code snippet:
using System;
using System.Collections.Generic;
using System.IO;
using System.Xml.Serialization;
using Skyline.DataMiner.Scripting;
using System.Xml;
/// <summary>
/// DataMiner QAction Class: Deserialize Xml Text.
/// </summary>
public static class QAction
{
    /// <summary>
    /// The QAction entry point.
    /// </summary>
    /// <param name="protocol">Link with SLProtocol process.</param>
    public static void Run(SLProtocol protocol)
    {
        try
        {
            // Get Text based xml data as a string.
            string textData = Convert.ToString(protocol.GetParameter(Parameter.xmltexttodeserialize_7));
            // Deserialize Xml contents
            QAction_6.Xml.ListInstances listInstances = XmlDeserializeFromString<QAction_6.Xml.ListInstances>(textData);
            // Convert C# Generated Classes into Qaction Rows.
            List<object[]> instances = new List<object[]>();
            foreach (ListInstancesInstance instance in listInstances.Instance)
            {
                instances.Add(new InstancesxmlQActionRow
                {
                    Instancesxmlid_201 = instance.Id,
                    Instancesxmlname_202 = instance.Name,
                    Instancesxmlipaddress_203 = instance.IPAddress,
                    Instancesxmlcreatedfromtemplate_204 = instance.CreatedFromTemplate,
                    Instancesxmlstatus_205 = instance.Status
                }.ToObjectArray());
            }
            protocol.FillArray(Parameter.Instancesxml.tablePid, instances, NotifyProtocol.SaveOption.Full);
        }
        catch (Exception ex)
        {
            protocol.Log(
                "QA" + protocol.QActionID + "|" + protocol.GetTriggerParameter() +
                "|Run|Deserializing Json text failed due to:" + Environment.NewLine + ex, LogType.Error,
                LogLevel.NoLogging);
        }
    }
    public static T XmlDeserializeFromString<T>(this string xmlTextData)
    {
        object result;
        try
        {
            using (TextReader reader = new StringReader(xmlTextData))
            {
                var serializer = new XmlSerializer(typeof(T));
                result = serializer.Deserialize(reader);
            }
            return (T) result;
        }
        catch
        {
            return default(T);
        }
    }
}
Serializing C# object data into XML format
Another common use case is to build an XML string based on a given object. In the example below, we will build the C# object instance and serialize it into an XML string format.
To achieve this, an instance of the intended object must be created, then the object must be serialized via the XmlSerializer.Serialize(XmlWriter xmlwriter, object o), where object "o" can be any kind of C# object.
Step 1: Creating an object instance
The following code snippet creates a custom Instance object:
Instance instance = new Instance()
{
    Name = "DataMiner Main",
    Id = 74947982479,
    IPAddress = "10.10.10.1",
    CreatedFromTemplate = true,
    Status = "ACTIVE"
};
Step 2: Serializing the XML object
The following code snippet serializes the previous Instance object into an XML string:
public static string SerializeObjectIntoXml<T>(T objectToSerialize)
{
    using (var stream = new StringWriter())
    using (var writer = XmlWriter.Create(stream))
    {
        var serializer = new XmlSerializer(objectToSerialize.GetType());
        serializer.Serialize(writer, objectToSerialize);
        return stream.ToString();
    }
}
Printing the returned value results in the following output:
<Instance>
    <Name>DataMiner Main</Name>
    <IPAddress>10.10.10.1</IPAddress>
    <Id>74947982479</Id>
    <CreatedFromTemplate>true</CreatedFromTemplate>
    <Status>ACTIVE</Status>
</Instance>
Class generation pitfalls
Automated class generation might not always provide the perfect C# classes. When a JSON or XML string is transformed into a C# class, these automated tools base themselves on only one sample of the possible JSON/XML structure. This might lead to imprecise data types being generated automatically from these tools.
Below, two JSON samples for the same object are shown along with the respective C# classes generated by using the Paste as JSON Class feature in Visual Studio.
JSON structure:
{
    "Id": 454352,
    "Name": "DataMiner Main",
    "IPAddress":  "10.10.10.2",
    "CreatedFromTemplate": false,
    "Status": "ACTIVE"
}
Generated class:
public class Rootobject
{
    public int Id { get; set; }
    public string Name { get; set; }
    public string IPAddress { get; set; }
    public bool CreatedFromTemplate { get; set; }
    public string Status { get; set; }
}
JSON structure:
{
    "Id": 454353,
    "Name": null,
    "IPAddress":  "10.10.10.2",
    "CreatedFromTemplate": null,
    "Status": "ACTIVE"
}
Generated class:
public class Rootobject
{
    public int Id { get; set; }
    public object Name { get; set; }
    public string IPAddress { get; set; }
    public object CreatedFromTemplate { get; set; }
    public string Status { get; set; }
}
Notice the Name and CreatedFromTemplate properties. In the first example, a class was generated with a property Name of type string and a property CreatedFromTemplate of type bool. In the second example, the tool detected null as value, so it simply assumed that these were object types.
In these cases, we highly recommend that you double-check the documentation on these data structure objects to properly identify the accurate property types.
Handling parameters with special characters
Some API data structures might reply with special characters such as - or .. In C#, these characters are special and cannot be used in a variable declaration, so extra configuration is required at variable declaration level.
If an API replies to your request with a parameter named Instance-Id, you will need to decorate your C# variable with an attribute. Here are the recommended adaptations required for both cases while using the System.XML.dll and the Newtonsoft.Json.dll:
Deserializing with NewtonSoft.Json.dll
[JsonProperty("Instance-Id")]
public string InstanceId { get; set;}
Deserializing with System.Xml.dll
[System.Xml.Serialization.XmlElementAttribute("Instance-Id")]
public string InstanceId { get; set; }
The attribute at the top is consumed by the respective serializer and parses a parameter named Instance-Id to the C# property named InstanceId.
Using Serialization settings
While handling data with a serializer, you sometimes need to optimize/tweak the serialized content, for instance to prevent printing null, setting a specific encoding or culture etc. XML and JSON libraries have their own implementation of serializer settings.
- In case of System.Xml, System.Xml.XmlWriterSettings is used.
- In case of NewtonSoft.Json, Newtonsoft.Json.JsonSerializerSettings is used.
For more information on those serializer settings, see the following documentation:
- XML: https://docs.microsoft.com/en-us/dotnet/api/system.xml.xmlwritersettings?view=net-5.0
- JSON: https://www.newtonsoft.com/json/help/html/T_Newtonsoft_Json_JsonSerializerSettings.htm
Efficiency vs. readability
In some scenarios, APIs might reply with large XML or JSON structures that could lead to poor code performance because of the amount of text to process.
To improve code deserialization, you can use classes like XDocument for XML and JObject for JSON. These classes provide a non-object-oriented way of deserializing the respective data formats.
However, while these classes improve performance, they lack code readability. It is up to you to judge which classes are most suitable depending on the situation you are facing.
Reference documentation
For more information on the mentioned libraries, see the following documentation:
- System.Xml.dll: https://docs.microsoft.com/en-us/dotnet/api/system.xml?view=netframework-4.6.2
- NewtonSoft.Json.dll: https://www.newtonsoft.com/json/help/html/Introduction.htm