Configuring OpenSearch backups
This procedure to configure an OpenSearch database backup focuses on setting up and using an OpenSearch snapshot to back up and restore OpenSearch data.
Requirements
You will need a client application that is able to communicate with the OpenSearch rest API. This application must be able to send POST and PUT messages with a request body.
Examples:
OpenSearch Dashboards: OpenSearch Dashboards is often used together with OpenSearch.
CURL: Curl is a simple command-line utility that allows messages with payload (e.g. POST and PUT messages) and is useful for scripting.
...
Setting up a shared folder
In this procedure, we will be using an NFS server and NFS client to establish a shared folder accessible by all OpenSearch nodes. This shared folder allows all nodes to store snapshot data. Use an NFS server and client as explained in How to Set Up NFS Server and Client on CentOS 8.
Tip
- If required, contact your IT department to follow the NFS server setup procedure, as this step may otherwise be challenging. Further input on networking infrastructure may also be required.
- It is also possible to set up an NFS share on Windows and share it with the destination Linux system. See Windows Server 2016 as an NFS server for Linux clients.
Note
- As this setup might be more challenging, we recommend that you set it up in advance.
- Be wary of read, write, and execute rights, firewall configurations, and the state of the NFS server service during the setup. For the machines that will act as NFS servers, make sure the firewall allows NFS traffic. You can use the following command for this:
sudo ufw allow nfs - Make sure the OpenSearch user has enough rights to the folder to read, write, and execute its contents.
Set up a shared folder on the source OpenSearch cluster for all nodes to contain the snapshots. This folder must be shared across all machines in the OpenSearch clusters in all directions.
sudo mkdir /var/nfs/opensearch -pGive the folder the necessary permissions on all nodes.
sudo chmod 777 /var/nfs/opensearchIf you do not have enough rights to the shared folder, use the
chmodandchowncommand.Note
It is possible you will need to contact your IT department to get more rights.
NFS server
Install the NFS server packages on one of the nodes. We recommend using the cluster_manager node.
sudo apt update
sudo apt install nfs-kernel-server
Configure the NFS server to share the folder with NFS clients by editing the
/etc/exportsfile.sudo nano /etc/exportsAdd the following line to the
/etc/exportsfile:/var/nfs/opensearch 166.206.186.0/24(rw,sync,no_root_squash,no_subtree_check)- "166.206.186.0/24": This will allow all nodes/servers that are in the network-address range: 166.206.186.x and subnet mask 255.255.255.0.
Save the file by pressing Ctrl+O, then Enter, and exit the editor by pressing Ctrl+X.
Restart the NFS server:
sudo systemctl restart nfs-kernel-server
NFS client
Install the NFS client on each node:
sudo apt update
sudo apt install nfs-common
Mount the shared folder on each node:
sudo mount [NFSServerIP]:/var/nfs/opensearch /var/nfs/opensearchExample:
sudo mount 166.206.186.146:/var/nfs/opensearch /var/nfs/opensearchImportant
You do not need to perform the mounting step on the node that serves as the NFS server.
To make the mount persistent across server reboots, edit the
/etc/fstabfile:sudo nano /etc/fstabAdd the following line to the file:
[NFSServerIP]:/var/nfs/opensearch /var/nfs/opensearch nfs rw,_netdev,tcp 0 0Example:
166.206.186.146:/var/nfs/opensearch /var/nfs/opensearch nfs rw,_netdev,tcp 0 0Save the file by pressing Ctrl+O, then Enter, and exit the editor by pressing Ctrl+X.
Test if the mount was successful by running the following command:
df -hThe output of this command should display the mounted NFS share.
Create a test file in the mounted directory to verify accessibility:
sudo touch /var/nfs/opensearch/test.txtThis will create a file named "test.txt" that can be accessed from any other NFS client.
Creating the snapshot repository
Creating the repository using REST API
Create a repository by executing the following PUT request in your client application (e.g. Elasticvue, Postman, etc.):
PUT /_snapshot/opensearchbackup
{
  "type": "fs",
  "settings": {
    "location": "/var/nfs/opensearch"
  }
}
"/var/nfs/opensearch": The path of the shared folder you created
"opensearchbackup": A repository name of your choice
Tip
For more information, see Shared file system.
Note
You can also use ElasticVue to create your repository: Go to Snapshots > Snapshot Repositories, and click the New repository button. Then fill in the name and the repository location, and leave the default settings untouched (i.e. Compress should be enabled, and Readonly should be disabled).
Verify whether the repository has been created correctly by entering the following GET request using your chosen client application.
GET _snapshot/opensearchbackupIf the repository has been created correctly, the response will provide repository information.
Example, using OpenSearch Dashboards as client application:
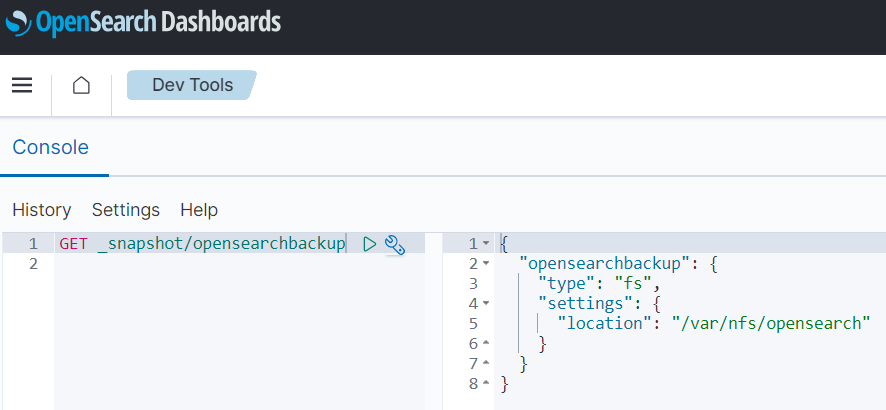
"opensearchbackup": Name of your snapshot repository
"fs": A file system repository
"/var/nfs/opensearch": The path where all snapshots are stored
Tip
For more information, see Get snapshot repository.
Creating the repository using OpenSearch Dashboards
Important
To be able to restore a snapshot later, you must go through these steps first. Without a functional repository, you will run into issues that will delay the snapshot restore.
Access the opensearch.yml file on all nodes of the OpenSearch cluster. Open the file and set path.repo as your previously created shared folder.
Open OpenSearch Dashboards. Click the hamburger button in the top-left corner and select Snapshot Management. In the left-hand pane, now select Repositories to view an overview of all repositories.
Select Create repository in the top-right corner.

Specify the following details:
Repository name: The name of your repository
Repository type: Set to Shared file system
Location: The location where your repository is saved
Save all changes by clicking Add.
In the overview, you should now see your newly added repository.
Taking the snapshot
Taking the snapshot using REST API
Execute the following PUT request in your chosen client application:
PUT /_snapshot/opensearchbackup/20230620
{
"indices": "*",
"ignore_unavailable": true,
"include_global_state": false,
"partial": false
}
"20230620": Name for the snapshot
"opensearchbackup": Name of your snapshot repository
You can also add a request body to include or exclude certain indices or specify other settings. See Take snapshots.
You cannot take a snapshot if another is currently in progress. To check the status, enter the following GET request:
GET /_snapshot/_statusVerify that the snapshot was created successfully by entering the following GET request:
GET /_snapshot/opensearchbackup/20230620The field next to "state": should display "SUCCESS".
You have now finished configuring an OpenSearch backup.
Taking a snapshot using OpenSearch Dashboards
In OpenSearch Dashboards, click the hamburger button in the top-left corner and select Snapshot Management. In the left-hand pane, now select Snapshots to view an overview of all snapshots.
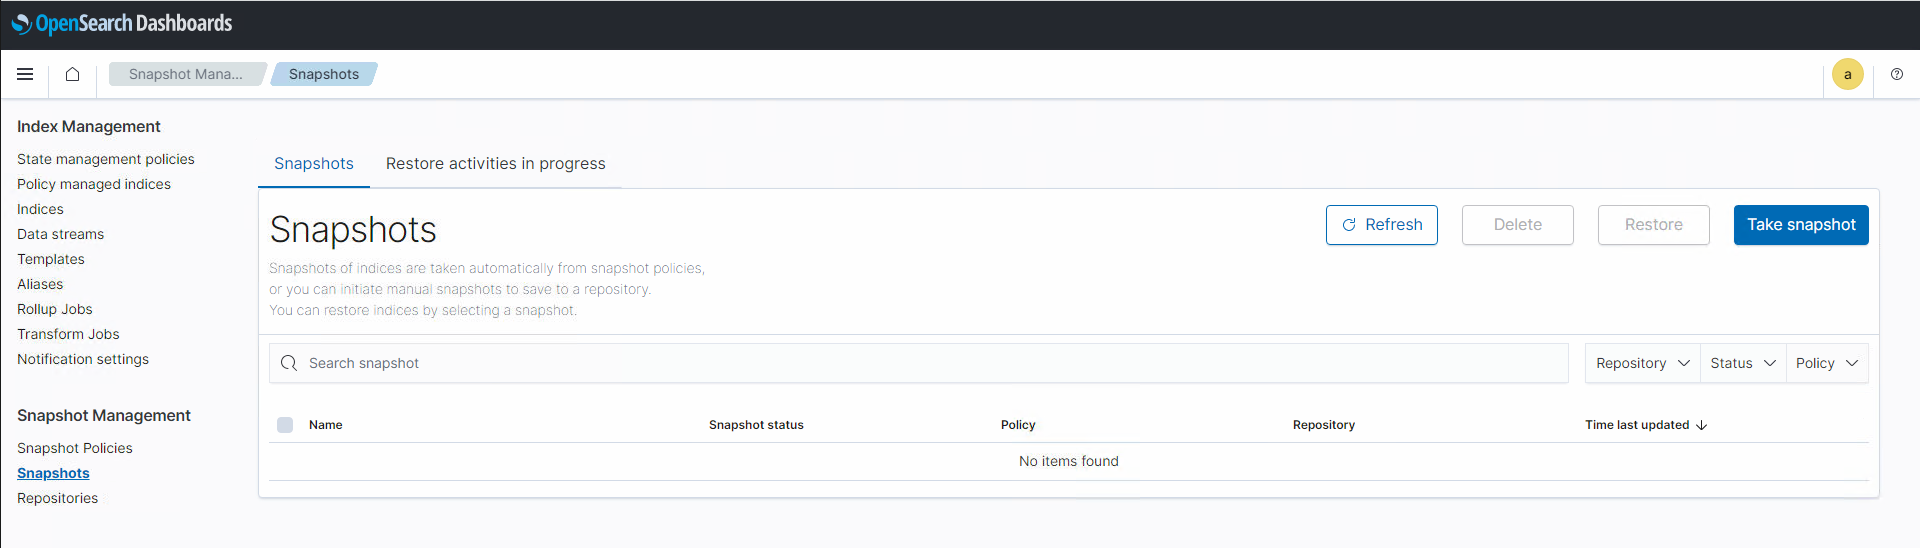
Select Take snapshot in the top-right corner.
Specify the following details:
Snapshot name: The name of the snapshot
Select or input source indexes or index patterns: Enter an asterisk ("*")
Select a repository for snapshots: The repository you created in Creating a snapshot repository
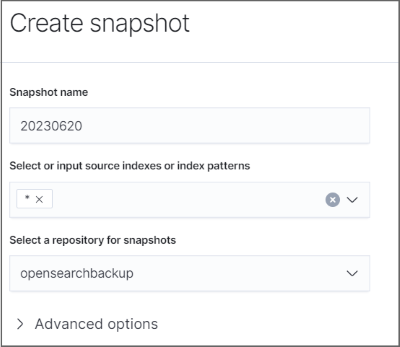
Save all changes by clicking Add.
In the overview, you will now see your newly taken snapshot.
Restoring the snapshot
Caution
Restoring the snapshot can only be accomplished using the REST API. If you have used OpenSearch Dashboards to create the repository and take the snapshot, it is essential that you transition to employing REST API for this purpose.
Ensure that the target OpenSearch cluster is empty.
Open your chosen client application. To see all snapshots in your repository, execute:
GET /_snapshot/[repositoryname]/_allExample:
GET /_snapshot/opensearchbackup/_allIn the target OpenSearch cluster, execute the following POST request:
POST /_snapshot/[repositoryname]/[snapshotname]/_restore
{
  "indices": "[dbprefix]*"
}
"dbprefix": The prefix specified in the DB tag for the indexing database in the DB.xml file (in the folder
C:\Skyline DataMiner\)Note
To find the prefix DataMiner puts in front of an index name, enter
http://[IP address]:9200/_cat/indicesin your browser's address bar. Replace "[IP address]" with your IP address.
Example:
POST /_snapshot/opensearchbackup/20230620/_restore
{
  "indices": "sldmadb*"
}
Caution
Because we are using the Security plugin in this procedure, make sure to carefully read OpenSearch's security considerations. Note that including the
opendistro_securityindex in the snapshot may cause issues.Verify whether the snapshot restore worked by requesting the status of the snapshot restore:
GET /_snapshot/_status
Troubleshooting
For troubleshooting information, see Common OpenSearch-related issues.