Migrating SRM profiles to the indexing database
Migrating the profiles from the Profiles.xml file to the indexing database improves the scalability and performance on systems that have a large number of profiles.
When you install an indexing database and migrate booking data on an existing DataMiner System prior to DataMiner 10.4.0, profiles are not automatically migrated. Based on your specific setup, and keeping in mind the limitations and differences with XML storage, you can decide independently whether or not you want to start this migration. However, from DataMiner 10.4.0 onwards, the use of an indexing database (or Storage as a Service) to store profiles is mandatory. Using XML storage is no longer possible from that DataMiner version onwards.
Tip
If you are looking for information on how to migrate an SRM configuration from one DMA to another, see Migrating an SRM configuration.
Note
- XML storage is no longer supported from DataMiner 10.4.0 onwards. Upgrading to 10.4.0 will not be possible if the profile data is still stored in XML. It is not possible to switch storage types after you upgrade to DataMiner 10.4.0.
- Elasticsearch is only supported up to version 6.8, which is no longer supported by Elastic. If you are using Elasticsearch as the indexing database, we therefore recommend using Storage as a Service instead, or if you do want to continue using self-managed storage even though this is not recommended, using OpenSearch.
Migrating from XML to the indexing database
To migrate the profiles, you will need to use the SLNetClientTest tool. Note that while the tool mentions only "Elastic", it can also be used for a migration to OpenSearch.
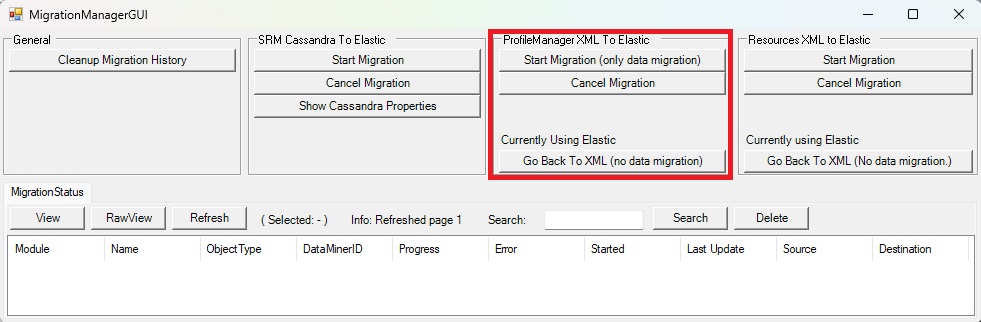
Migration window in SLNetClientTest tool (version 10.3.2)
Warning
Always be extremely careful when using this tool, as it can have far-reaching consequences on the functionality of your DataMiner System.
Connect to the DMS using the SLNetClientTest tool:
In the SLNetClientTest tool, go to Connection > Connect.
In the Connect window, under Authentication, select Explicit credentials and specify the credentials of an administrator user.
Click the Connect button.
In the Advanced menu, select Migration.
In the ProfileManager XML to Elastic section, click the Start Migration button to start the migration wizard.
A window will show the migration actions that have been scheduled. If you close this window, the migration will continue in the background. To cancel the migration, click the Cancel Migration button.
In the MigrationStatus table in SLNetClientTest tool, the profile instances, definitions, and parameters rows will reflect the progress of the migration.
All profiles will be loaded from the Profiles.xml file on the DataMiner Agent where the migration was triggered. The Profiles.xml files of the other DataMiner Agents in the cluster are not migrated. This is not necessary, as the Profiles.xml file is synced in the cluster.
The profiles objects will be written to the indexing database.
Important
A snapshot of the Profiles.xml file will be migrated, which means that Profile Manager is not stopped during the migration and keeps keep working as expected. However, changes to profiles that are done during the migration will not be included in the migration, so avoid creating, updating, or deleting profile objects until the migration is complete and the system has switched to using the indexing database for profile information.
Note
The migration should not take more than a few minutes. During testing, migrating a Profiles.xml file of 100 MB in a system with a local Elasticsearch database took about 4 minutes.
Check whether in the MigrationStatus table, the migration of profile instances, definitions, and parameters has the status completed, and there are no error messages.
Tip
If you see errors, refer to the Troubleshooting section below.
When the migration is complete, click the Create Configuration button to create the configuration file.
If this button is not visible, that means you already have a configuration file. You can continue by clicking the Start using Elastic button to switch to indexing database storage.
Troubleshooting
If the migration should fail for any reason, the migration status object in the SLNetClientTest tool window will get a red background color. The SLMigrationManager.txt and SLProfileManager.txt log files will contain more information.
If a MigrationStatus is stuck in the InProgress state, you will need to cancel the migration and trigger the migration again. You can do so with the Cancel Migration button in the ProfileManger XML to Elastic section of the SLNetClientTest tool window.
Behavior in new installations
When a new DataMiner Agent is installed, the used storage type will depend on when Profile Manager starts up for the first time.
If DataMiner is installed with the 10.0 installer and Profile Manager is used, XML storage will be used. An indexing database is not yet supported as a storage type for profiles in DataMiner 10.0. After you have upgraded this DataMiner Agent to a recent DataMiner version, it will continue to use XML storage until you trigger the migration.
If DataMiner is installed and upgraded to 10.4 before Profile Manager is first started, or if it is installed with the 10.4 installer, indexing database storage will be used. This means profiles will only be functional on a DataMiner System that has indexing database storage running.
When you add a new DataMiner Agent to an existing cluster, it will have the same behavior as the rest of the cluster.
Checking the storage type used by a DataMiner Agent
If you want to know which storage type a DataMiner Agent is currently using, open the migration window as detailed under Migrating from XML to the indexing database.
The current storage type is displayed in the ProfileManager XML to Elastic section, under the Cancel Migration button. It will either state Currently using XML or Currently using Elastic.
Limitations and differences with XML storage
Field size
Field names in the indexing database have a maximum length of 32766 bytes, which means any field of a profile indexed in the database can only contain 32766 bytes. This limit is mostly important for string fields, which can contain 32766 characters of one byte (or 16383 characters of two bytes).
Note
While indexing database storage is used, if there is an attempt to save a profile with a field that is too big, the API will return an Unknown error. The SLProfileManager.txt log file will contain the actual exception, which will mention the field that could not be indexed in the database.
Initial event on subscriptions
If XML storage is used and you subscribe to the ProfileManagerEventMessage, you will receive an initial event with all profiles. This event is not sent when indexing database storage is used, in order to prevent sending a message to the client containing thousands of profiles.
Syncing
If XML storage is used, all Profile Manager instances in the cluster will sync the profiles in their XML file on startup and during the midnight sync. If indexing database storage is used, DataMiner relies on the database to do the syncing, so this does not happen during the midnight sync or on startup. However, Profile Manager will refresh the cached profiles during the midnight sync by reading all profiles again from the database. There is no functional difference between these approaches, but using the indexing database for storage will reduce the communication between Profile Manager instances in a cluster environment.