Configuring SAML with Microsoft Entra ID as identity provider
From DataMiner 10.1.5 onwards, Microsoft Entra ID (known as Azure Active Directory prior to July 2023) is supported as an identity provider for external authentication via SAML.
To configure external authentication with Entra ID as the identity provider, you will first need to set up authentication. Once this is done, you will need to configure how users should be provisioned.
Configuring authentication
To configure authentication, follow these steps:
Setting up a Microsoft Entra ID Enterprise application
To set up external authentication, you first need to create an enterprise application in Entra ID.
Note
- In DataMiner versions prior to DataMiner 10.2.0/10.2.1, using an enterprise application is not yet supported, so you should instead register DataMiner on the App registrations page. However, note that many features will not be available with such a setup, so we highly recommend upgrading to a more recent DataMiner version and setting up an enterprise application instead.
- Only a Global Administrator, Application Administrator, Cloud Application Administrator, and Application Developer have the necessary permissions to create enterprise applications.
In Entra ID, register DataMiner as an enterprise application:
Navigate to
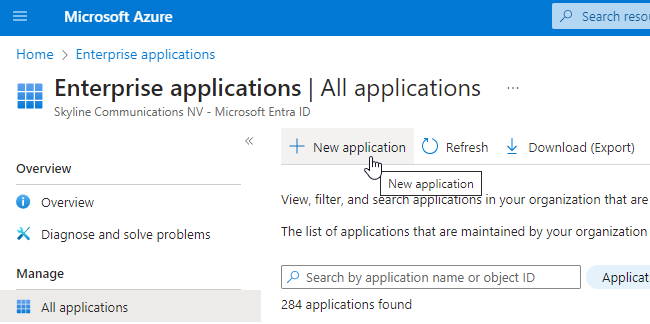
portal.azure.comand log in.In the search box at the top, enter Enterprise applications to go to the Enterprise Applications page.
At the top, click New application.
Click Create your own application.
Important
You need administrator permissions to create your own application.
Select Integrate another application you don’t find in the gallery and click Create.
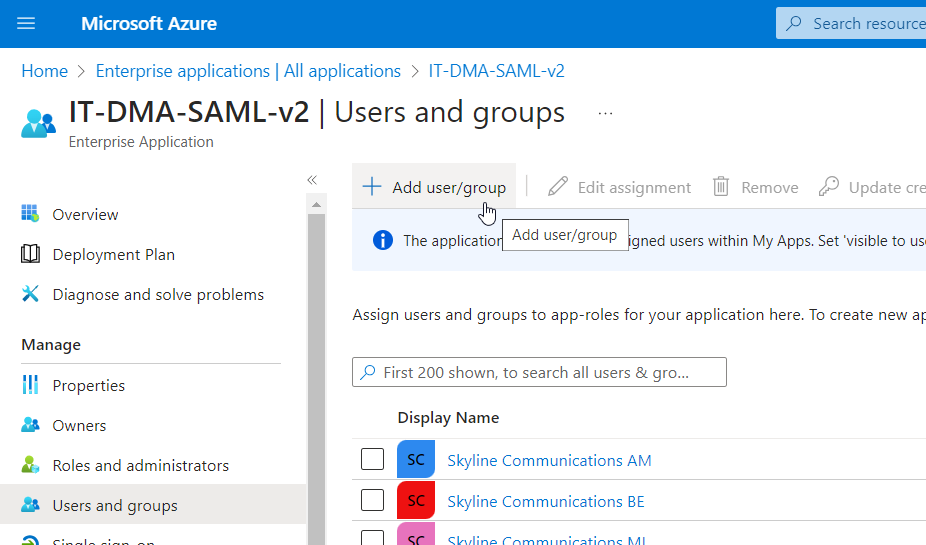
In the pane on the left, go to Users and groups.
Use the Add user/group button to add the necessary users and groups and assign the necessary roles.
Note
Make sure the Email field is filled in for all users. Azure will not authenticate users with an empty Email field.
Go to Single sign-on, and click Edit next to Basic SAML Configuration.
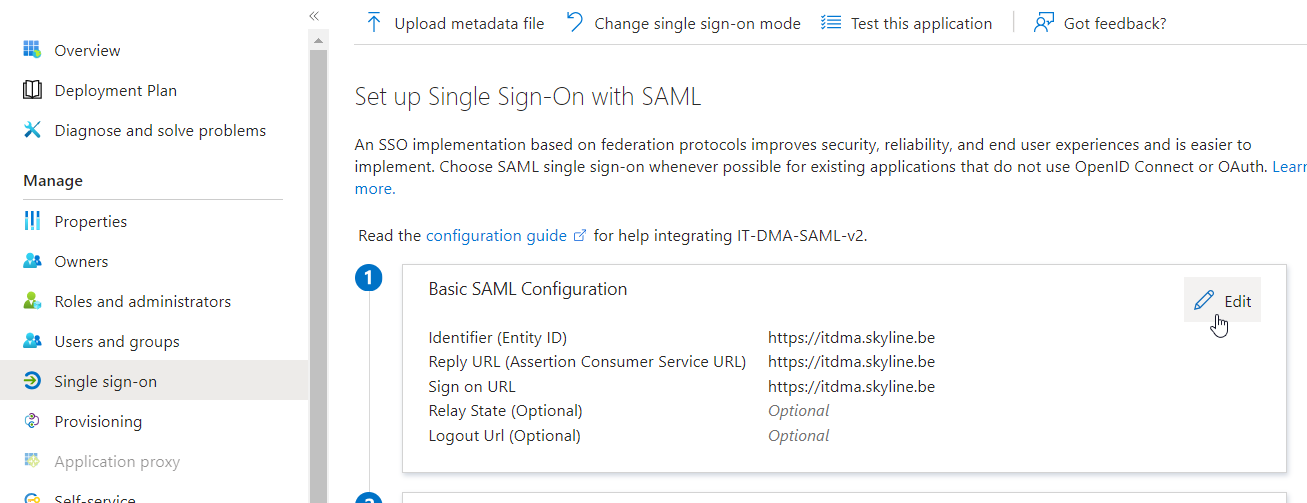
Configure the following settings for the basic SAML configuration:
Set Entity ID to the IP address or the DNS name of your DataMiner System, for example
https://dataminer.example.com/.If your DMS consists of DMAs accessible via different URLs or IP addresses, choose one URL or IP address to use as the entity ID.
Under Reply URL, specify the following URL(s), replacing
dataminer.example.comwith the IP address or DNS name of your DataMiner System (note the trailing "/"):From DataMiner 10.3.5 onwards:
https://dataminer.example.com/API/
For older DataMiner versions only:
https://dataminer.example.com/root/https://dataminer.example.com/ticketing/https://dataminer.example.com/jobs/https://dataminer.example.com/monitoring/https://dataminer.example.com/dashboard/https://dataminer.example.com/API/https://dataminer.example.com/
If the DMA is connected to dataminer.services, also add the following URLs, replacing
<dms-dns-name>with the DNS name of the DataMiner System and<organization-name>with the name of the organizationhttps://<dms-dns-name>-<organization-name>.on.dataminer.services/API/https://<dms-dns-name>-<organization-name>.on.dataminer.services/account-linkinghttps://<dms-dns-name>-<organization-name>.on.dataminer.services/account-linking/
Note
If your DMS consists of DMAs accessible via different URLs, specify all of those URLs under Reply URL, as detailed above. Otherwise, if a URL is used that is not specified there, this will result in an error.

Set Sign on URL to the IP address or DNS name of your DataMiner System, for example
https://dataminer.example.com/.If your DMS consists of DMAs accessible via different URLs, specify only the most commonly used URL here.
In the top-left corner, click Save.
Still on the Single sign-on page, look for the SAML Certificates section and copy the App Federation Metadata Url.
You will need this later, for the ipMetadata configuration in DataMiner.xml.
Creating a DataMiner metadata file
Create a new XML file named spMetadata.xml.
We recommend placing this file in the
C:\Skyline DataMinerfolder, though it is possible to put it in a different location.Copy the following template into spMetadata.xml:
From DataMiner 10.3.5 onwards:
<?xml version="1.0" encoding="UTF-8"?>
<md:EntityDescriptor xmlns:md="urn:oasis:names:tc:SAML:2.0:metadata" xmlns:ds="http://www.w3.org/2000/09/xmldsig#" entityID="[ENTITYID]" validUntil="2050-01-04T10:00:00.000Z">
  <md:SPSSODescriptor AuthnRequestsSigned="false" WantAssertionsSigned="true" protocolSupportEnumeration="urn:oasis:names:tc:SAML:2.0:protocol">
    <md:AssertionConsumerService Binding="urn:oasis:names:tc:SAML:2.0:bindings:HTTP-POST" Location="https://dataminer.example.com/API/" index="0" isDefault="true"/>
  </md:SPSSODescriptor>
</md:EntityDescriptor>
Older DataMiner versions:
<?xml version="1.0" encoding="UTF-8"?>
<md:EntityDescriptor xmlns:md="urn:oasis:names:tc:SAML:2.0:metadata" xmlns:ds="http://www.w3.org/2000/09/xmldsig#" entityID="[ENTITYID]" validUntil="2050-01-04T10:00:00.000Z">
  <md:SPSSODescriptor AuthnRequestsSigned="false" WantAssertionsSigned="true" protocolSupportEnumeration="urn:oasis:names:tc:SAML:2.0:protocol">
    <md:AssertionConsumerService Binding="urn:oasis:names:tc:SAML:2.0:bindings:HTTP-POST" Location="https://dataminer.example.com/" index="0" isDefault="true"/>
    <md:AssertionConsumerService Binding="urn:oasis:names:tc:SAML:2.0:bindings:HTTP-POST" Location="https://dataminer.example.com/API/" index="1" isDefault="false"/>
    <md:AssertionConsumerService Binding="urn:oasis:names:tc:SAML:2.0:bindings:HTTP-POST" Location="https://dataminer.example.com/root/" index="2" isDefault="false"/>
    <md:AssertionConsumerService Binding="urn:oasis:names:tc:SAML:2.0:bindings:HTTP-POST" Location="https://dataminer.example.com/dashboard/" index="3" isDefault="false"/>
    <md:AssertionConsumerService Binding="urn:oasis:names:tc:SAML:2.0:bindings:HTTP-POST" Location="https://dataminer.example.com/monitoring/" index="4" isDefault="false"/>
    <md:AssertionConsumerService Binding="urn:oasis:names:tc:SAML:2.0:bindings:HTTP-POST" Location="https://dataminer.example.com/jobs/" index="5" isDefault="false"/>
    <md:AssertionConsumerService Binding="urn:oasis:names:tc:SAML:2.0:bindings:HTTP-POST" Location="https://dataminer.example.com/ticketing/" index="6" isDefault="false"/>
  </md:SPSSODescriptor>
</md:EntityDescriptor>
For a DMA connected to dataminer.services, add the three following additional bindings within the
<md:SPSSODescriptor>element:<md:SPSSODescriptor AuthnRequestsSigned="false" WantAssertionsSigned="true" protocolSupportEnumeration="urn:oasis:names:tc:SAML:2.0:protocol"> ... <md:AssertionConsumerService Binding="urn:oasis:names:tc:SAML:2.0:bindings:HTTP-POST" Location="https://<dms-dns-name>-<organization-name>.on.dataminer.services/API/" index="1" isDefault="false"/> <md:AssertionConsumerService Binding="urn:oasis:names:tc:SAML:2.0:bindings:HTTP-POST" Location="https://<dms-dns-name>-<organization-name>.on.dataminer.services/account-linking" index="2" isDefault="false"/> <md:AssertionConsumerService Binding="urn:oasis:names:tc:SAML:2.0:bindings:HTTP-POST" Location="https://<dms-dns-name>-<organization-name>.on.dataminer.services/account-linking/" index="3" isDefault="false"/> </md:SPSSODescriptor>
Replace [ENTITYID] with the URL or IP address you specified as the Entity ID while setting up the Microsoft Entra ID Enterprise application.
Replace
https://dataminer.example.comwith the IP address or the DNS name of your DataMiner System. The specified URL(s) must match the Reply URL you specified while setting up the Microsoft Entra ID Enterprise application.If you are configuring this for a DataMiner Agent connected to dataminer.services, replace
<dms-dns-name>with the DNS name of the DataMiner System and<organization-name>with the name of the organization.For example, if the DNS name is "dataminer" and the organization name is "skyline", the first URL is
https://dataminer-skyline.on.dataminer.services/API/.If you are using DataMiner 10.2.1/10.2.0 or higher, make sure
WantAssertionsSignedis set to true.Note
This flag must be set to true because SAML responses without signatures can be freely edited to tamper with permissions for the application, leading to severe vulnerabilities. In DataMiner versions prior to DataMiner 10.2.1/10.2.0, setting this flag to true is not yet supported, so we highly recommend upgrading to a more recent DataMiner version.
Configuring DataMiner.xml to use external authentication
Go to the folder
C:\Skyline DataMinerand open the DataMiner.xml file.In DataMiner.xml, configure the
<ExternalAuthentication>tag as illustrated in the example below:<DataMiner ...> ... <ExternalAuthentication type="SAML" ipMetadata="[Path/URL of the identity provider’s metadata file]" spMetadata="[Path/URL of the DataMiner’s metadata file]" timeout="300" /> ... </DataMiner>type:
SAML(Identity federation using SAML assertions)ipMetadata: The path to or the URL of the identity provider's metadata file, which you copied while setting up the Microsoft Entra ID Enterprise application.
spMetadata: The path to or the URL of the DataMiner metadata file you created earlier.
timeout: Optional. The amount of time DataMiner should wait for the user to be authenticated by the identity provider. If this attribute is not specified, DataMiner will wait 300 seconds (5 minutes).
Save and close the file, and restart the DMA.
Configuring user provisioning
Once authentication has been configured, you need to make sure users are provisioned. There are two ways to do this:
- By importing users and groups from Microsoft Entra ID into DataMiner.
- By configuring automatic creation of users. This way, when a user authenticates using SAML, they will automatically be added in DataMiner.
Caution
If there are two DataMiner users who share the same email address, both users will not be able to log in. To prevent this from happening, we recommended using only one method to add users. For example, do not add Windows domain users if the Entra ID users use the same email address.
Configuring DataMiner to import users and groups from Microsoft Entra ID
Important
If you import over 1000 users or groups, it may take some time before the import is complete. Avoid importing over 10,000 users and groups, as this can result in a timeout.
Note
Prior to DataMiner 10.3.0 [CU12]/10.4.3, the following are not supported: usernames with non-ASCII characters, multiple users with the same first name and surname, and users for which the first name and surname are not provisioned.
Navigate to
portal.azure.comand log in.In the search box at the top, enter App registrations to go to the App registrations page.
Select All applications and use the filter box to find the application you created for DataMiner.
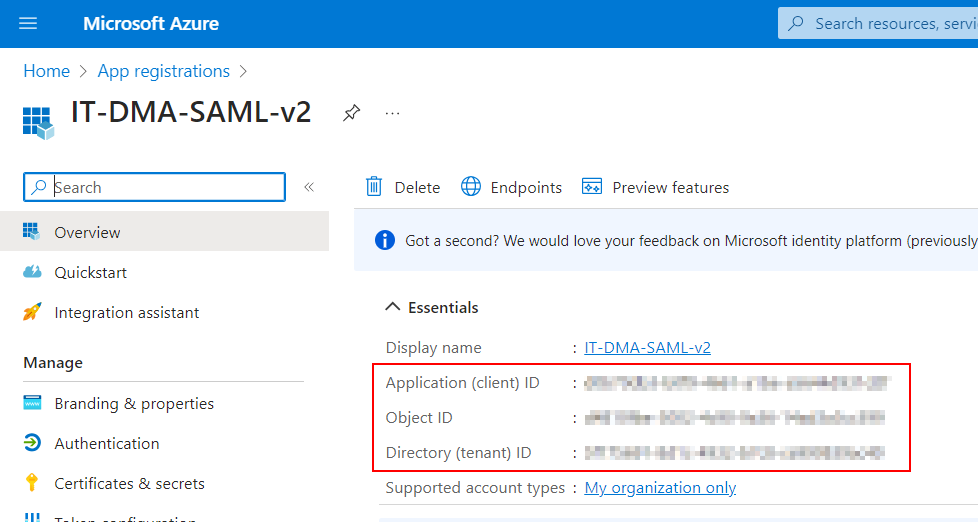
Select the application to view a page with more detailed information.
Gather the following information from this page:
Application (client) ID
Object ID (optional from 10.3.11/10.4.0 onwards)
Directory (tenant) ID
These GUIDs identify the application (DataMiner) in the Entra ID platform, and identify the users & groups directory on the Azure portal, respectively. You will need these later in this procedure.
Note
Do not use the Object ID under Azure Active Directory > Enterprise applications > [your application name]. This is a different Object ID, which will not work for this procedure.
In the pane on the left, select Certificates & secrets.
In the Client secrets section, select New client secret.
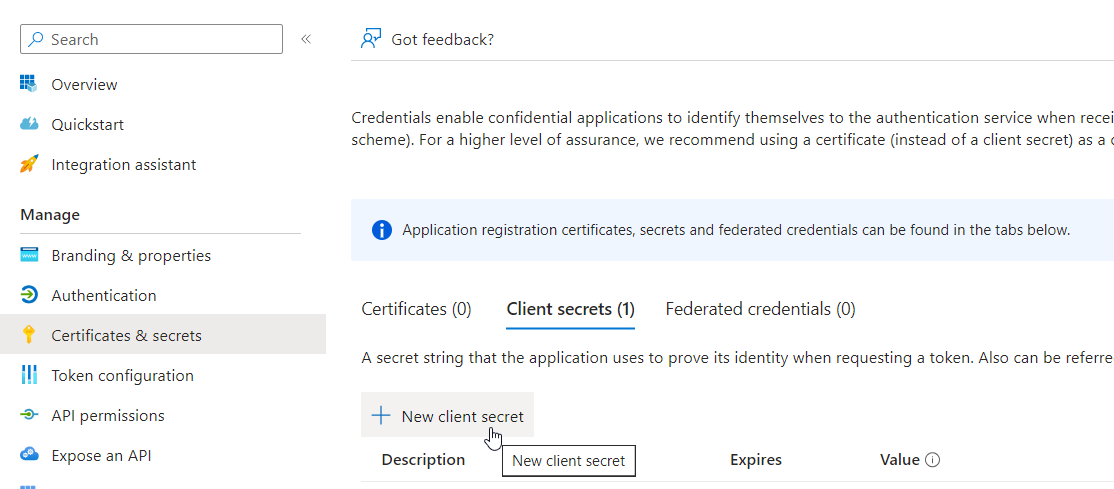
Enter a description and an expiration date for the application secret, and click Add.
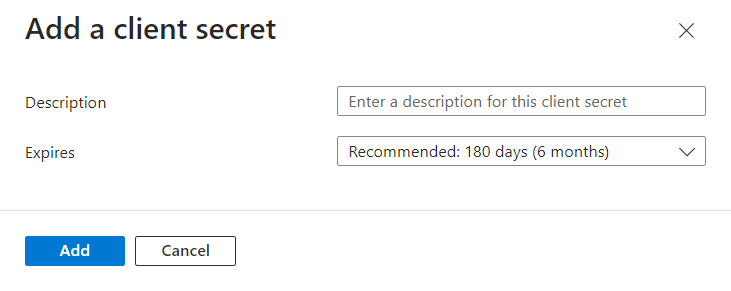
Copy the secret value for later on. You will need this value later in this procedure.
Important
Once you leave this page, you will no longer be able to access the secret value.
Stop the DataMiner Agent for which you want to configure this.
Note
It is possible to configure different methods of authentication for different DMAs in a DataMiner System. You can for example configure one DMA to import users and groups from Entra ID, but use local accounts to log in on a different DMA.
On the DataMiner server, go to the folder
C:\Skyline DataMinerand open the DataMiner.xml file.In DataMiner.xml, specify the information you previously gathered using the same syntax as in the following example:
<AzureAD tenantId="[GUID]" objectId="[GUID]" clientId="[GUID]" clientSecret="[the DataMiner application secret value]" />- tenantId: Directory (tenant) ID from Azure.
- objectId: Object ID from Azure.
- clientId: Application (client) ID from Azure.
- clientSecret: The client secret you created earlier.
Save the file and restart DataMiner.
Note
After you restart DataMiner, the specified client secret will be replaced by a GUID in the DataMiner.xml file.
In the Azure portal, go back to the root page for the DataMiner application under App registrations.
In the pane on the left, select API Permissions.
Make sure the following permissions are enabled:
Microsoft Graph > GroupMember.Read.All – Application – Read groups memberships
Microsoft Graph > User.Read.All – Application - Read all users' full profiles
Microsoft Graph > User.Read – Delegated – Sign in and read user profile
Microsoft Graph > Application.Read.All – Application – Read applications
Important
For the GroupMember.Read.All, User.Read.All and Application.Read.All permissions, administrator permissions are required.
Note
From DataMiner 10.3.12 onwards, the Application.Read.All permission is optional. However, if you do not enable this permission, you will not get a warning if your client secret is about to expire, so we strongly recommend that you enable this. If this is enabled, you will get the following notice in the Alarm Console when appropriate: Your Azure AD application's client secret is expiring soon.
Open DataMiner Cube and log in with an existing Administrator account.
Add the users/groups as described under Adding a user and Adding a user group. Select to add an existing user or group in order to add users and groups available on Entra ID.
When you have added the necessary users, configure their permissions. See Configuring a user group.
Users will now be able to log in to DataMiner with any of the Entra ID user accounts you have added, using either the domain and username (DOMAIN\user) or the email address.
Note
Prior to DataMiner 10.3.0 [CU12]/10.4.3, usernames of imported users have the format
{organization}\{givenName}.{surname}. From DataMiner 10.3.0 [CU12]/10.4.3 onwards, they have the format{domain}\{username}. For example, the username "ZIINE\Björn.Waldegård" in older DataMiner versions becomes "ziine.com\bjorn.waldegard" from DataMiner 10.3.0 [CU12]/10.4.3 onwards.
Configuring automatic creation of users authenticated by Entra ID using SAML
From DataMiner 10.2.0/10.1.12 onwards, users authenticated by Entra ID using SAML can be automatically created and assigned to groups in DataMiner. This is often referred to as JIT (Just-In-Time) Provisioning.
There are two ways to configure this setup: with or without group claims.
With group claims, when a user logs in for the first time, they will be added to an existing group that exists both in Entra ID and in DataMiner.
Without group claims, any user that logs in for the first time will be added to one default security group, which you will need to configure during the setup detailed below. This is easier to configure, but has the disadvantage that user information that is created will not be updated.
Navigate to
portal.azure.comand log in.In the search box at the top, enter Enterprise applications to go to the Enterprise Applications page.
Select the application you created for DataMiner.
In the pane on the left on your DataMiner application page, click Single sign-on.
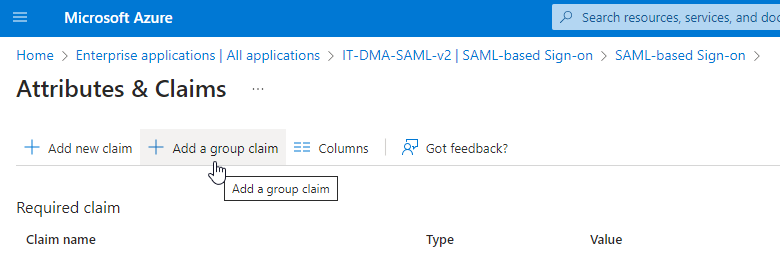
Next to Attributes & Claims, click Edit.

Note
Make sure that the identity provider claims "givenname", "surname", "emailaddress", "name", and "Unique User Identifier" are present, matching the screenshot above.
Click Add a group claim.
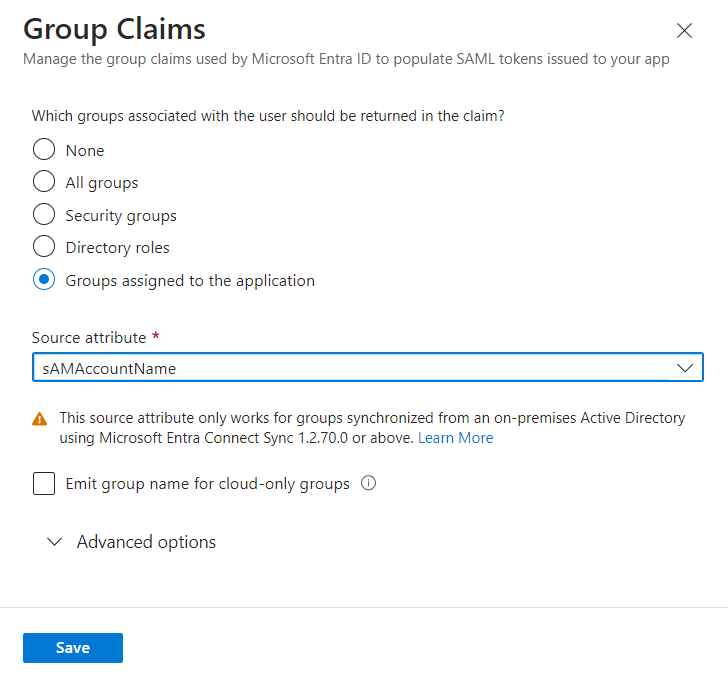
Configure the group claim:
Select to include Groups assigned to the application.
With this option, the groups you configured when setting up the application will be included in the group claim.
Under Source attribute, select one of the following options from the dropdown list, depending on your setup:
If Entra ID is synced with an on-premises Active Directory, select sAMAccountName.
If the groups only exist on Azure, select Cloud-only group display names.
Optionally, expand the advanced options to add a filter or customize the name of the group claim.
Click Save.
Important
Double-check which settings you should use: only select sAMAccountName if Entra ID is synced with an on-premises Active Directory. If the groups only exist on Azure, set the Source attribute to Cloud-only group display names.
This is because the account name of the group will only be sent via SAML when the groups are synchronized (from an on-premises AD). Otherwise, the ID of the group will be sent instead.
In DataMiner Cube, add the groups corresponding with the groups you included in the group claim in Entra ID. See Adding a user group.
Stop DataMiner.
Go to the
C:\Skyline DataMinerfolder and open the DataMiner.xml file.In DataMiner.xml, add the
<AutomaticUserCreation>tag as illustrated in the example below.The tags
<EmailClaim>,<Givenname>, and<Surname>define the names of the claims on the service provider's side. Make sure that in these tags, the claim is defined using the appropriate XML prefix illustrated below (e.g.http://schemas.xmlsoap.org/ws/2005/05/identity/claims/).Make sure that the name of each claim (i.e. the part after the XML prefix, e.g. emailaddress, givenname, surname) matches the identity provider claims that were shown under Attributes & Claims in the Azure portal earlier.
<DataMiner ...>
  ...
  <ExternalAuthentication
    type="SAML"
    ipMetadata="[Path/URL of the identity provider’s metadata file]"
    spMetadata="[Path/URL of DataMiner's metadata file]"
    timeout="300">
    <AutomaticUserCreation enabled="true">
      <EmailClaim>http://schemas.xmlsoap.org/ws/2005/05/identity/claims/emailaddress</EmailClaim>
      <Givenname>http://schemas.xmlsoap.org/ws/2005/05/identity/claims/givenname</Givenname>
      <Surname>http://schemas.xmlsoap.org/ws/2005/05/identity/claims/surname</Surname>
      <Groups claims="true">http://schemas.microsoft.com/ws/2008/06/identity/claims/groups</Groups>
    </AutomaticUserCreation>
  </ExternalAuthentication>
  ...
</DataMiner>
Important
XML is case-sensitive, so make sure the capitalization from the identity provider matches that in DataMiner.xml. If you for example add the claim givenName in the Azure portal but then set the
<Givenname>tag tohttp://schemas.xmlsoap.org/ws/2005/05/identity/claims/givennamehere, the difference in casing will make it impossible to log in.Save the DataMiner.xml file.
Restart the DataMiner Agent.