Variables
Variables are reusable data objects that can be dynamically updated. They are defined independently from components and can be passed to components as data, linked in a query, used in a flow, and more.
Variables are available starting from DataMiner 10.3.0 [CU21]/10.4.0 [CU9]/10.4.12.
Creating a variable
To create a new variable:
In edit mode, go to the Data pane on the right, expand the Variables item, and click the + icon.
Specify a name for the variable. This name must be unique within the dashboard or the low-code app.
In the dropdown menu, select the variable type:
Element
Service
View
Object manager instance
Text
Boolean (available from DataMiner 10.4.0 [CU12]/10.5.3 onwards)
Number
Table
Optionally, enable the Read-only setting if you want the variable's value to remain fixed and unchangeable when interacting with the app. This setting is only available for Low-Code Apps, as Dashboard variables are always read-only.
Depending on the selected variable type, specify the default value for the variable.
Note
In a low-code app, specifying a default value for a variable is optional, unless the variable is set to Read-only.
Default element: Enter the name of an element in your DataMiner System or select one from the dropdown list.
Default service: Enter the name of a service in your DataMiner System or select on from the dropdown list.
Default view: Enter the name of a view in your DataMiner System or select from the dropdown list.
Default object manager instance:
Enter the name of a module in your DataMiner System or select from the dropdown list.
Enter the name of an instance in your DataMiner System or select from the dropdown list.
From DataMiner 10.4.0 [CU10]/10.5.0/10.5.1 onwards, select Apply to confirm your chosen DOM module and instance.
Default text: Enter custom text.
Default boolean: Choose True to enable the boolean variable by default, False to disable it, or Empty to leave it unset until a value is specified.
Default number: Enter a number or use the arrow icons to increase or decrease the value.
Default table: Configure a static table.
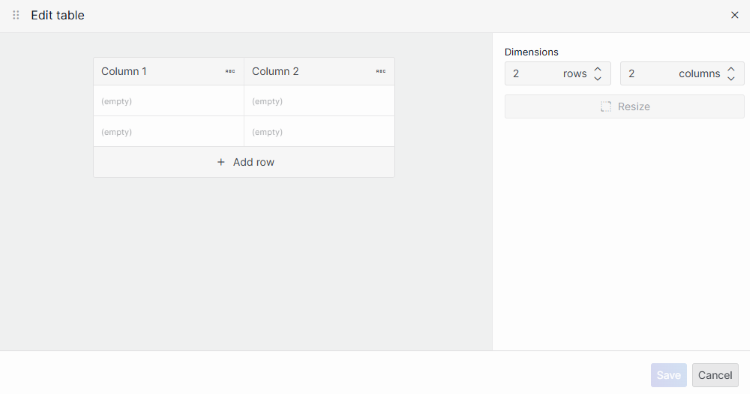
Click the cogwheel icon to open the table editor.

Table editor in DataMiner 10.4.12Under Dimensions, select the desired number of rows and columns and click Resize.
Note
- A table can contain a maximum of 20 columns and 100 rows.
- To add a row or column, hover over the table and click the + icon in the desired location.
- To change the order of rows or columns, click the
 or
or  and drag the row or column to your preferred position.
Enter names for each column.
Add content to the cells.
Click "ABC" in the top-right corner of a column header to select the data type (text, number, or boolean) for that column.

Table editor in DataMiner 10.4.12Select a cell and enter a raw value, which will be used for business logic, such as sorting and filtering.
Optionally, add a different display value, which will be used in the user interface. If left untouched, the display value defaults to the raw value.
Note
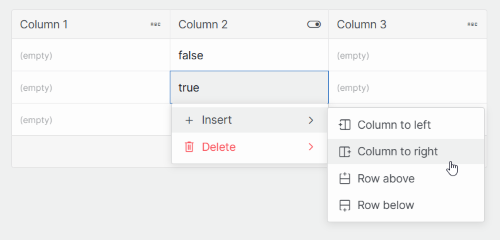
Right-click a column header to insert or delete a column or change its data type.
Right-click a cell to insert or delete a row or column.

Table editor in DataMiner 10.4.12
Click Save in the lower right corner.
Click the
 button to stop editing the variable.