Changing the spectrum analyzer settings
With the settings pane on the right side of the card, you can change the settings that determine what trace is retrieved. The trace window is then immediately updated according to the changes.
In the Settings pane, in the tab Manual > Settings, you can modify the settings like any other parameter in Cube. Just enter or select the new value, and click the green tick mark. If you want to modify several settings at the same time, you can also specify the new values and then click Apply all below the list of settings.
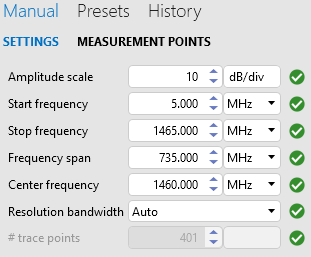 Spectrum analyzer settings in DataMiner 10.4.1
In most spectrum elements, the following settings are available, though this depends on the protocol:
Reference level: The amplitude reference level. Different units can be selected for the value you enter, e.g. dBm, dBmV, mV.
From DataMiner 10.2.0 [CU22]/10.3.0 [CU10]/10.4.1 onwards, you can also change the reference level using the pencil next to the reference level Y-axis label in the real-time display section of the spectrum analyzer card.
From DataMiner 10.4.0 [CU14]/10.5.0 [CU2]/10.5.5 onwards, you can auto-adjust the reference level (together with the amplitude scale) using the
 button next to the reference level Y-axis label in the real-time display section of the spectrum analyzer card.
Amplitude scale: The scale used in the real-time display. Select a different value to change the size of each square in the grid.
From DataMiner 10.4.0 [CU14]/10.5.0 [CU2]/10.5.5 onwards, you can auto-adjust the amplitude scale (together with the reference level) using the
button next to the reference level Y-axis label in the real-time display section of the spectrum analyzer card.Start frequency: The start frequency of the displayed frequency span. Different units can be selected for the value you enter, e.g. kHz, GHz.
Stop frequency: The stop frequency of the displayed frequency span. Different units can be selected for the value you enter, e.g. kHz, GHz.
Frequency span: The range between the start and stop frequencies.
From DataMiner 10.2.0 [CU22]/10.3.0 [CU10]/10.4.1 onwards, you can set the frequency span to 0 to enter zero-span mode. The X-axis will then change to a time axis instead of a frequency axis, using the sweeptime as its time indicator. All other frequency-related features will be disabled.
Center frequency: The frequency in the middle of the display’s frequency axis. Different units can be selected for the value you enter, e.g. kHz, GHz.
From DataMiner 10.2.0 [CU22]/10.3.0 [CU10]/10.4.1 onwards, you can also change the center frequency using the pencil next to the center frequency X-axis label in the real-time display section of the spectrum analyzer card.
Resolution bandwidth: RBW filter. Can be set to auto, or to a custom value that can be selected in the drop-down list.
From DataMiner 10.2.0 [CU21]/10.3.0 [CU9]/10.3.12 onwards, you can also change the resolution bandwidth (RBW) in the info pane, to the right of the real-time display on the spectrum analyzer card, by clicking the plus ("+") or minus ("-") buttons.
Video bandwidth: VBW filter. Can be set to auto, or to a custom value that can be selected in the drop-down list.
From DataMiner 10.2.0 [CU21]/10.3.0 [CU9]/10.3.12 onwards, you can also change the video bandwidth (VBW) in the info pane, to the right of the real-time display on the spectrum analyzer card, by clicking the plus ("+") or minus ("-") buttons.
Sweeptime: The time that the analyzer takes to tune across the displayed frequency span. Can either be set to auto by selecting the checkbox, or to a custom value by clearing the checkbox and selecting the value in the drop-down list.
Input attenuation: This will amplify or lower the signal strength at the input of the spectrum analyzer, in order to improve measuring accuracy.
Note
- Either Start frequency and Stop frequency or Frequency span and Center frequency are used in order to determine the frequency settings. Only one of these pairs should be used. If both are used, priority is given to Start frequency and Stop frequency, and Frequency span and Center frequency will not work properly.
- If at the top of the settings panel “(From device)” is displayed, the settings have been loaded from the device. This happens when the spectrum element is configured to follow the device settings (see Configuring a spectrum element to follow the device settings).