Creating an API to retrieve elements in alarm
Important
We highly recommend following the hello world tutorial before you start this tutorial, as it builds on the knowledge of that first tutorial.
In this tutorial, you will build a more realistic use case for an API. This API will allow you to retrieve a list of elements that have alarms with a specified alarm level. It will process and validate the input, get all the elements according to this input, and return them as a JSON response.
The content and screenshots for this tutorial were created in DataMiner version 10.3.9.
Overview
- Step 1: Create the Automation script
- Step 2: Create an API token
- Step 3: Create the API definition
- Step 4: Trigger the API using Postman
Step 1: Create the Automation script
To develop this new API script, you can use the Automation script solution from the hello world tutorial. Make sure you have this solution open in Visual Studio. You will need a new script project to develop this new API.
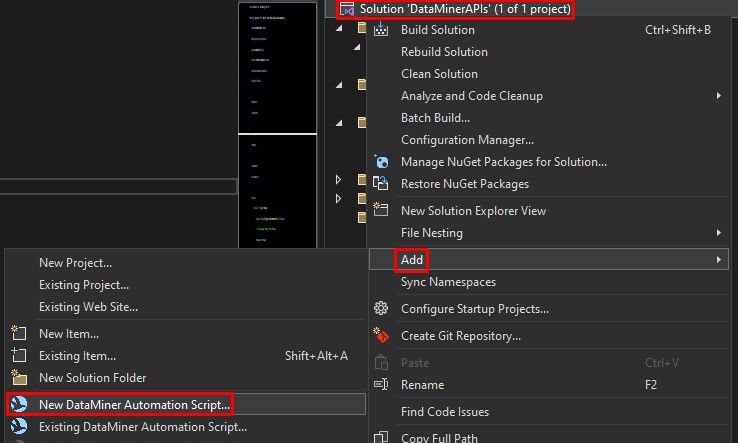
In Visual Studio, right-click the solution at the top of the Solution Explorer, and select Add > New DataMiner Automation Script.
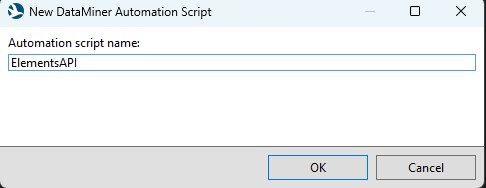
In the dialog, enter the name "ElementsAPI".
The new Automation project has now been created for this API script. In the next sections, you will expand this script step by step:
- Prepare the script
- Store user input
- Validate user input
- Expand the user input with JSON
- Retrieve the element data
- Publish the script
Prepare the script
Before the API logic can be written, the API script wrapper code needs to be present. The default run method should be replaced with a special entry point method.
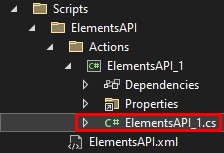
Double-click the ElementsAPI_1.cs file in the Solution Explorer.
In the code window, remove the default
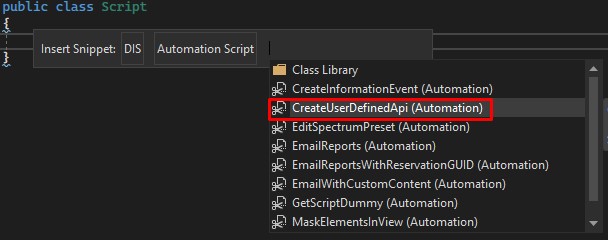
Run(IEngine engine)method.Right-click the empty line between the Script class brackets and select Snippet > Insert Snippet.

Select the snippet DIS > Automation Script > CreateUserDefinedAPI.
The script has now been updated with the OnApiTrigger(IEngine, ApiTriggerInput) method. You can also remove the comments and unused "using" directives. This should result in the following script code:
namespace ElementsAPI_1
{
    using Skyline.DataMiner.Automation;
    using Skyline.DataMiner.Net.Apps.UserDefinableApis;
    using Skyline.DataMiner.Net.Apps.UserDefinableApis.Actions;

    public class Script
    {

        [AutomationEntryPoint(AutomationEntryPointType.Types.OnApiTrigger)]
        public ApiTriggerOutput OnApiTrigger(IEngine engine, ApiTriggerInput requestData)
        {
            return new ApiTriggerOutput
            {
                ResponseBody = "Succeeded",
                ResponseCode = (int)StatusCode.Ok,
            };
        }
    }
}
Store user input
For this API, the input from the user should be the alarm level (minor, major, etc.) for which the user wants to see the elements. Anything passed in the body of the API request will be available as a string in the RawBody property of the requestData input argument of the entrypoint method. This content of the rawBody can be stored in a variable.
namespace ElementsAPI_1
{
    using Skyline.DataMiner.Automation;
    using Skyline.DataMiner.Net.Apps.UserDefinableApis;
    using Skyline.DataMiner.Net.Apps.UserDefinableApis.Actions;

    public class Script
    {
        [AutomationEntryPoint(AutomationEntryPointType.Types.OnApiTrigger)]
        public ApiTriggerOutput OnApiTrigger(IEngine engine, ApiTriggerInput requestData)
        {
            var alarmLevel = requestData.RawBody;

            return new ApiTriggerOutput
            {
                ResponseBody = "Succeeded",
                ResponseCode = (int)StatusCode.Ok,
            };
        }
    }
}
Validate user input
The API will currently accept any string as input, even if this is not a valid alarm level. This is why there should be a validation step.
You can add a collection of valid alarm levels, which will be used to check the input. If no valid match is found, a clear error can be returned.
For the response code, the integer representation of the StatusCode.BadRequest enum option can be assigned. This will cause the response of the API to be clearly marked as a user request error with the appropriate response code (400).
namespace ElementsAPI_1
{
    using System.Collections.Generic;
    using Skyline.DataMiner.Automation;
    using Skyline.DataMiner.Net.Apps.UserDefinableApis;
    using Skyline.DataMiner.Net.Apps.UserDefinableApis.Actions;

    public class Script
    {
        private readonly List<string> _knownAlarmLevels
            = new List<string> { "Warning", "Minor", "Major", "Critical" };

        [AutomationEntryPoint(AutomationEntryPointType.Types.OnApiTrigger)]
        public ApiTriggerOutput OnApiTrigger(IEngine engine, ApiTriggerInput requestData)
        {
            var alarmLevel = requestData.RawBody;

            if (string.IsNullOrWhiteSpace(alarmLevel) || !_knownAlarmLevels.Contains(alarmLevel))
            {
                return new ApiTriggerOutput()
                {
                    ResponseBody =
                        $"Invalid alarm level passed, possible values are: ${string.Join(",", _knownAlarmLevels)}",
                    ResponseCode = (int)StatusCode.BadRequest,
                };
            }

            return new ApiTriggerOutput
            {
                ResponseBody = "Succeeded",
                ResponseCode = (int)StatusCode.Ok,
            };
        }
    }
}
Expand the user input with JSON
On large systems, this API could potentially return a large number of records. To prevent performance issues, this should be limited to a certain number, which can also be provided by the user.
The current version of the script expects only one single string value from the body, but now two will have to be sent. This is where JSON can be used to structure the input data and allow you to make APIs that expect multiple input values.
To use JSON, you will need to include the Newtonsoft.Json NuGet package.
In Visual Studio, right-click the project ElementsAPI_1 and click Manage NuGet packages.
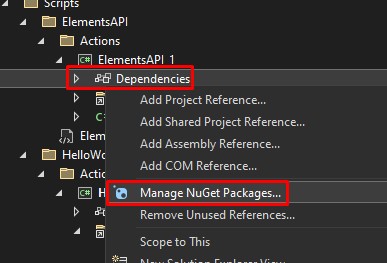
In the window that opens, click Browse at the top.

Now search for "Newtonsoft.Json", and click the first package.
On the right, click Install.

Note
You could also use the built-in parameter conversion instead of doing the JSON deserialization within this script. This could be a simpler approach if you are less familiar with it. To find out more, see User input data.
To convert (i.e. deserialize) the input JSON to data that can be used in the script, you will have to define a class that contains all the input data that is expected. In this case, the input would look like this:
{
    "alarmLevel" : "Minor",
    "limit" : 10
}
The C# class should then look like this:
public class Input
{
    public string AlarmLevel { get; set; }

    public int Limit { get; set; }
}
When this is done, you can add the actual conversion. By calling JsonConvert.DeserializeObject<Input>(), you can easily do so. The library will parse the input and return an instance of the input class where the values have been mapped to the values provided in that JSON input.
When the input data is not correctly formatted, exceptions can be thrown. This is why a try-catch statements should be placed around this conversion. When an exception occurs, a clear error can be returned explaining this. A check can be added at the start of the script that returns an error when the body is empty. This will reduce the number of scenarios where things can go wrong.
Note that there are also JsonSerializerSettings defined. These ensure that the conversion will always accept and output camel-case JSON names, which is the recommended casing type for JSON. ("alarmLevel" instead of "AlarmLevel")
namespace ElementsAPI_1
{
    using System.Collections.Generic;
    using Models;
    using Skyline.DataMiner.Automation;
    using Skyline.DataMiner.Net.Apps.UserDefinableApis;
    using Skyline.DataMiner.Net.Apps.UserDefinableApis.Actions;
    using Newtonsoft.Json;
    using Newtonsoft.Json.Serialization;

    public class Script
    {
        private readonly List<string> _knownAlarmLevels
            = new List<string> { "Warning", "Minor", "Major", "Critical" };

        private readonly JsonSerializerSettings _serializerSettings
            = new JsonSerializerSettings()
            {
                ContractResolver = new CamelCasePropertyNamesContractResolver(),
            };

        [AutomationEntryPoint(AutomationEntryPointType.Types.OnApiTrigger)]
        public ApiTriggerOutput OnApiTrigger(IEngine engine, ApiTriggerInput requestData)
        {
            if (string.IsNullOrWhiteSpace(requestData.RawBody))
            {
                return new ApiTriggerOutput()
                {
                    ResponseBody = "Request body cannot be empty",
                    ResponseCode = (int)StatusCode.BadRequest,
                };
            }

            Input input;
            try
            {
                input = JsonConvert.DeserializeObject<Input>(
                    requestData.RawBody ?? string.Empty, _serializerSettings);
            }
            catch
            {
                return new ApiTriggerOutput()
                {
                    ResponseBody = "Could not parse request body.",
                    ResponseCode = (int)StatusCode.InternalServerError,
                };
            }

            if (string.IsNullOrWhiteSpace(input.AlarmLevel) || !_knownAlarmLevels.Contains(input.AlarmLevel))
            {
                return new ApiTriggerOutput()
                {
                    ResponseBody =
                        $"Invalid alarm level passed, possible values are: ${string.Join(",", _knownAlarmLevels)}",
                    ResponseCode = (int)StatusCode.BadRequest,
                };
            }

            return new ApiTriggerOutput
            {
                ResponseBody = "Succeeded",
                ResponseCode = (int)StatusCode.Ok,
            };
        }
    }
}

namespace Models
{
    public class Input
    {
        public string AlarmLevel { get; set; }

        public int Limit { get; set; }
    }
}
Retrieve the element data
After the input data is converted and validated, it can be used to retrieve the actual element data. This logic should preferably be put into a separate method called GetElements(). This method:
- Accepts the input data.
- Converts it to a filter.
- Requests the elements from DataMiner via IEngine.
- Converts the element data to a specific
ElementInfooutput class. - Ensures the number of records does not exceed the limit set by the input.
Just like with the input data conversion, exceptions could occur when data is retrieved from the system. This why a try-catch statement is recommended here as well. Another clear error can be returned when something goes wrong.
As you can see at the bottom of the script, an ElementInfo class has been defined, which will be used to generate the JSON response. Defining your own types is recommended. This way you have full control over what is included and how it will be serialized. Avoid serializing a class from an external DLL, as there is no guarantee this will remain functional after updates.
namespace ElementsAPI_1
{
    using System.Linq;
    using System.Collections.Generic;
    using Models;
    using Skyline.DataMiner.Automation;
    using Skyline.DataMiner.Net.Apps.UserDefinableApis;
    using Skyline.DataMiner.Net.Apps.UserDefinableApis.Actions;
    using Newtonsoft.Json;
    using Newtonsoft.Json.Serialization;

    public class Script
    {
        private readonly List<string> _knownAlarmLevels
            = new List<string> { "Warning", "Minor", "Major", "Critical" };

        private readonly JsonSerializerSettings _serializerSettings
            = new JsonSerializerSettings()
            {
                ContractResolver = new CamelCasePropertyNamesContractResolver(),
            };

        [AutomationEntryPoint(AutomationEntryPointType.Types.OnApiTrigger)]
        public ApiTriggerOutput OnApiTrigger(IEngine engine, ApiTriggerInput requestData)
        {
            if (string.IsNullOrWhiteSpace(requestData.RawBody))
            {
                return new ApiTriggerOutput()
                {
                    ResponseBody = "Request body cannot be empty",
                    ResponseCode = (int)StatusCode.BadRequest,
                };
            }

            Input input;
            try
            {
                input = JsonConvert.DeserializeObject<Input>(
                    requestData.RawBody ?? string.Empty, _serializerSettings);
            }
            catch
            {
                return new ApiTriggerOutput()
                {
                    ResponseBody = "Could not parse request body.",
                    ResponseCode = (int)StatusCode.InternalServerError,
                };
            }

            if (string.IsNullOrWhiteSpace(input.AlarmLevel) || !_knownAlarmLevels.Contains(input.AlarmLevel))
            {
                return new ApiTriggerOutput()
                {
                    ResponseBody =
                        $"Invalid alarm level passed, possible values are: ${string.Join(",", _knownAlarmLevels)}",
                    ResponseCode = (int)StatusCode.BadRequest,
                };
            }

            List<ElementInfo> elements;
            try
            {
                elements = GetElements(engine, input);
            }
            catch
            {
                return new ApiTriggerOutput()
                {
                    ResponseBody = "Something went wrong fetching the Elements.",
                    ResponseCode = (int)StatusCode.InternalServerError,
                };
            }

            return new ApiTriggerOutput
            {
                ResponseBody = JsonConvert.SerializeObject(elements, _serializerSettings),
                ResponseCode = (int)StatusCode.Ok,
            };
        }

        private List<ElementInfo> GetElements(IEngine engine, Input input)
        {
            var elementFilter = new ElementFilter();
            switch (input.AlarmLevel)
            {
                case "Minor":
                    elementFilter.MinorOnly = true;
                    break;
                case "Warning":
                    elementFilter.WarningOnly = true;
                    break;
                case "Major":
                    elementFilter.MajorOnly = true;
                    break;
                case "Critical":
                    elementFilter.CriticalOnly = true;
                    break;
            }

            var rawElements = engine.FindElements(elementFilter);

            var elements = new List<ElementInfo>();
            foreach (var rawElement in rawElements)
            {
                elements.Add(new ElementInfo()
                {
                    DataMinerId = rawElement.RawInfo.DataMinerID,
                    ElementId = rawElement.RawInfo.ElementID,
                    Name = rawElement.ElementName,
                    ProtocolName = rawElement.ProtocolName,
                    ProtocolVersion = rawElement.ProtocolVersion,
                });
            }

            return elements.Take(input.Limit).ToList();
        }
    }
}

namespace Models
{
    public class ElementInfo
    {
        public int ElementId { get; set; }

        public int DataMinerId { get; set; }

        public string ProtocolName { get; set; }

        public string ProtocolVersion { get; set; }

        public string Name { get; set; }
    }

    public class Input
    {
        public string AlarmLevel { get; set; }

        public int Limit { get; set; }
    }
}
Publish the script
When the API script is complete, it needs to be published to the DataMiner System. You can do so using the built-in publish feature of DIS. Make sure that DIS can connect to the DataMiner System you want to upload your script to. You will need to edit the DIS settings so the DMA is selectable:
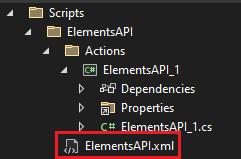
In the Solution Explorer, double-click ElementsAPI.xml.
At the top of the code window, click the arrow next to the Publish button and select the DataMiner System you want to upload the script to.

Step 2: Create an API token
To access the API, you will need an API token. You can reuse the one you created in the hello world tutorial, or you can create a new one.
Open DataMiner Cube, and log into your DataMiner System.
Go to System Center > User-Defined APIs.
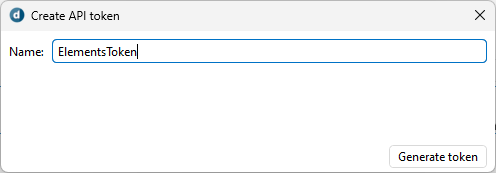
Under Tokens, click Create
For the Name, enter "ElementsToken", and click Generate token.
Copy the generated secret to a safe location (e.g. a password manager).
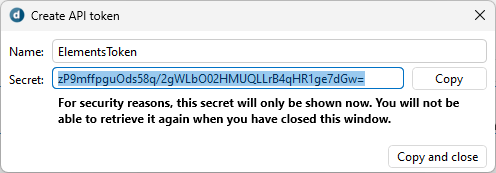
Important
After closing this window, you will no longer be able to retrieve the secret. Make sure that the secret is saved somewhere safe. If it is lost, a new token will have to be created.
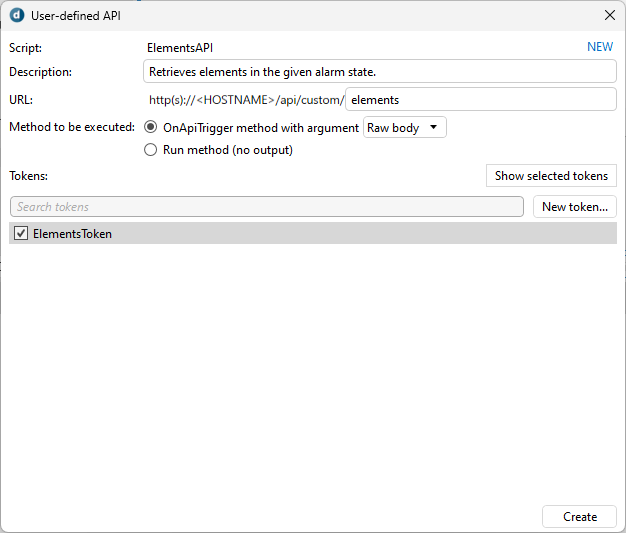
Step 3: Create the API Definition
The next step is to create an API definition that ties the token and script together.
Open the Automation module in DataMiner Cube.
Open the ElementsAPI Automation script.
At the bottom of the screen, click the Configure API button.

Optionally enter a description for the API.
For the URL, enter "elements".
In the bottom Tokens pane, select the ElementsToken, which was created in the previous step.
Finally, click the Create button.
Step 4: Trigger the API using Postman
The API is now ready to be tested using an API testing app like Postman. If you have never used Postman before, check step 5 of the hello world tutorial for more detailed information.
Open Postman and click the + icon to create a new request.
In the URL field, enter
https://HOSTNAME/api/custom/elements, replacing "HOSTNAME" with the hostname of the DataMiner Agent.Go to the Authorization tab and select Bearer Token as Type.
In the Token field, enter the API token secret that you copied in step 2.
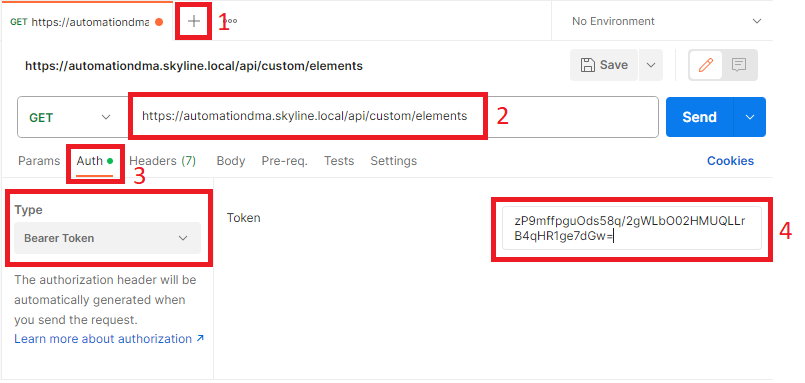
Click the blue Send button.
You should get a Bad Request status code with the validation error that was added in the script. This happens because no body was provided in the request. This proves that the validation logic works as expected.

Open the Body tab of the request.
Change the body type from none to raw in the dropdown.
Change the content type from text to JSON.

Enter the JSON input below the selectors.
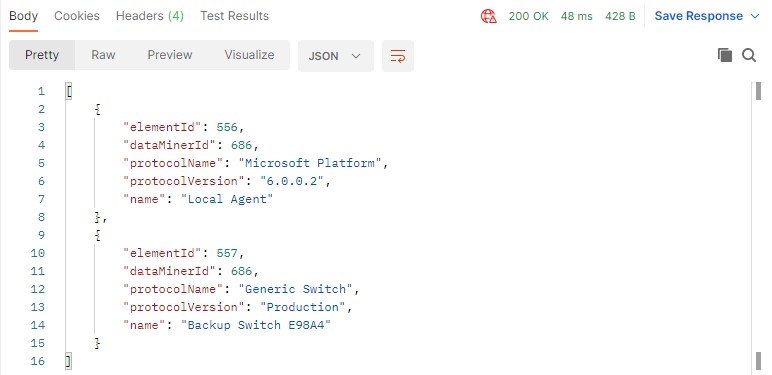
{
    "alarmLevel": "Minor",
    "limit": 10
}
Click the blue Send button again.
The API will be triggered, and all elements that have minor alarms should be returned.
This is only a simple example of what can be done using the input and output functionality of a user-defined API. Numerous extensions could be made. For example, a list of alarm levels could be provided in the input, or a flag (i.e. bool property) could be added to the response that indicates whether there are more elements than the provided limit.