Realistic dynamic simulations
This section explains how you can let the tool return varying realistic device data. In a first step, you will need to poll a device for a certain period of time, for example by using a DataMiner element. Because of this continuous polling, you will have multiple values for an OID, each with a different timestamp. After that, all those retrieved values need to be put in a database. Finally, the simulation file needs to point to that database, so that it can return the different values at runtime.
Retrieving real device data
The way this works is by polling a real device but putting the simulator between the real device and your DataMiner element. The simulator will act as proxy and will forward any packet it receives. However, it does one additional thing: when it receives a packet from the device, it will read all the variable bindings and write them to a file. This way, you will have multiple values for each OID if you let this run for some time.
To configure this, you will need to create a simulation file that looks similar to a regular simulation file:
<?xml version="1.0" encoding="utf-8" ?>
<Simulation>
	<ProxyAgents>
		<ProxyAgent ip="10.2.1.22" MacAddress="" SNMPVersion="2" Name="" Port="7001" AutoBuildVersion="1.2" deviceIP="10.3.9.1" maxDuration="0.16666666"/>
	</ProxyAgents>
</Simulation>
The difference with a regular simulation file is that there is a ProxyAgents tag with ProxyAgent tags instead of an Agents tag with Agent tags. This indicates to the simulator that this is a proxy simulation. The ProxyAgent tag has the same attributes as the Agent tag, except for an additional deviceIP attribute. This deviceIP is mandatory and indicates for which device the simulator acts as a proxy. There are also three additional optional attributes for the ProxyAgent tag:
maxFileSize: This specifies the maximum size of the file (in MB) that the variable bindings are written to. By default, this is 1024 MB. In case the file becomes too big, a new file will be created.
maxDuration: This specifies the maximum duration the proxy simulation will run (in hours).
By default, this is 1 hour. If, for example, you want to capture the data on a device for 2 hours, you need to use this attribute and set it to the value 2.devicePort: This specifies the port the device is listening on. By default, this is 161.
When this simulation containing the ProxyAgent is running, the tool will automatically create the folder C:\QASNMPSimulations\ProxySimulations, together with a file that has the same name as the simulation file, but with the extension .txt. In case the file becomes too big, it will be renamed; the first file ends with _1.txt, the second file with _2.txt, etc.
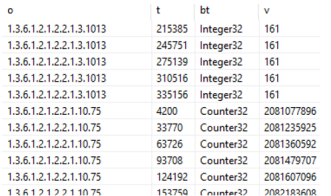
These files will contain all variable bindings coming from the device that the proxy captures. Each line contains a timestamp, OID, binding type, and value. All are separated by #@#. Below is an example of such a proxy simulation file:

Putting real device data in the database
Once all the necessary data has been collected, it needs to be imported in the database. To do so:
In the menu bar of the Skyline Device Simulator tool, select Advanced > Import proxysimulation to DB.
A pop-up window will open where you need to configure the necessary fields:
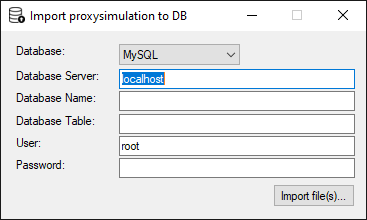
Import proxysimulation to DB windowSelect a database, i.e. MySQL or Cassandra.
Enter the database server, the user and password to connect to the server.
Specify the name of the table where the data should be added.
Note
If the specified database and/or table do not exist yet, they will be created automatically.
Click the Import file(s) button and select the files that were generated in the previous step. It is possible to select multiple files at the same time.
Note
The import operation may take some time, depending on the size of your file. From DataMiner 10.2.7/10.3.0 onwards, a progress bar is displayed. In older versions of this tool, the UI will freeze until the import is finished. To get an idea of the import progress in that case, you can execute a select count(*) … query on your table (if you know the number of rows that need to be imported).
The following sections will explain the structure of the tables in both databases. They are quite similar.
MySQL table structure
CREATE TABLE `<tablename>` (
`Oid` VARCHAR(<length>) NOT NULL,
`Time` BIGINT(20) UNSIGNED NOT NULL,
`Type` VARCHAR(50) NOT NULL,
`Value` TEXT NULL,
PRIMARY KEY (`Oid`, `Time`)
)
<tablename> is the specified table name.
<length> is determined by the tool by retrieving the maximum length for an OID.
Example:

Example MySQL table structure
Cassandra table structure
CREATE TABLE <keyspace>.<tablename> (
     o text,
     t bigint,
     bt text,
     v text,
     PRIMARY KEY (o, t)
);
<keyspace> is the keyspace where the table is created.
<tablename> is the name of the table that will be created.
Example:
Example Cassandra table structure
Configuring the simulation file to poll the database
Finally, configure the simulation file to poll the database:
Do a normal walk on the device using the Tools > Create SNMP simulation file functionality from the menu bar. See Creating SNMP simulations.
Adapt the generated simulation file as follows:
The Agents tag needs to be replaced by a DatabaseAgents tag
The Agent tag needs to be replaced by a DatabaseAgent tag
Several mandatory attributes need to be added to the DatabaseAgent tag
databaseType: This can be MySQL or Cassandra
databaseServer
databaseName
databaseTable
user
password
See the following example:
 <?xml version="1.0" encoding="utf-8" ?>
   <Simulation>
 	  <DatabaseAgents>
 		<DatabaseAgent ip="10.2.1.22" MacAddress="" SNMPVersion="2" Name="Cisco Switch" Port="7001" AutoBuildVersion="1.2" databaseType="MySQL" databaseServer="localhost" databaseName="demo" databaseTable="cisco" user="root" password="" />
 	  </DatabaseAgents>
               <Definitions>
Place the simulation file in the folder
C:\QASNMPSimulations. The tool will now be able to run it.
Note
SNMPv3 is not yet supported.