Restoring a MySQL table structure or table data
The procedure below details how you can restore a broken table structure in a MySQL database or restore missing or corrupted MySQL table data.
Requirements
- Access to the servers with administrator rights. This requires a connection dedicated completely or partially to this procedure, via VPN or local network.
- In case of data modelling needs, access to a spreadsheet application.
- Access to MySQL Workbench.
- Knowledge of the exact problem with the MySQL database. This must be identified before you start this procedure.
Procedure
Determine the database restore method
Prerequisites
- Remote access to the system.
- Credentials with administrator rights.
- A sufficiently fast connection to copy files back and forth.
Steps
Connect to the system using the designated VPN or host PC.
Make sure you have access to MySQL Workbench.
Determine which of the 3 alternatives below is appropriate to restore the database:
- Restoring a corrupt table structure.
- Taking an .sql table backup.
- Restoring data using a backup .sql file or data of a Failover Agent.
Alternative 1: Restore the corrupt table structure
Use the steps below to restore tables in a MySQL DataMiner database after a database restoration procedure where tables may have been corrupted.
Prerequisites
- You have established that certain tables can no longer be queried.
- MySQL is possibly no longer running.
Steps
Check the log information.
- You can find the MySQL error log in a file with the name of the DMA and the extension .err in the MySQL ProgramData folder, e.g.
C:\ProgramData\MySQL\MySQL Server 5.5. - DataMiner logging can be found in the SLDatagateway, SLDBconnection and SLDatabase log files in the folder
C:\Skyline DataMiner\Logging.
- You can find the MySQL error log in a file with the name of the DMA and the extension .err in the MySQL ProgramData folder, e.g.
Open MySQL Workbench to verify the integrity of the SLDMADB tables. If you need to provide credentials, use
-user root -password (empty).Check if the MySQL service is running. If it is not, enforce forced recovery mode by configuring the MySQL configuration file as follows:
Make sure you have a backup copy of your database in case it needs to be recreated.
Go to the MySQL installation folder, e.g. C:\Program Files\MySQL\MySQL Server 5.5.
Open the file my.ini, using an application like Notepad, and add the following recovery options:
[mysqld]
innodb_force_recovery = 1
Note
You should only ever set
innodb_force_recoveryto a value greater than 0 in an emergency situation, so that you can start InnoDB and dump your tables. When forcing InnoDB recovery, you should always start withinnodb_force_recovery = 1and only increase the value incrementally, as necessary. For most situations,innodb_force_recovery = 3will work. Values of 4 or greater can permanently corrupt data files. Only use aninnodb_force_recoverysetting of 4 or greater on a production server instance after you have successfully tested the setting on a separate physical copy of your database.
Once the MySQL service is running, go to System Center in DataMiner Cube and check if the missing table is mentioned in the sync status.
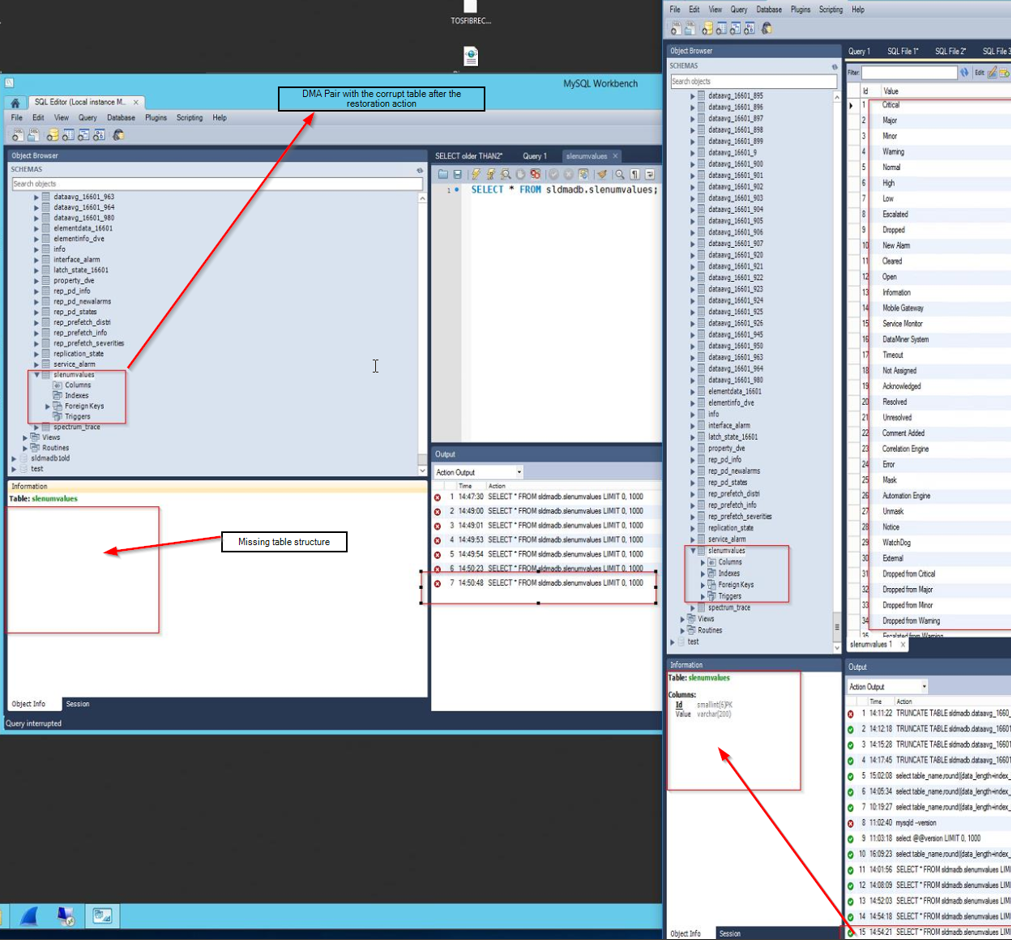
Log back into MySQL Workbench, navigate to SLDMADB and check the table structure and content. If possible, compare with the DMA for an accurate view. For example, in the image below, selecting the SLEnumvalues table reveals that the table structure is missing. To confirm this, try querying the data and check if the query fails.
Recreate the missing table.
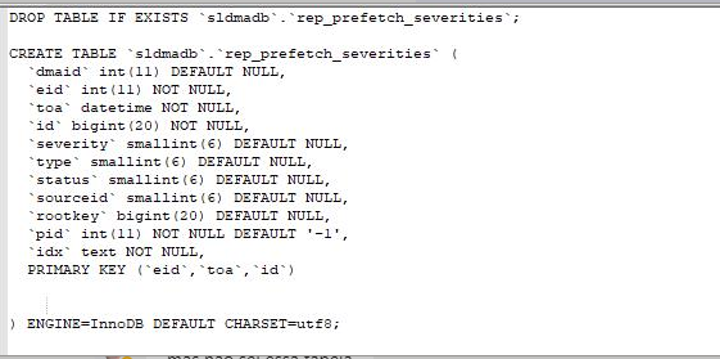
For example, for the SLEnumvalues table, you can do so with the following query:
Drop table if EXISTS `sldmadb`.`slenumvalues`;
CREATE TABLE `sldmadb`.`slenumvalues` (
  `Id` smallint(6) NOT NULL,
  `Value` varchar(200) NOT NULL,
  PRIMARY KEY (`Id`)
) ENGINE=InnoDB DEFAULT CHARSET=latin1
Consult the structure of the table in the workbench to structure your query correctly.
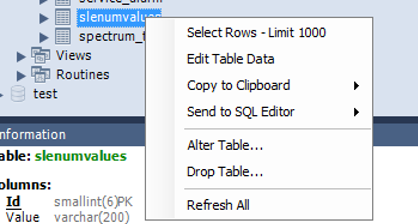
Alternatively, you can use the workbench to create the table:

In a Failover setup, another possible alternative is to dump the table and export it from the other Agent. Make sure the corrupt table is deleted (i.e. dropped). Then use MySQL tools to export the table, copy the export file to the other DMA and import it via MySQL workbench). Finally, load the imported table and compare the location in the workbench with the actual location of the database in the file system.
Alternative 2: Take an ".sql" backup
Use the steps below to take a self-contained backup file that can be used to restore a single table or an entire schema. With this backup file you can then proceed to alternative 3.
Prerequisites
- Access to the remote desktop of the server.
- You have established that all data is present and uncorrupted.
Steps
- In case the backup file will need to moved to another machine after it is created, make sure that it can be copied sufficiently fast and that the target machine has enough disk space.
- Open MySQL Workbench, go to the Server Administration column on the right and double-click Local MySQL. If you do not see this option, click New Server Instance to create a new default server instance, then connect to localhost and complete the wizard.
- In the menu on the left, select Data Export.
- Either select all tables (default) or select the tables you want to export.
- Make sure that there is enough space on the target disk to proceed. Change the path for the export file if necessary.
- Start the export.
- In case you are taking the backup from the online DMA in a Failover setup, stop the DMA as soon as you have started the export.
- When the export is complete, go to the specified export file and move it to the desired location.
Alternative 3: Restore an ".sql" backup
Use the steps below to restore lost data (i.e. a single table or an entire schema) using a self-contained backup file.
Prerequisites
- Access to the remote desktop of the server.
- A recent .sql self-contained file located in the same system as where you want to restore data.
- A sufficiently large maintenance window during which you can stop and restart DataMiner.
Steps
Make sure you have identified the correct tables or schema to restore.
Make sure the .sql backup file is readily available.
Open MySQL Workbench, go to the SQL Development column on the left and double-click Local instance MySQL. If you do not see this option, click New connection.
Stop DataMiner completely.
Drop the corrupt tables or schema using the drop command.
- If this operation times out, it is likely to still be ongoing in the background.
- If this operation fails (i.e. after a long time, no space has been cleared on the disk), use the MySQL command line utility to do the operation manually.
Navigate back to the MySQL Workbench home tab (via the home icon in the lower left corner), go to the Server Administration column on the right and double-click Local MySQL. If you do not see this option, click New Server Instance to create a new default server instance, then connect to localhost and complete the wizard.
In the menu on the left, select Data Import/Restore.
Select Import from Self-Contained File.
Make sure that there is enough space on the target disk to proceed.
Click Start Import.
When the import has finished, query the data to confirm that the import is complete.
Restart DataMiner.
In a Failover setup, wait for any offloads to be completed. In DataMiner Cube, go to System Center > Agents > Failover > Sync. If any tables are not marked as OK, synchronize them.
Time estimate
The duration for this procedure largely depends on the database size. For example, restoring a 25 GB database in a Failover setup, with 178 GB of unnecessary data that needs to be truncated, can take about 3 hours.