Using your IS-04 registry to provision DataMiner with IDP
Below, you can find how you can configure DataMiner IDP to use an NMOS IS-04 registry, so that the registered IS-04 nodes are provisioned in the DMS.
Important
From IDP 1.5.0 onwards, the IS-04 scripts are not included in the IDP package.
Installation
Make sure your DataMiner System has been upgraded to the correct minimum version required for the version of Process Automation that you intend to use, or preferably, simply upgrade to the latest DataMiner feature release.
Install DataMiner IDP with Process Automation.
Important
IS-04 workflows are no longer supported as of Process Automation 1.3. To follow the procedure below, make sure you use an earlier version of Process Automation.
Make sure a DataMiner element is available that uses the connector AMWA NMOS IS-04 Registry. During element creation, the IP address/host of the connection HTTP Connection Main must be set to the IP address of the IS-04 registry.
Configuration
Adding the element property IS-04 Node GUID
Note
This is no longer necessary from IDP version 1.1.15 onwards. From IDP version 1.1.15 onwards, the property can be added via the CI Type Management wizard instead. For more information, see Editing the provisioning details of a CI type.
Add the custom element property IS-04 Node GUID, as described in Adding a custom property to an item. Make sure to specify the options as shown in figure 1 below.
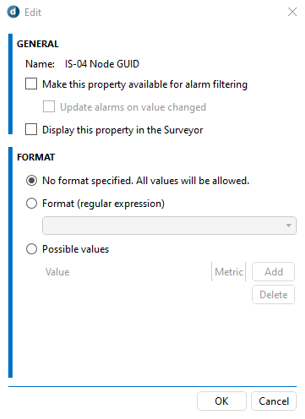
Figure 1: Configuration of element property IS-04 Node GUID
When an element is provisioned for an IS-04 node that registered itself to the IS-04 registry, the custom update property script will fill in this element property with the node's Node ID.
It is important that the Node ID is stored on the provisioned elements, as this is how the connector AMWA NMOS IS04 Registry will identify if a node has already been provisioned. If this property is not configured or not filled in by the custom update property script, each node update will trigger the provisioning of a new element.
Configuring the CI types
DataMiner IDP will perform a discovery for the registered nodes that have not yet been provisioned. However, to discover and provision elements, DataMiner IDP needs correctly configured CI types.
You can add CI types in the IDP app on the tab Admin > CI Types. For more information, see CI types.
Editing the discovery details of a CI type
In the IDP app, there are two ways to start editing the discovery details for a specific CI type:
Go to Admin > CI Types > Overview, click the Edit button, and then click the Configure button next to Discovery.
Go to Admin > CI Types > Overview, and click the Advanced button.
Either way, a pop-up window will open. In this window, select one or more discovery identifiers from the list at the bottom. The discovery identifiers are defined in discovery profiles. If you need other discovery identifiers than the ones that are listed, you will need to create new discovery profiles.
The configured discovery details will be used to identify a CI type when a response is received from a device. For example, the CI type shown in figure 2 will be identified when a device returns a sysObjectID equal to 1.3.6.1.4.1.8813.2.993.1 or 1.3.6.1.4.1.8813.2.993.1.
The Conditions field supports logical operators as explained in Conditions Options.
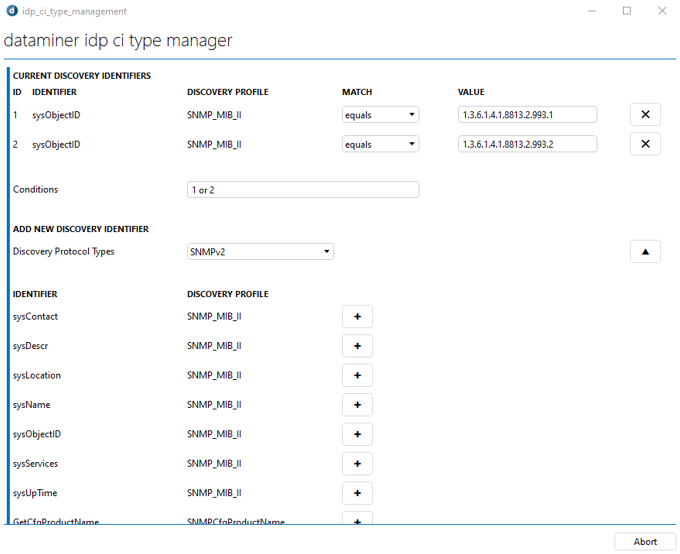
Figure 2 Discovery details of a CI type using SNMPv2 discovery identifiers
Note
DataMiner IDP also supports discovery using HTTP(S), so you could also use the NMOS Node API to identify a CI type. However, this requires that you create a new discovery profile.
Editing the provisioning details of a CI type
In the IDP app, there are two ways to start editing the provisioning details for a specific CI type:
Go to Admin > CI Types > Overview, click the Edit button, and then click the Configure button next to Provisioning.
Go to Admin > CI Types > Overview, and click the Advanced button.
Either way, a pop-up window will open. In this window, you need to configure the following information.
The name of the provisioned element. You can use the placeholder [IPAddress], as illustrated in figure 3. This will be dynamically replaced with the IP address of the discovered device.
The connector that should be used for the CI type. To configure this, click the Details button next to Element Details. Figure 4 illustrates the window that will then be displayed. In this window:
- You must select the protocol and version.
- You can optionally already configure other aspects of the element configuration, such as the alarm and trend template, the ports, the initial element state, etc.
The IS-04 Node GUID property (possible from IDP 1.1.15 onwards). To add this property, click the Properties button. In the Other Properties section, you can then select to Use an existing property if the property already exists in the DMS, or otherwise select Create new property. Then specify the property and click Add (see figure 5).
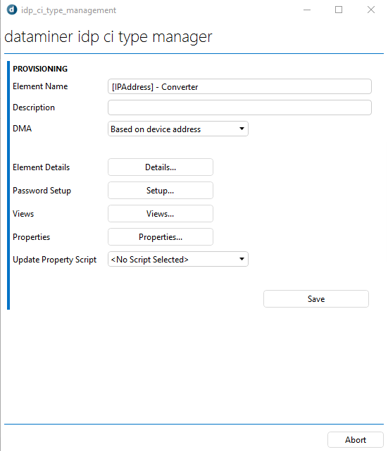
Figure 3: Provisioning details of a CI type
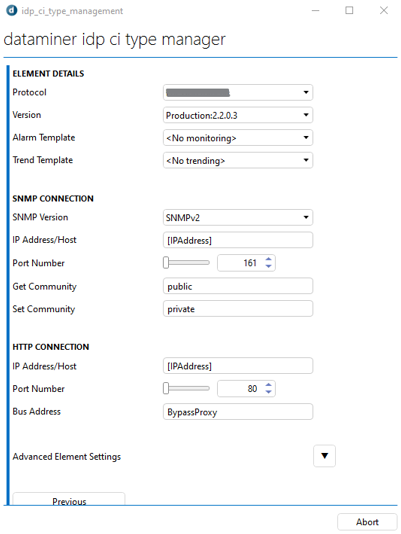
Figure 4: Element details of a CI type
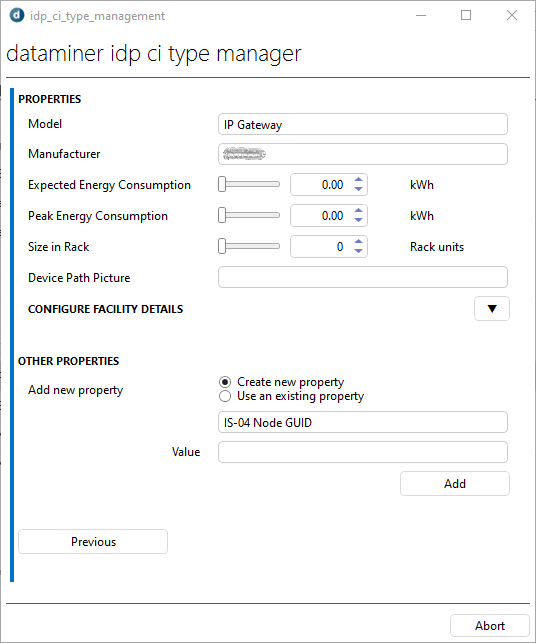
Figure 5: Configuring the IS-04 Node GUID property
Creating new discovery profiles (optional)
In case the equipment cannot be discovered using the discovery identifiers from the out-of-the box discovery profiles, you need to define new discovery profiles.
To do so, create JSON files and import them into DataMiner IDP as explained in Discovery profiles.
Once you have imported a discovery profile, you can use its discovery identifiers to configure the discovery details of CI types.
Configuring the Update Property Script
Note
This is no longer necessary from IDP version 1.1.15 onwards.
When an element has been provisioned, DataMiner IDP can run the Update Property Script. This is an Automation script that is configured per CI type. The Update Property Script needs to find the Node ID of the provisioned element and configure it on the element property IS-04 Node GUID.
DataMiner IDP comes with an example script IDP_Example_Custom_UpdateProperties, which can be used as a starting point. You can [duplicate this script](xref: Managing_Automation_scripts#adding-a-new-automation-script) and change it as follows:
- First, the script must identify the IP address of the device using the supplied DataMiner and element ID.
- Next, it must use the IP address to look up the Node ID on the element using the AMWA NMOS IS-04 Registry connector.
- Finally, it must fill in the Node ID in the custom element property IS-04 Node GUID.
When the script has been implemented, you need to configure the necessary CI types with this script. You can do so in the provisioning details of the CI types (see figure 3). You can select any of the scripts from the folder configured with the CI Update Property Script Folder setting, which is available on the Admin > Settings page of the IDP app.
Configuring the Automation settings
After the CI types have been configured with discovery and provisioning details as described above, go to the Admin > Activities (or in Processes > Activities prior to IDP 1.1.20) page of the IDP app and verify whether the discovery and provisioning operations are enabled.
Starting the IS-04 processes
For the IS-04 nodes to be provisioned, there have to be two active processes:
A process using the existing process IDP IS-04 Provision New Nodes. This process will be used when an IS-04 node registers itself with the IS-04 registry, and no element in the DMS exists for it yet. This process performs a discovery, identifies the correct CI type of the node and provisions an element for it.
A process using the existing process IDP IS-04 Update Existing Nodes. This process will be used when an IS-04 node registers itself with the IS-04 registry, and an element in the DMS already exist for it. This process will update the IP address of the IS-04 node by reapplying the CI type on the provisioned element.
It is advised to make sure both processes are always active. You can do so by setting the activation window type to Permanent (see figure 6) in the Process Automation Wizard.
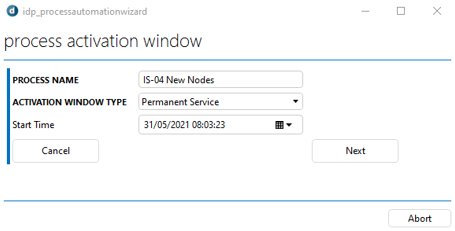
Figure 6: First step of the Process Automation Wizard
IDP IS-04 Provision New Nodes

Figure 7: Activities in the process IDP IS-04 Provision New Nodes
To create an active process:
Launch the Process Automation Wizard, as explained in Processes.
In the first step of the wizard, fill in the name, activation window type and activation window time (see figure 6).
In the second step, select the existing process IDP IS-04 Provision New Nodes.
For each activity, select a profile and resource. It is advised to select a resource pool. If necessary, create a custom profile (see example in figure 8):
- For the activity SLC IDP Convert To Scan Range, the profile should specify the discovery profile that is used to discover the CI types.
- For the activity SLC IDP Discover Data Source, the discovery details should be specified.
- For the activity SLC IDP Provision Element, the source of the provisioned elements should be specified.
Finally, in the third step, select a profile and resource for the token, and click Create (see figure 9).
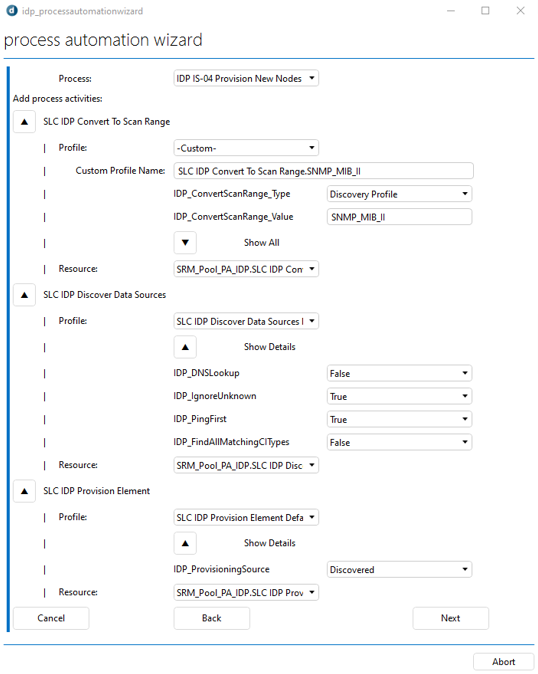
Figure 8: Details of the process configuration to provision new nodes
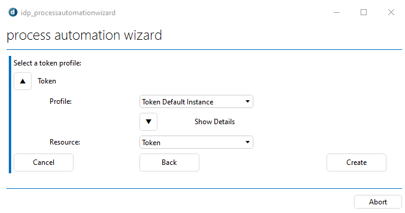
Figure 9: Token profile and resource selection in the last step of the Process Automation Wizard
IDP IS-04 Update Existing Nodes

Figure 10: Activities in the process IDP IS-04 Update Existing Nodes
To create an active process:
Launch the Process Automation Wizard, as explained in Processes.
In the first step of the wizard, fill in the name, activation window type and activation window time details (see figure 6).
In the second step, select the existing process IDP IS-04 Update Existing Nodes.
For each activity, select a resource. It is advised to select a resource pool. The activities in this process do not require profiles (see figure 10).
Finally, in the third step, select a profile and resource for the token, and click Create (see figure 9).
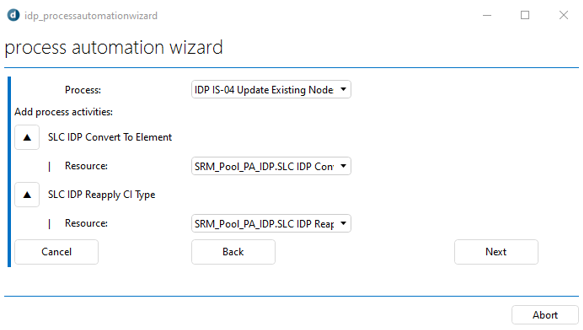
Figure 11: Details of the process configuration to update existing elements