Creating and configuring a process definition
Note
When creating and configuring a process definition, it is important to follow each step listed below in the specific order they occur on this page.
Creating a process DOM definition
Create a process DOM definition, adding all parameters that are relevant for the process.
Note
At present, there is no user interface or dedicated development environment available to create DOM definitions. Contact Skyline Communications if you want more information on how to create DOM definitions.
The process DOM instance will be the only way to exchange data between activities. Therefore, make sure it contains all relevant field descriptors.
The process DOM definition needs to be part of the process_automation module ID. The Process DOM definition is defined in the process_automation module.
Note
By default, TTL on the process_automation module ID is set to 30 days. This means that process DOM instances will stay in the database for 30 days after the last update action.
Creating a process definition
In DataMiner Cube, open the Process Automation app.
In the process definitions tab, click New to start creating a new process definition.
Specify a name for the process definition, select a Booking Manager element, and click Create.
A new process definition will be created and automatically selected.
Drag activities from the Functions sidebar to the workspace on the right.
Connect the activities by dragging from one blue dot on the edge of an activity icon to another. To remove connections, right-click the line created between activities and select Delete.
Keep this in mind:
Always start with a PA None Event or PA Timer Start Event.
Make sure all branches end with a PA End Event.
For each script task that will be used in a process, make use of the generic PA Script Task.
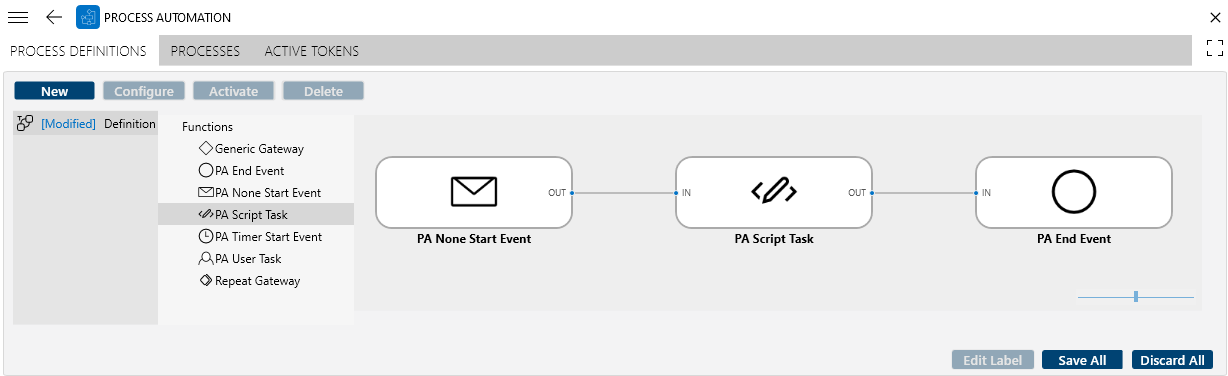
Save the service definition with the Save All button.
Select each activity individually and give it a meaningful label using the Edit Label button in the lower right corner.
Note
Labels must be unique across the entire process definition.
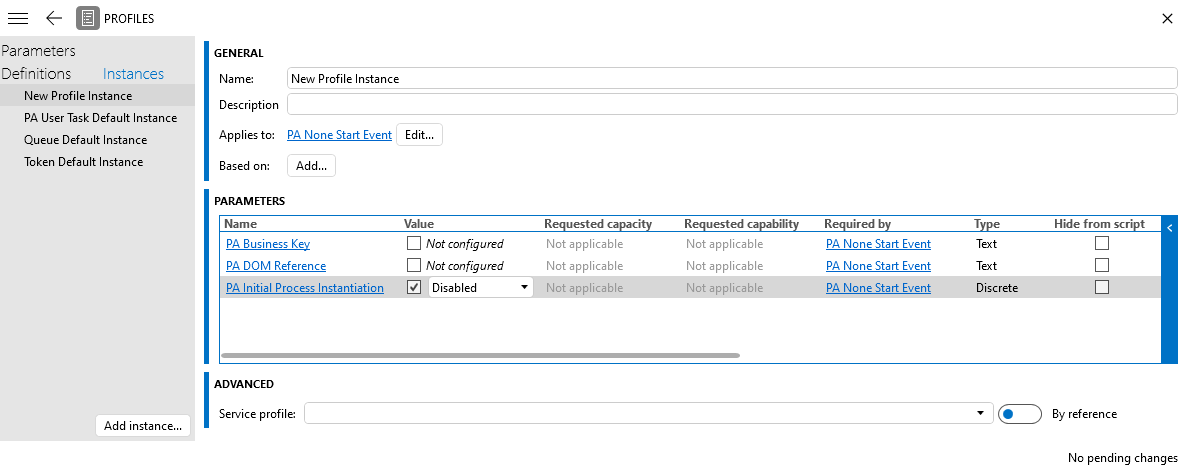
Creating and assigning profile instances
Make sure there is a profile instance for the PA None Start Event. If this profile instance does not exist yet, create one in the Profiles module that applies to the PA None Start Event, with the following values:
PA Initial Process Instantiation: Set this to Disabled.
PA Business Key: Leave this set to Not configured.
PA DOM Reference: Leave this set to Not configured.
Alternatively, start the process with a PA Timer Start Event that can be used to generate new tokens periodically (see Pushing tokens periodically).
In the Process Automation app, select the newly created process definition.
Click the Configure button to open the process definition configuration wizard.
On the first page of the wizard, select the process DOM definition and click Next. A page will be shown where all nodes in the process definition are listed.
For each node in the process definition:
Select the node and click Configure.
Provide the requested information. This will mainly be related to the profile instance selection, profile instance creation, and the link with DOM field descriptors.
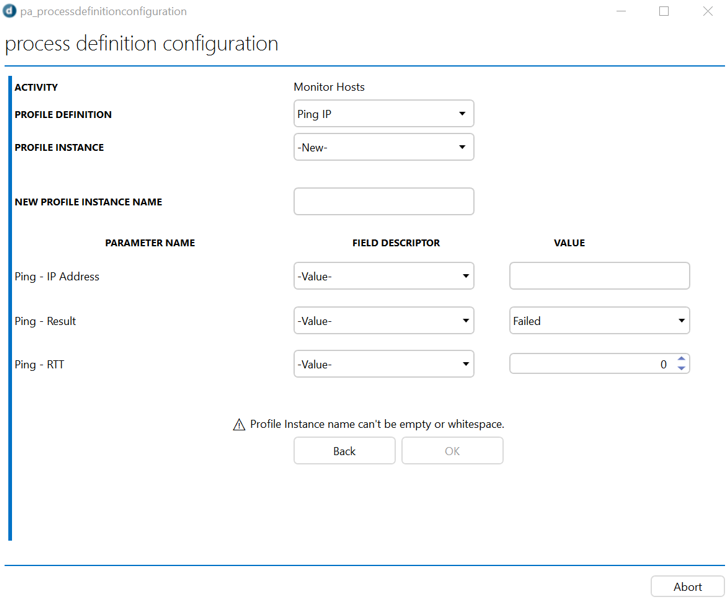
For example, for a "Ping IP" script task, the following input would be needed in the wizard:
Profile Definition: The profile definition set up during the creation of the "Ping IP" script task.
Profile Instance: An existing or new profile instance.
Profile Parameters: A list of profile parameters that are part of the profile definition.
Parameters are used to define the input and output of the activity. Input parameters can contain hard-coded values. In that case, the same value will always be used. Alternatively, they can refer to a field descriptor from the process DOM instances. In that case, different values can be used for each process run.
Hard-coded value:

Dynamic value:

Output parameters should be linked to the field descriptor of the process DOM instance.
Click the Confirm button.
Creating an activation window
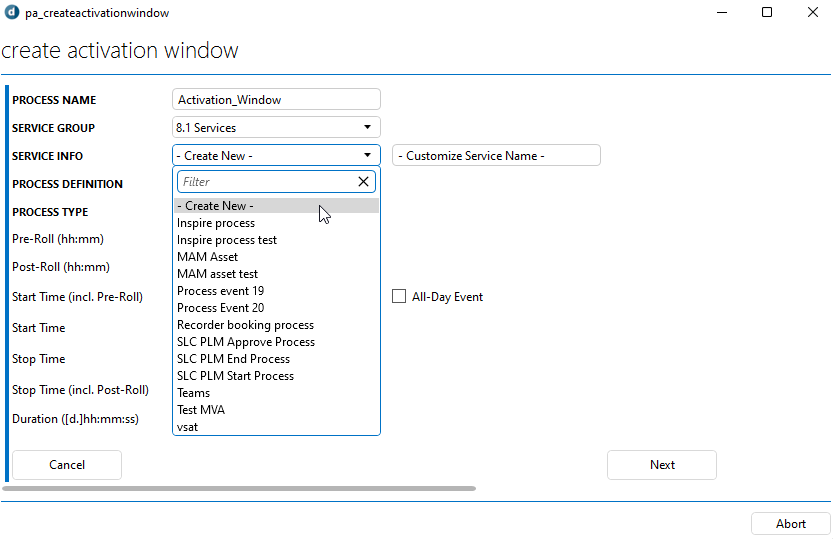
In the Process Automation app, select the newly created process definition.
Click the Activate button.
On the first page of the create activation window wizard, specify the following information:
Process name: Specify a name for the activation window.
Service group: This information will already be filled in and can be left as is.
Service info: This identifies the process and makes it possible to push tokens into the process from custom code. To configure this, there are two options:
Select Create New to create Service info with the same name as the activation window.
Select an existing Service info item in case multiple activation windows need to be created that should always be linked to the same process identifier.
Process definition: This information will already be filled in and can be left as is.
Process type: This information will already be filled in and can be left as is.
Time specifications: Edit according to your own preferences.
Note
Make sure all fields are populated.
Click the Confirm button.