Additional configuration for Resource Scheduling
Booking Manager configuration
Before you can start using Resource Scheduling, you need to configure the Booking Manager app to use the correct booking context:
- Open the Booking Manager app.
- Click the hamburger button in the top-left corner and select Show card side panel.
- In the card side panel, click DATA. This will open the General data page.
- In the Application Setup section of the General data page, set the parameter Booking Application Context parameter to Resource Scheduling.
Default wizard to schedule a resource
When you install the SRM framework, an Automation script is included that can be used as the default wizard to schedule a resource.
Required input parameters
The wizard is an interactive Automation script called SRM_BookResourcesQuickly. As of SRM version 1.2.27, the input parameters accept the following fields in JSON format:
- BookingManagerElement: The name of a Booking Manager element. This is used to generate log files in the directory specified in that element.
- ResourceIds: The GUIDs of the resources that need to be added to the booking, separated by commas.
- ChangeTimeInputData: Optional. The proposed time of the booking. Consists of the StartDate and EndDate datetime fields.
- AssignCapacityType: Optional. Can be set to None or Request. If this is set to Request, more options will be available to book concurrency/capacity in the wizard.
- TimeRange: Optional. The proposed time of the booking to be created. This is a semicolon-separated list of start and stop time in binary format, as provided by Cube when a time range is selected on the timeline component.
For example: {"AssignCapacityType":"Request","BookingManagerElement":"Resource Scheduling","EndDate":"2022-09-07T14:08:28.0052229Z","ResourceIds":"e489a83d-182b-45c7-a981-615c253525b2","StartDate":"2022-09-07T12:38:25.6772229Z"}
Note
For an up-to-date definition of the input argument, import SLSRMLibrary.dll and check the class Skyline.DataMiner.Library.Solutions.SRM.Model.BookResourcesQuickly.InputData, or Skyline.DataMiner.Core.SRM.Model.BookResourcesQuickly.InputData from feature release 2.0.1 of the SRM framework onwards.
Running the wizard
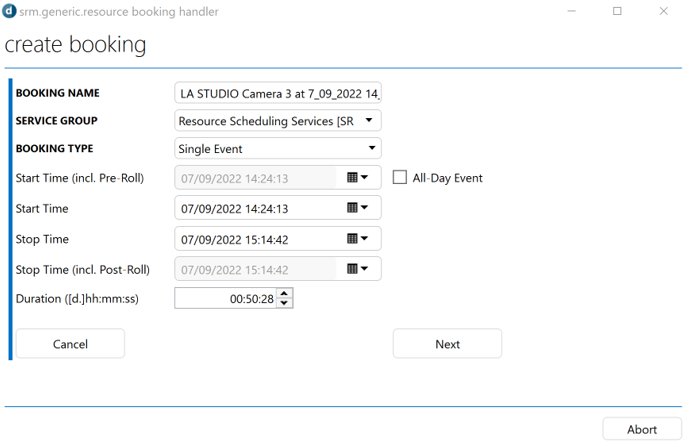
When a user runs the wizard, they will first need to specify the name and timing for the booking.
In the next step of the wizard, they can optionally provide capacity values. Alternatively, if no other overlapping should be created on the resource, they can book the entire resource.
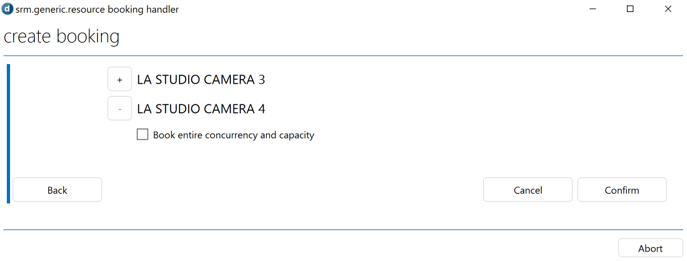
After they click Confirm, the booking will be created.
Creating a custom front end for the resource scheduling wizard
The wizard can be launched from Visual Overview or from a low-code app.
A typical use case is to make use of the Resource Manager component in Visual Overview, showing resource bands on the Y-axis:
Embed a Resource Manager component in your Visio drawing, and use the YAxisResources variable to define the resources that will be listed on the Y-axis. See Embedding a Resource Manager component.
When a user selects a resource band on the timeline, the SelectedResource variable will be populated with the GUID of the resource.
When a user selects a time range on the timeline, the SelectedtimeRange variable will be populated with that time range.
Tip
For example, in case you want to create a Visio drawing that will be assigned to a view, and all resources associated with elements in that view should be presented on the Y-axis of the timeline:
Add the following shape data on page level:
Shape data field Value InitVar YAxisResources:view=[This View]Options CardVariableAdd the following shape data on the rectangle shape that will be used to embed the timeline:
Shape data field Value Component ReservationsOptions CardVariable
Add a shape to the Visio drawing that executes the SRM_BookResourcesQuickly script, using the SelectedResource and SelectedTimeRange variables in the input data.
Tip
Continuing from the same example as mentioned above, if you have a Booking Manager element named "Resource Scheduling", add a rectangle shape with the following shape data:
Shape data field Value Execute script:SRM_BookResourcesQuickly||Input Data={"BookingManagerElement":"Resource Scheduling","TimeRange":"[RegexReplace:;,[cardvar:SelectedTimeRange],$]","ResourceIds":"[cardvar:SelectedResource]","AssignCapacityType":"Request"}|||NoConfirmation,CloseWhenFinished
Other front-end scripts
The SRM framework also includes other front-end scripts that can be used to execute certain actions.
Default wizard to extend an existing booking with a resource
The SRM_AddResourceFromPoolToBooking Automation script can be used as the default wizard to extend an existing booking with a resource from a predefined pool. The input argument of the script is a JSON string containing the following attributes:
- ReservationId: The GUID of the booking to which the resource should be added.
- PoolId: The ID of the resource pool to be selected. This has priority over PoolName, so if both are specified, only PoolId is read.
- PoolName: The name of the resource pool to be selected. This is only read if PoolId is equal to Guid.Empty.
Default wizard to remove a resource from a booking
The SRM_UnassignResourceFromBooking Automation script can be used as the default wizard to remove a resource from a booking. The input argument of the script is a JSON string containing the following attributes:
- ReservationId: The GUID of the booking from which the resource will be removed.
- ResourceId: The GUID of the resource that should be removed.