Creating Profile-Load Scripts
A Profile-Load Script (PLS) is responsible for the orchestration of a specific virtual function. It is typically created for a specific virtual function exposed by a specific connector.
You will need to make sure a Profile-Load Script is available for each virtual function in the system.
Creating a Profile-Load Script
Below you can find the basic steps to create a Profile-Load Scripts. For more detailed information on script input arguments and content, as well as on how to test a PLS, refer to the sections below this.
Start from the example script SRM_ProfileLoadScriptTemplate, which is included in the SRM framework.
Add a script dummy named FunctionDVE, and link it to the protocol function DVE.
A protocol function DVE is dynamically generated when a function definition is uploaded. Its name consists of the main protocol name and the name of the function.
Configure the script to set the configuration parameters on the virtual function of a connector.
To make sure the PLS is executed when a specific virtual function is orchestrated, when you have created the script, assign it to a profile definition:
In the Profiles module, select the profile definition in the definitions tab.
In the Scripts section, click Add to add the script. See Configuring profile definitions.
Note
If the same virtual function is exposed by multiple connectors, different Profile-Load Scripts can be listed for the same profile definition.
Input arguments of a Profile-Load Script
A PLS takes the following input arguments:
Script dummy: FunctionDve, based on the virtual function definition.
Specify the following two strings, separated by a period:
The name of the protocol (or "connector") associated with the main element generating the virtual function instance.
The name of the virtual function.
Note
If you implement a PLS based on the example script in the framework, you will have to add this input argument.
Script parameter: Info
Script parameter: ProfileInstance
Input arguments will automatically be filled in by the SRM framework when a profile needs to be applied to a function DVE.
Caution
The content and syntax of the script parameters is subject to change. You should therefore never manipulate this yourself when you create or edit a PLS script.
Content of a Profile-Load Script
Helpers
The PLS example script contains helper classes and methods that you must use when you start implementing the script:
var configurationInfo = LoadResourceConfigurationInfo(engine);
var nodeProfileConfiguration = LoadNodeProfileConfiguration(engine);
var helper = new ProfileParameterEntryHelper(engine, configurationInfo?.OrchestrationLogger);
Note
When working in Visual Studio, make sure to add a reference to Newtonsoft 13.x if you use SRM 1.2.30 or higher, or Newtonsoft 11.x for older SRM versions. Newer versions of Newtonsoft might not work together with the SRM framework.
Retrieving profile parameter values
You can use the following method from the helper to retrieve the profile parameter values:
var parametersConfiguration = helper.GetNodeSrmParametersConfiguration(configurationInfo, nodeProfileConfiguration).ToList();
The example below shows how to access the parameter values:
foreach (var config in parametersConfiguration)
   {
       string value = config.Value.Type == ParameterValue.ValueType.Double ? Convert.ToString(config.Value.DoubleValue) : config.Value.StringValue;
       engine.GenerateInformation($"Parameter configuration {config.ProfileParameterName} with table key {config.ResourceKey}, parameter Id {config.ProtocolParameterId} and value {value}.");
   }
Note
In case a mediation snippet is defined on profile parameter level, the mediated value will be returned.
Function DVE configuration
Using the script dummy ("FunctionDve"), you can start configuring parameters on the function DVE (i.e. the virtual function resource):
var dummyDve = engine.GetDummy("FunctionDve");
dummyDve.SetParameter(dummyDve.GetWriteParameterIDFromRead(config.ProtocolParameterId), config.Value.GetValue());
Logging
From within a Profile-Load Script, custom records can be added to the action logs, together with a severity indication:
helper.LogFailure("An issue occurred");
   // generate a log record with ‘Normal’ severity

helper.LogSuccess("Configuration was successful");
   // generate a log record with ‘Critical severity

helper.Log("Report a warning", LogEntryType.Warning);
   // generate a log record with a custom severity
   // Namespace Skyline.DataMiner.Library.Solutions.SRM.Logging.Orchestration is needed
Returning data
When Service Orchestration is used, a Profile-Load Script can return data that can then be used within an LSO script. This is done by means of a <string,string> dictionary that can be built using the following method:
ProfileParameterEntryHelper.AddOrUpdateResult(string key, string value)
Script result
If a Profile-Load Script fails to configure the function DVE, an exception must be thrown so that the framework can capture it and use it to set the booking to the "Failed" service state.
Testing Profile-Load Scripts
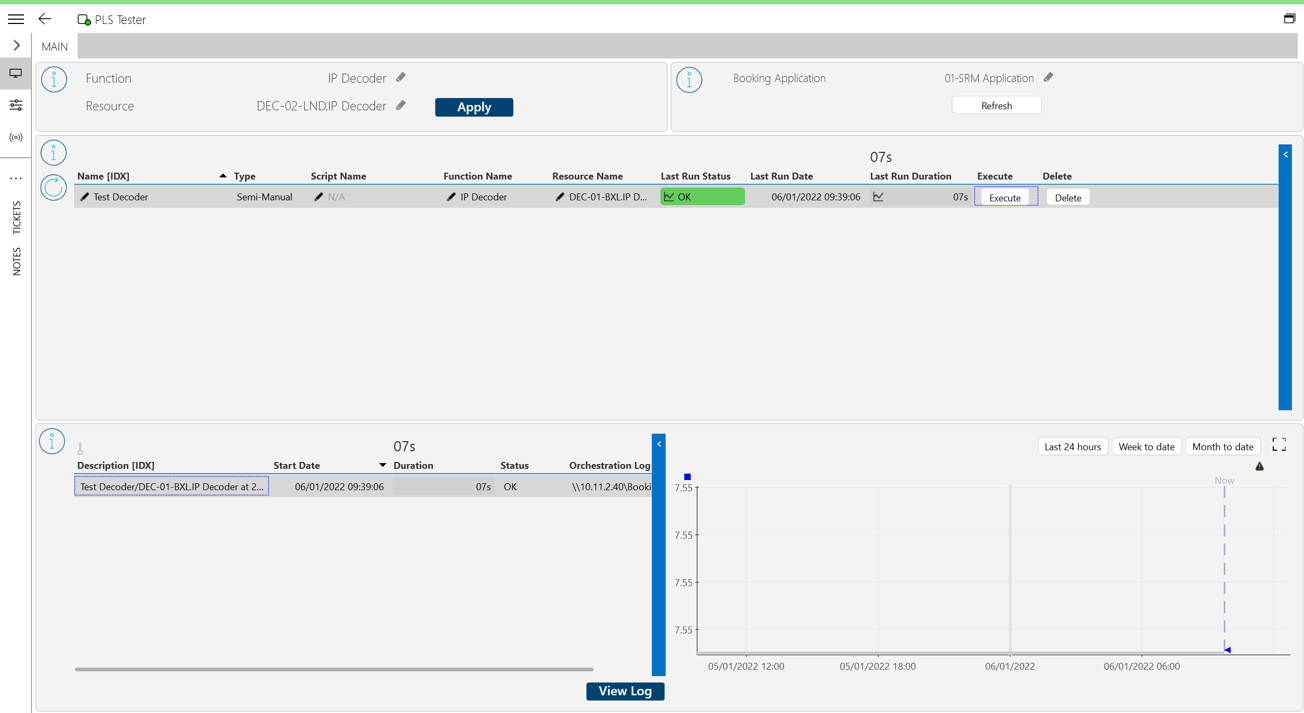
To validate Profile-Load Scripts individually without the need to create a booking, you can create a PLS Tester element, which can be used manually, semi-manually, or automatically. This tool is included in the SRM package since version 1.2.21.
PLS Tester setup
Make sure a Booking Manager app has been created in the DMS.
Create an element using the Skyline Profile Load Script Tester protocol.
In the top-right corner of the visual overview of the element, select the Booking Manager app you want to use for the testing.

Note
If the Booking Manager app you want to use is not available for selection in the dropdown box, click the Refresh button to update the available selection options.
Manual usage of the PLS Tester
After initial configuration, the PLS Tester can immediately be used to manually validate a Profile-Load Script.
At the top of the PLS Tester visual overview, in the Function box, select the virtual function for which you want to run a test.

In the Resource box, select a specific virtual function resource.

Note
If you cannot select the virtual function or resource you want, click the Refresh button to update the available selection options.
Click the Apply button.
This will open a pop-up window.
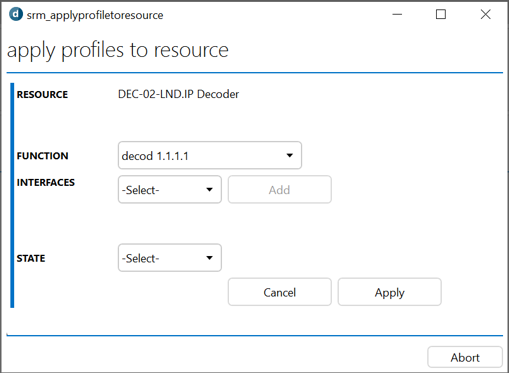
Configure the necessary settings in the pop-up window:
In the Profiles box, Select the profile instance you want to apply.
Optionally, enable the selection of profile instances for the interfaces and select the instances.
Optionally, in the State box, select a target service state.
Note
- If no target service state is selected, the selected profile instance(s) will be applied.
- If a target service state is selected, the associated state profile instance will be applied.
- If a target service state is selected, you can also select Full Config to apply a combination of the selected profile instance(s) and the state profile instance(s).
Click Apply.
Semi-manual usage of the PLS Tester
The PLS Tester also allows you to define test cases with a preselected resource. When such a test case is executed, only the necessary profile instances need to be selected.
In the PLS Tester visual overview, right-click the Test Cases table and select Add Semi-Manual in the context menu.
Specify a name for the test case, select a virtual function, and click OK.
The test case will now be displayed in the table.
In the Resource Name column of the table, select a resource to finalize the configuration of the test.
To execute the test case, click the Execute button in the Test Case table.
This will open a pop-up window where you can select profile instances, similar to the manual mode.
Each time a test case is executed, a record is generated in the Test Cases Results table. A trend graph is also available that shows the evolution of the execution duration over time.
When you select a test case result, you can click the View Log button to access a log file with more details on the execution of the PLS.
Automatic usage of the PLS Tester
PLS can be used in an automated way with a script that fully defines the test sequence.
The test sequence can be as simple as applying a profile instance to a single resource, but as it is based on a custom script, it can also support advanced test cases involving many resources and profile instances.
Create a custom script defining the test sequence, based on the example script SRM_ProfileLoadScriptTesterScriptExample provided with the SRM framework.
For example:
{
   protected override void ExecuteTestCase(Engine engine)
   {
      // Apply profile instances to the resource
      this.SelectResource("MyResource")
          .SetProfileInstance("HD Decoding")
          .SetProfileInstance("ASI Profile", InterfaceType.In, "ASI")
          .ApplyProfile(string.Empty);

      // Apply the full 'START' state profile instance to the resource
      // With profile action 'START'
      this.SelectResource("MyResource")
          .SetProfileInstance("07A - A03 - NS3")
          .ApplyCombinedProfile("START", "START");
   }
}
Right-click the Test Cases table and select Add Script in the context menu.
Specify a name for the test case, select the custom script defining the test sequence, and click OK.
The test case will now be displayed in the table.
Note
In case the script is not displayed, click the Refresh button to the left of the Test Cases table.
To execute the test case, click the Execute button in the Test Case table.
Tip
To trigger the execution of test cases at specific times, use the Scheduler module.