Configuring the images shown in the Facilities section
Configuring the image for an element in the rack view
About the equipment image in the rack view
When you select a rack in the table on the Facilities page and click Show in rack, this will open the rack view in a new card.
The image shown for an element in this rack view is configured using the custom element property Device Path Picture.
The rack view Visio drawing will load the front panel image via a small built-in web page hosted on the DMA, at http://<DMAIP>/RLM/index.html?img=<value of Device Path Picture>. This page takes whatever value is passed in the img query parameter and loads it directly as an image URL in the browser. There is no server-side validation or path resolution. This means the value of Device Path Picture must resolve to a valid, browser-reachable image URL from the DMA serving the request.
Setting the equipment image
If all elements of the same CI Type use the same image, configure the property on the CI Type so that it is set automatically when the elements are provisioned:
Upload the image file to the folder
C:\Skyline DataMiner\Documents\Generic Rack Layout Manager\Imageson the DMA.In the IDP app, go to Admin > CI Types > Overview, select the relevant CI Type, and click Edit.
Click Configure next to Provisioning, and then click Properties.
In the Configure Facility Details section, set the Device Path Picture property to the image's path relative to the DMA's web root, for example:
/Documents/Generic Rack Layout Manager/Images/CiscoSwitch!a.pngSave the CI Type configuration and provision the elements.
The image should now be shown as the front panel for each provisioned element of that CI Type.
For an existing element, or when an element requires a different image, you can set the property directly on the element:
Upload the image file to the folder
C:\Skyline DataMiner\Documents\Generic Rack Layout Manager\Imageson the DMA.Right-click the relevant element in Cube, and select Properties > Custom.
Set the Device Path Picture property to the image's path relative to the DMA's web root.
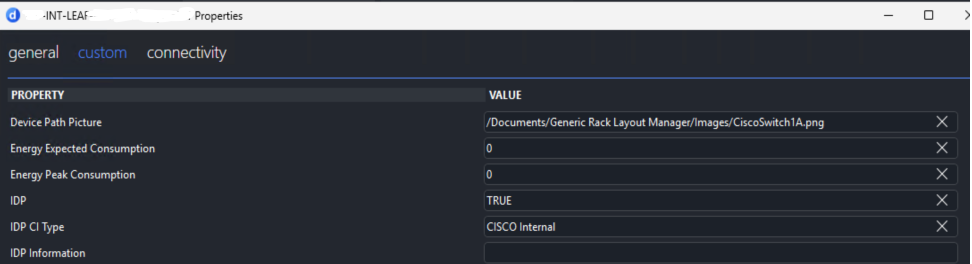
Refresh the element's rack view.
The image should now be shown as the element's front panel.
Notes and troubleshooting
If Device Path Picture is left empty or set to
N/A, the rack view displays a placeholder message instead of an image: There's no picture defined in the properties! (Device Path Picture).The image URL is resolved against
[DMAIP], i.e., whichever DMA the current Cube session is connected to. In a DataMiner System with multiple DMAs, make sure the Documents folder is synchronized, so that it is present on every DMA a user might connect to.As
Documents\Generic Rack Layout Managercontains spaces in its folder name and the property value is inserted directly into a URL query string, avoid manually re-encoding spaces yourself. The drawing's formula handles this, so you should use the plain path as shown above.If the image fails to load (404), verify the following things:
- The file exists at the exact path specified, with matching casing.
- The path does not duplicate the
/Documents/Generic Rack Layout Manager/prefix. The property value should be the full path from the web root, not a path relative to the Images folder. - The RLM web component (
C:\Skyline DataMiner\Webpages\RLM\) is present on the DMA currently serving the rack view. This is required in addition to the Documents folder itself.
Setting a plan or picture for locations, buildings, floors, and rooms
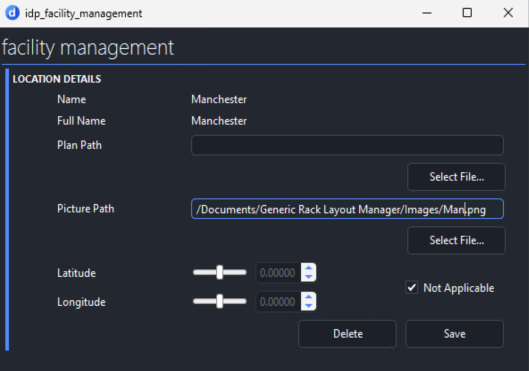
Within the IDP app, under Admin > Facilities > Locations you can configure the plan or picture used for a location, building, floor, or room:
On the Admin > Facilities > Locations page of the IDP app, select an item in the Locations, Buildings, Floors, or Rooms table, and click the Edit button above the table.
If the item you want does not exist yet in the table, you can add it with the New button instead.
In the pop-up window, under the Plan Path or Picture Path field, click Select File to upload your image file to the DMA.
Alternatively, if the image has already been uploaded to the folder
C:\Skyline DataMiner\Documents\Generic Rack Layout Manager\Images, you can specify the image's path relative to the DMA's web root, similar to when you set the equipment image for the rack view.For example:
Note
The image has a size limit of 2 MB and must have the extension .jpg, .jpeg, or .png.
Setting a Visio page as an element's front panel
In addition to the static image set via the Device Path Picture property, an element can also have a dedicated Visio page shown as its front panel. Once configured, this same page is used in two places:
- In the rack view, as the element's representation within its assigned rack slot.
- When the front panel is selected for the element, within the rack view.
You will need to configure this Visio drawing as follows:
- Make sure the drawing has a page dedicated to representing the front panel.
- To be displayed in a 1U slot and against a 1U device, a Visio page named
RLM-1Umust exist. To be displayed for a 2U, the Visio page must be namedRLM-2U. - Assign the drawing as the main Visio drawing for the element. See Setting the active Visio file for an element, service, or view.
The views will resolve the page to display via a page variable on the rack Visio drawing named VdxPage. This variable determines which page within the element's Visio drawing should be loaded and displayed as that element's front panel.
Once the page is present and correctly linked, it will automatically be picked up and displayed both in the rack view and as the front panel. No separate configuration is needed for each display context.
Note
- If no dedicated front panel page is configured for an element, a generic placeholder block is shown instead, sized according to the element's configured rack unit height (
Location Rack Unitsin the CI Type). - There is a hard-coded limit of 20 rack units for the device height in the rack view.