Creating a Cypress test for an interactive automation script
Cypress is a powerful end-to-end testing framework designed for the modern web. While it simplifies UI testing, leveraging its full potential requires a solid understanding of its core concepts and best practices. This page covers the essential steps to set up, configure, and test an interactive automation script using Cypress, using an example. By following these steps, you can create reliable, reusable tests to validate new components and UI interactions within a real application environment.
Tip
For additional information, explore these resources:
Prerequisites
Node.js must be installed. Make sure Node has been added to your PATH to enable terminal commands.
An Integrated Development Environment (IDE) such as Visual Studio Code must be available.
In the steps below, Visual Studio Code will be mentioned, but a different IDE could be used instead.
A DataMiner System running DataMiner 10.3.0 [CU16]/10.4.0 [CU4]/10.4.7 or higher.
Project setup and Cypress installation
Create a folder for your project (e.g.,
C:\Testing) and open it in Visual Studio Code.Initialize the project and install Cypress:
Open a new terminal in Visual Studio Code and execute the following command:
npm initPress Enter to proceed through the setup without specifying values until the initialization is complete.
Use the following command to install Cypress:
npm install cypress
To simplify running Cypress, add the following line to the
"scripts"section of yourpackage.jsonfile:"scripts": { "start": "npx cypress open" }To verify the installation, run
npm run startto launch Cypress and confirm that it opens successfully.If it is the first time you run Cypress, select E2E Testing as the testing type when prompted.
Creating the interactive automation script
Create an automation script as a Visual Studio solution, as explained under automation scripts as a Visual Studio solution.
Add the NuGet package Skyline.DataMiner.Utils.InteractiveAutomationScriptToolkit to your project.
Note
Ensure that your project uses at least version 9.0.2 of Skyline.DataMiner.Utils.InteractiveAutomationScriptToolkit and version 10.4.7 of Skyline.DataMiner.Dev.Automation to have the DebugTag property available on a widget.
Use the following C# code to implement a sample interactive script that displays a "Hello, World!" message with an OK button:
using System;
using Skyline.DataMiner.Automation;
using Skyline.DataMiner.Utils.InteractiveAutomationScript;

/// <summary>
/// Represents a DataMiner automation script.
/// </summary>
public class Script
{
    /// <summary>
    /// The script entry point.
    /// </summary>
    /// <param name="engine">Link with SLAutomation process.</param>
    public void Run(IEngine engine)
    {
       // DO NOT REMOVE THE COMMENTED OUT CODE BELOW OR THE SCRIPT WILL NOT RUN!
       // Interactive scripts need to be launched differently.
       // This is determined by a simple string search looking for "engine.ShowUI" in the source code.
       // However, due to the NuGet package, this string can no longer be detected.
       // This comment is here as a temporary workaround until it has been fixed.
       //// engine.ShowUI(

       try
       {
          // Controls the event loop and switch between dialogs
          var controller = new InteractiveController(engine);

          // Create an instance of the dialog you wish to show.
          var helloWorldDialog = new HelloWorldDialog(engine);

          // Starts the event loop and shows the first dialog.
          controller.ShowDialog(helloWorldDialog);
       }
       catch (ScriptAbortException)
       {
          // Catch normal abort exceptions (engine.ExitFail or engine.ExitSuccess)
          throw; // Comment if it should be treated as a normal exit of the script.
       }
       catch (ScriptForceAbortException)
       {
          // Catch forced abort exceptions, caused via external maintenance messages.
          throw;
       }
       catch (ScriptTimeoutException)
       {
          // Catch timeout exceptions for when a script has been running for too long.
          throw;
       }
       catch (InteractiveUserDetachedException)
       {
          // Catch a user detaching from the interactive script by closing the window.
          // Only applicable for interactive scripts, can be removed for non-interactive scripts.
          throw;
       }
       catch (Exception e)
       {
          engine.ExitFail($"Run|Something went wrong: {e}");
       }
    }
}

public class HelloWorldDialog : Dialog
{
   public HelloWorldDialog(IEngine engine) : base(engine)
   {
       // Create a label widget
       var label = new Label("Hello, World!") { Style = TextStyle.Title };

       // Define the debug tag to be used in the cypress test
       label.DebugTag = "label";

       // Add it to the dialog grid at position 0,0
       AddWidget(label, 0, 0);

       // Create a button widget
       var button = new Button("OK");

       // Define the debug tag to be used in the cypress test
       button.DebugTag = "button";

       // Add it to the dialog just below the label
       AddWidget(button, 1, 0);

       // Add an action to be performed whenever the button is clicked
       button.Pressed += (sender, args) => engine.ExitSuccess("Done");
   }
 }
Setting up the web environment
Add a button to the low-code app and configure it to trigger the created interactive automation script when clicked.
For more information, see Button.
Creating the Cypress test
In the
cypress/e2efolder, create a test file with a.cy.jsextension, such asHelloWorldDialog.cy.js.Implement the example Cypress test below to log in, navigate to the low-code app, and interact with the automation script.
Note
Ensure all variable values in the test below are updated with the correct information (dmaAddress, username, password, etc.) before you run the test. This allows the script to interact properly with your specific application environment.
In this example, the DebugTag defined in the automation script will be used to verify that the text displayed on a label and button is correct. You should therefore make sure that all DebugTag values used in your automation script are unique per IAS page. This allows you to reference widgets unambiguously during testing. For example, by setting the DebugTag for a label to myLabel, you will be able to locate the widget in the test using the following code:
cy.get('[data-cy="myLabel"]');
describe('Test Interactive Automation Script', () => {
    // Define the necessary variables and replace with your specific details
    const dmaAddress = ''; // Replace with the IP or hostname of a DMA (e.g., 'localhost')
    const username = ''; // Replace with username of a test user
    const password = ''; // Replace with password of the test user
    const buttonLabel = ''; // Replace with the button label
    const appId = ''; // Replace with the app ID

    // Before running the tests, visit the low-code app
    before(() => cy.visit(`http://${dmaAddress}/app/${appId}`));

    it('should log in, execute the Interactive Automation Script, check label and click the button', () => {
        // Check if the login component exists
        cy.get('dma-login').should('exist');

        // Enter login credentials
        cy.get('[data-cy="login.username"]').type(username);
        cy.get('[data-cy="login.password"]').type(password);

        // Click the login button
        cy.contains('dma-button', 'Log on').click();

        // Verify successful login
        cy.get('dma-login').should('not.exist');

        // Start the IAS by clicking the associated button
        cy.contains('dma-button', buttonLabel).click();

        // Validate that the pop-up message appears with the correct title
        cy.get('[data-cy="popup"]').contains('Dialog').should('be.visible');

        // Get the component with the debug tag 'label' and check if the component has the correct text
        cy.get('[data-cy="label"]').should('have.text', 'Hello, World!');

        // Get the component with the debug tag 'button' and click the OK button
        cy.get('[data-cy="button"]').should('have.text', 'OK').click();
    });
});
Running the Cypress test
Launch Cypress by running the following command in the terminal:
npm run startSelect the test file (
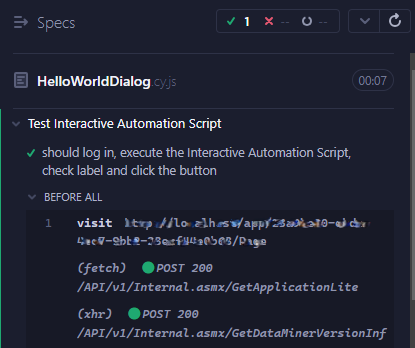
HelloWorldDialog.cy.ts).Cypress will execute the test, displaying results in real time: green indicates success, and any errors are logged in detail for debugging.
The image below shows the result of a successful test:

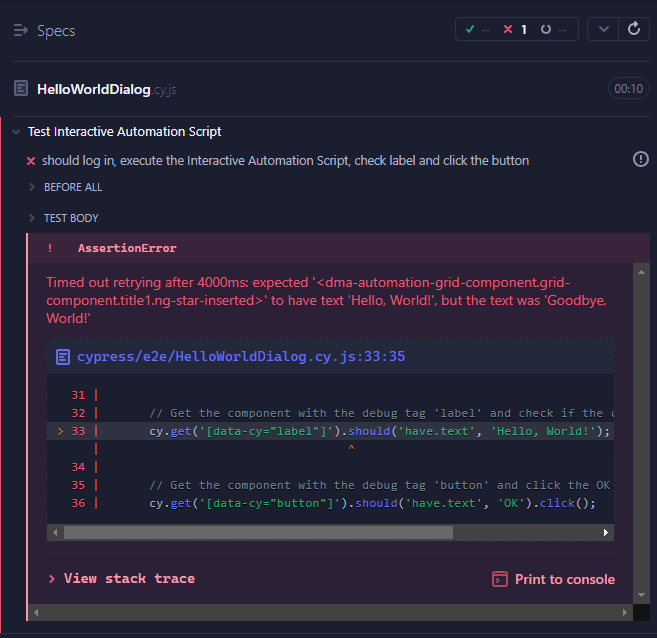
If you want to test a failure scenario, modify the interactive automation script by changing the label text from "Hello, World!" to "Goodbye, World!", and run the test again.
You should now observe a failure because of the mismatch with the expected text. This failure will be reflected in the Cypress results:
