How to configure multithreaded timers
A multithreaded timer, as the name suggests, is a timer that performs action in a multithreaded manner. By using such timers, you can ensure that every row in a table is polled (or executed) in a certain time slot.
Currently, multithreaded timers support the following communication protocols: SNMP, HTTP and Serial. In addition, a multithreaded timer can also be used to execute some QAction logic.
A multithreaded timer has some similarities with a normal timer, as both will define a Time interval and Content to be executed. The Time interval defines how often the timer will go off, and every time this happens the Group defined in the Content tag will be executed.
However, a multithreaded timer differs from a normal timer with several attributes that need to be defined in the options tag.
For more detailed information on multithreaded timers, see Multithreaded timers.
Basic configuration
Let's start from the following multithreaded timer code snippet (a timer used to perform an HTTP request):
<Timer id="1" options="ip:100,1;each:10000;threadpool:20;qactionbefore:2">
    <Name>HTTP Timer</Name>
    <Time>1000</Time>
    <Interval>0</Interval>
    <Content>
        <Group>100</Group>
    </Content>
</Timer>
This configuration can be considered the bare minimum, meaning that only the truly necessary configuration KPIs are included (IP, each, threadpool).
Basically, this configuration means that every second (Time: 1000 ms) the timer will go off to poll a number of rows present in table 100. The number of rows that will be polled every timer cycle depends on the number of rows present in the table and the "each" time defined in the options, as "each" defines the time all rows in the table have to be polled at least once.
For example, if table 100 contains 200 rows, this means that every second the timer goes off, 20 rows will be polled. This way, after 10 seconds (each: 10000) all rows in the table (10 times, 20 rows) have been polled at least once.
Note
Make sure the threadpool size is high enough (the minimum size should at least be equal to the total number of threads you wish to release every Timer Time). If this is defined too low, this can cause threads to get queued, resulting in the "each" time (full table poll) never being met.
To investigate this, it is possible to display some threadpool statistics. You can do this by defining some extra attributes after the threadpool size. These statistics will give a nice indication of what is currently happening, and are very helpful when investigating an issue.
<Timer id="1" options="ip:100,1;each:10000;threadpool:20,5,231,232,233,234,235,15000;dynamicthreadpool:230;qactionbefore:2">
    <Name>HTTP Timer</Name>
    <Time>1000</Time>
    <Interval>0</Interval>
    <Content>
        <Group>100</Group>
    </Content>
</Timer>
For more information on the threadpool options, see Timer options.
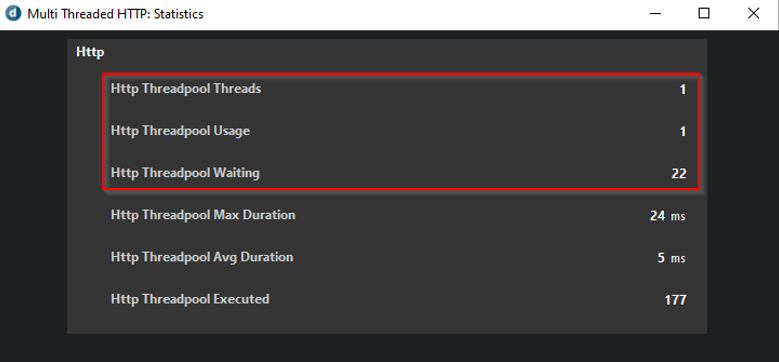
When the timer is configured correctly, the statistics should be as low as possible, no threads should be in a waiting state (queued), and the average and max duration of a thread execution should be kept as low as possible.
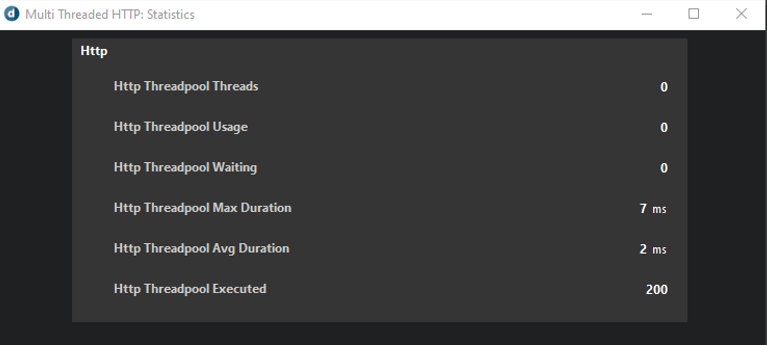
When the threadpool is defined too low, this can cause threads to be queued (i.e., put in a waiting state).
In this example, a multithreaded HTTP timer is used. If a complex device is polled, the responses can be quite big. This could cause huge spikes in memory and CPU usage every time the threads are launched to poll 20 rows, because all of them are currently launched simultaneously.
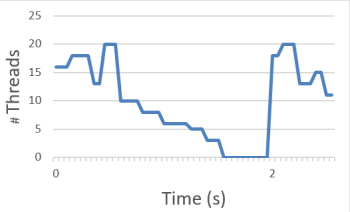
Example of CPU spikes when threads are launched simultaneously
To overcome this, you can make use of the pollingrate attribute in the options tag. For more information, see Multithreaded timers.
By defining the polling rate correctly, you can spread the launch of the threads equally over the timer's time and thereby avoid memory and CPU spikes.
Configuring the polling rate
Like in the example above, let's say there are 200 rows in a table and all of these rows should be polled within a 10-second timeframe. This means that every second, 20 rows should be polled. With the current configuration, all threads are launched simultaneously. To overcome this, configure the polling rate.
To do so, configure the pollingrate attribute in the format "pollingrate:a,b,c", where:
- "a" defines how often threads should be released (in milliseconds).
- "b" defines the number of threads that can be active simultaneously.
- "c" defines the number of threads that will be released every "a" milliseconds.
For example, take the following configuration:
<Timer id="1" options="ip:100,1;each:10000;pollingrate:200,4,4;threadpool:20,5,231,232,233,234,235,15000;dynamicthreadpool:230;qactionbefore:2">
    <Name>HTTP Timer</Name>
    <Time>1000</Time>
    <Interval>0</Interval>
    <Content>
        <Group>100</Group>
    </Content>
</Timer>
This configuration ensures that whenever the timer goes off, the 20 threads that were initially released at the start of the second are now spread over 200-millisecond intervals, meaning that every 200 milliseconds, "c" threads are released (in this case 4, as 1 second has five 200-millisecond intervals, and 5 * 4 = 20). This results in a better spread of load and less spikes in memory and CPU usage.
As defining the polling rate correctly can be tricky, you can use the PollingRate Calculator Tool to make things easier. For more information on how to download and use this tool, see Multithreaded timer polling rate calculator.
Using multiple multithreaded timers
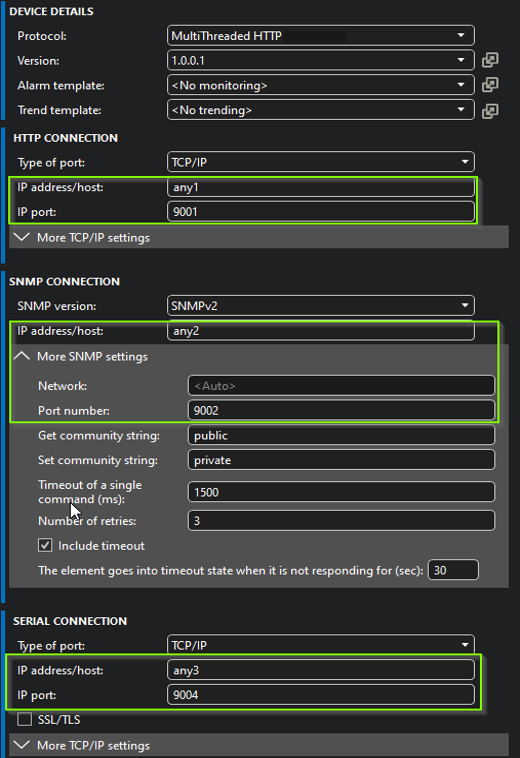
It is perfectly possible to have multiple multithreaded timers, even so that every timer is of a different type: HTTP, Serial or SNMP. To accomplish this, define additional connections in the advanced tag of the protocol, and create the new multithreaded timers for each connection, keeping in mind to use the correct connection attribute on every poll group.
However, as multithreaded timers make use of a table to retrieve the IP address to poll, it is still important that the element configuration defines a different IP/port for every connection.
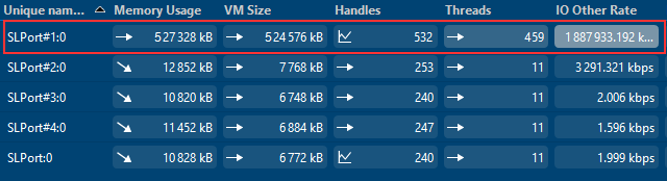
In the background, every identical IP/port combination gets assigned to one and the same SLPort process. When this configuration is not taken into account, this could lead to excessive strain on a single SLPort process, which could cause polling issues or even crashes.
Below you can find an example of an incorrect and correct configuration.
Example of an incorrect configuration
Using an identical IP/port combination can cause excessive strain on a single SLPort process.
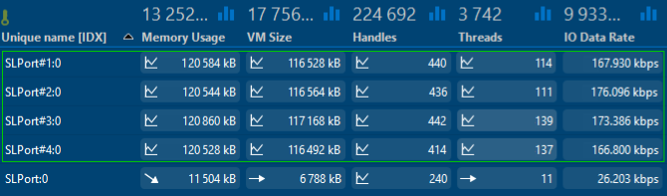
Example of a correct configuration
Using a unique IP/port combination will ensure that the load is spread equally over all SLPort processes.
SLPortSplit logging
If you want to check to which SLPort process a connection is assigned, you can check the SLPortSplit.txt log file. This file is available on every DMA in the folder C:\Skyline DataMiner\Logging. It displays an entry for every active connection in the following format:
[IP]:[IPPort] [SLPortID]
Example based on the configurations used above:
