How to implement the Subtable feature
Below, we describe one of the possible ways of implementing the Subtable feature in DataMiner.
In the example below, we will filter the interface table of a data source. The example is based on the SAP Base Info Table of the Alcatel SR Manager connector.
Why use the Subtable feature?
The Subtable feature can be used in DataMiner to have a filtered version of a bigger SNMP table. When a regular SNMP table is polled by DataMiner, all rows of that table will be retrieved regardless of how large that table is. However, in some scenarios, those tables can have a lot of information, so that rows that need the operator's attention do not stand out sufficiently. In addition, if a table has a high number of columns and rows, the polling time may become too long. The Subtable feature can help you circumvent these issues.
Step 1 - What are the rows you want to retrieve?
As a first step, you need to find out which rows need to be retrieved. If you know from the beginning that your rows will always be the same, and you also know their indexes, you can simply create a parameter to maintain all those indexes separated by a comma. In that case, you can move on to step 2.
However, if you want to dynamically change the rows across multiple data sources, you will need to follow these steps:
Create a replica of the original table with the minimum number of columns needed.
In our example, we are going to get the index column and the necessary extra columns to create the display key. We will call this table the SAP Base Info Hidden table.
Create a table that will allow you to manipulate the interfaces you want to retrieve in the original table – in our example SAP Table Filter.
Create two string parameters that will store the indexes that are in this second table (in our example SAP Table Filter), separated by commas. One of the strings will store all the filters, in case the original table is changed to operate in full mode instead of filtered mode. This way, when filtering is activated again, the same filters will be applied.
Step 1.1
The replica of the table is a normal SNMP table with the needed columns. In our example, we also have one retrieved column containing the display key. We will use this to have a more user-friendly way of selecting the filter.
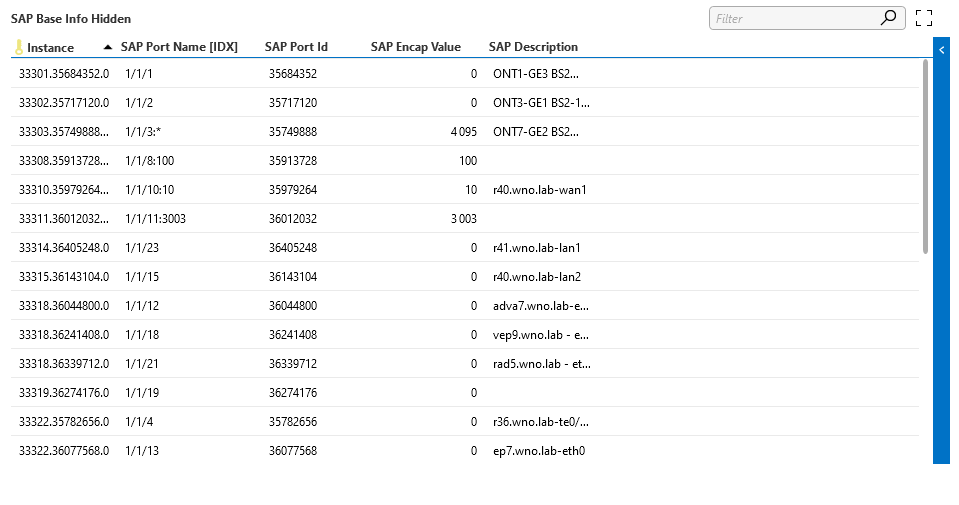
SAP Base Info Hidden table containing the columns to create the display key and the display key itself
The table definition in the connector for the SAP Base Info Hidden table:
<Param id="4600">
    <Name>sapBaseInfoHiddenTable</Name>
    <Description>SAP Base Info Hidden</Description>
    <Type>array</Type>
    <ArrayOptions index="0" options=";naming=:4605">
        <ColumnOption idx="0" pid="4601" type="snmp" options=""/>
        <ColumnOption idx="1" pid="4602" type="snmp" options=""/>
        <ColumnOption idx="2" pid="4603" type="snmp" options=""/>
        <ColumnOption idx="3" pid="4604" type="snmp" options=""/>
        <ColumnOption idx="4" pid="4605" type="retrieved" options=""/>
    </ArrayOptions>
    <Information>
        <Subtext><![CDATA[SAP Base Info Hidden Table used for]]></Subtext>
    </Information>
    <SNMP>
        <Enabled>true</Enabled>
        <OID type="complete" options=";instance;multipleGetBulk">tableOID</OID>
    </SNMP>
    <Display>
        <RTDisplay>true</RTDisplay>
        <Positions>
            <Position>
                <Page>SAP Filtering</Page>
                <Column>1</Column>
                <Row>0</Row>
            </Position>
        </Positions>
    </Display>
    <Measurement>
        <Type options="tab=columns:4601|0-4605|4-4602|1-4603|2-4604|3,width:100-138-100-112-109,sort:STRING-STRING-STRING-INT-STRING,lines:25,filter:true">table</Type>
    </Measurement>
</Param>
Step 1.2
In this step, you need to create logic to add rows to the filter table, in our case the SAP Table Filter table, and to allow the removal of such entries.
First, you need a dropdown list containing all the different available rows. In our example, we get the data for this parameter from another parameter that contains all the SAP port names separated by commas. Below you can find the filter parameter definition:
<Param id="4673" trending="false">
    <Name>sapFilterSelect</Name>
    <Description>Select SAP Filter</Description>
    <Information>
        <Subtext><![CDATA[Selecting a SAP from this list and adding it to the filter, will add this SAP to the SAP polling filter. The SAP will then be polled in the SAP tables.]]></Subtext>
    </Information>
    <Type>read</Type>
    <Interprete>
        <RawType>other</RawType>
        <Type>string</Type>
        <LengthType>next param</LengthType>
    </Interprete>
    <Display>
        <RTDisplay>true</RTDisplay>
        <Positions>
            <Position>
                <Page>SAP Filtering</Page>
                <Column>0</Column>
                <Row>1</Row>
            </Position>
        </Positions>
    </Display>
    <Measurement>
        <Type>discreet</Type>
        <Discreets dependencyId="4675"></Discreets>
    </Measurement>
</Param>
After this, you also need to build some logic to be able to add the selected filter to the table. Check the connector to assess the different actions done in a QAction to add the filter to the table. Your result should look something like this:
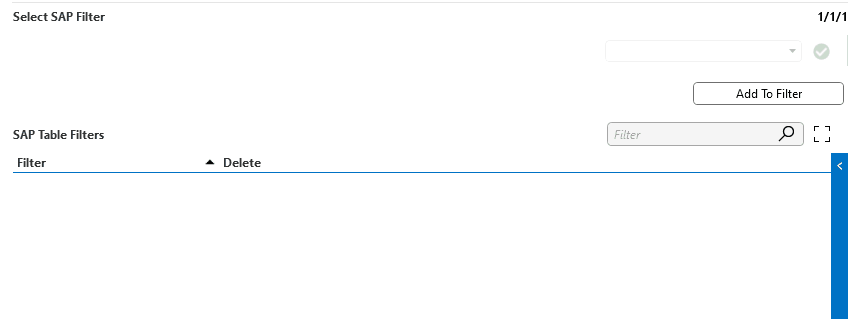
Adding a filter to the table
Step 1.3
For the last step of this first stage, you still need to create a parameter with all the indexes of the table that you want to retrieve information from. While in the previous step, you created a UI layer showcasing the display keys as a selectable entry, here you need to map those display keys to the actual indexes you want to poll. Those indexes should all be concatenated in the same string and separated by commas.
In our example, every time a new filter is added to the SAP Table Filter, we will look for that display key in the SAP Base Info Hidden table and add that index to the filter parameter. Keep in mind that if for some reason you are using the index/instance directly, you don’t need to do the lookup.
The final behavior of this component should look like this:
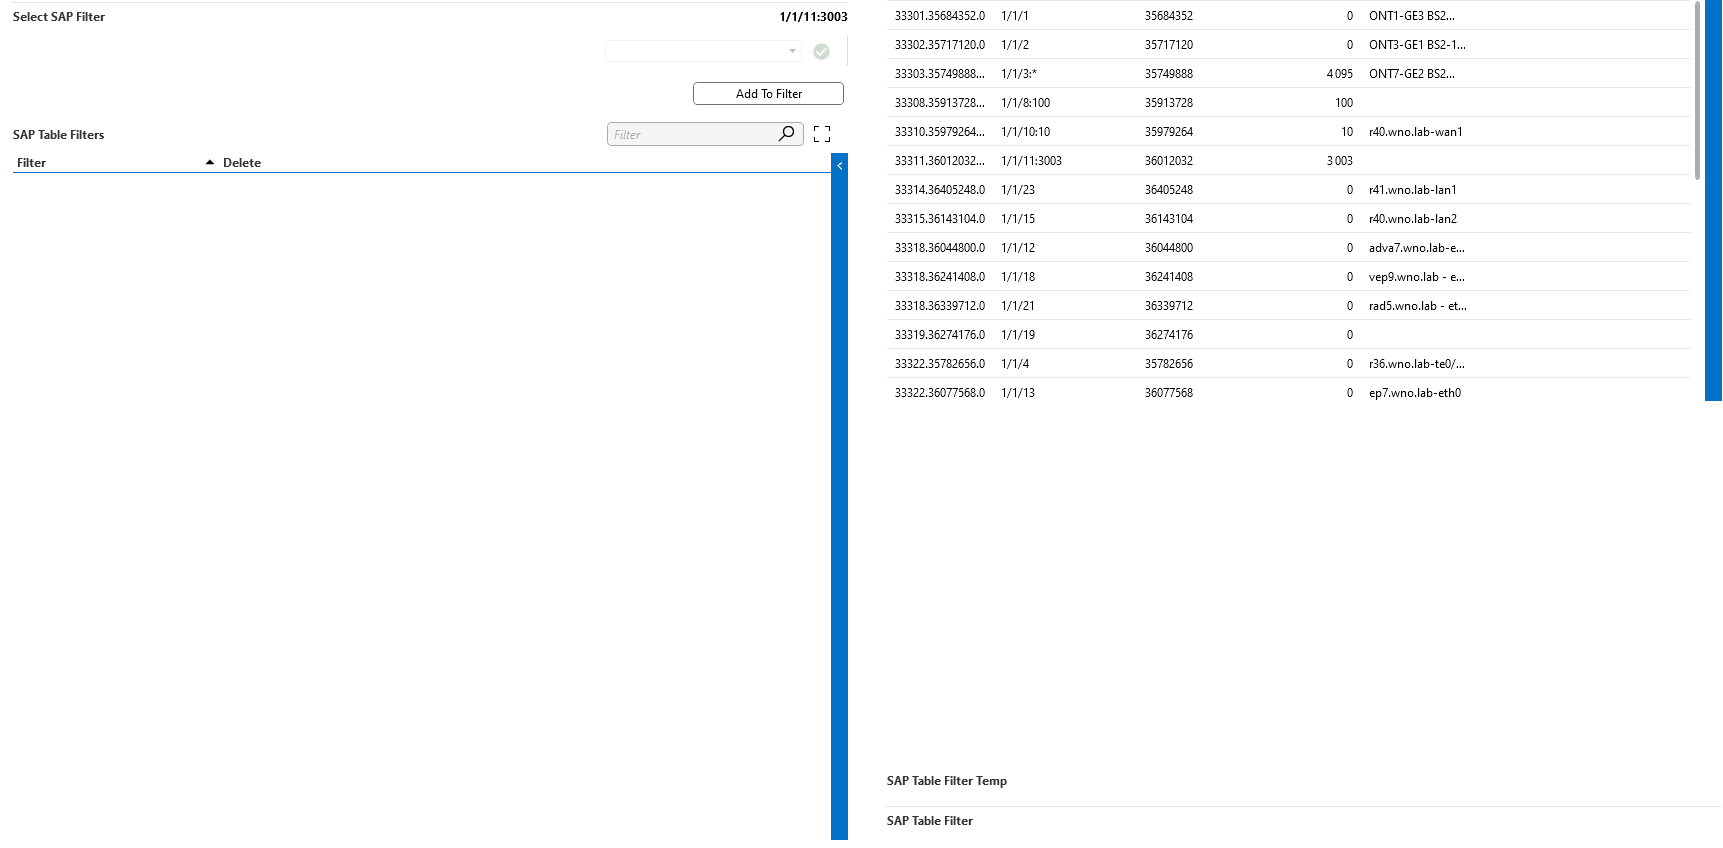
Managing filters
Step 2 - How do you only retrieve those specific rows?
Before we dive any further into this, note that if you choose to have a fixed parameter or manually input parameter that does not follow the previous logic, you should only add indexes that exist in the table. This is because when this feature is used, DataMiner will try to poll the information from those indexes, meaning that your data may shift or become corrupted.
Another important point is that, because of the nature of the feature, there is also a shift of columns when this data is polled. For this reason, a column is added after the instance column that can be referred to as a dump/temp column.
With this in mind, your table definition should look something like this:
<Param id="4100" trending="false">
    <Name>sapBaseInfoTable</Name>
    <Description>SAP Base Info</Description>
    <Type>array</Type>
    <ArrayOptions index="0" options=";naming=:4199">
        <ColumnOption idx="0" pid="4200" type="snmp" options="" />
        <ColumnOption idx="1" pid="4134" type="snmp" options="" />
        <ColumnOption idx="2" pid="4101" type="snmp" options=";foreignKey=8300" />
        <ColumnOption idx="3" pid="4102" type="snmp" options="" />
        <ColumnOption idx="4" pid="4103" type="snmp" options="" />
        <ColumnOption idx="5" pid="4104" type="snmp" options="" />
        <ColumnOption idx="6" pid="4105" type="snmp" options="" />
        <ColumnOption idx="7" pid="4106" type="snmp" options="" />
        <ColumnOption idx="8" pid="4107" type="snmp" options="" />
        <ColumnOption idx="9" pid="4120" type="snmp" options=";disableHeaderSum;disableHistogram;enableHeatmap" />
        <ColumnOption idx="10" pid="4124" type="snmp" options="" />
        <ColumnOption idx="11" pid="4127" type="snmp" options=";disableHeaderSum;disableHistogram;enableHeatmap" />
        <ColumnOption idx="12" pid="4128" type="snmp" options=";disableHeaderSum;disableHistogram;enableHeatmap" />
        <ColumnOption idx="13" pid="4129" type="snmp" options="" />
        <ColumnOption idx="14" pid="4130" type="snmp" options="" />
        <ColumnOption idx="15" pid="4199" type="retrieved" options="" />
        <ColumnOption idx="16" pid="4131" type="retrieved" options="" />
        <ColumnOption idx="17" pid="4132" type="retrieved" options="" />
        <ColumnOption idx="18" pid="4133" type="retrieved" options=";foreignKey=2100" />
    </ArrayOptions>
    <Information>
        <Subtext>A table that contains basic SAP information.</Subtext>
    </Information>
    <SNMP>
        <Enabled>true</Enabled>
        <OID type="complete" id="4682" options="instance;subtable;bulk:5">1.3.6.1.4.1.6527.3.1.2.4.3.2</OID>
    </SNMP>
    <Display>
        <RTDisplay>true</RTDisplay>
        <Positions>
            <Position>
                <Page>SAP</Page>
                <Column>0</Column>
                <Row>3</Row>
            </Position>
        </Positions>
    </Display>
    <Measurement>
        <Type options="tab=columns:4200|0-4101|2-4199|15-4102|3-4103|4-4104|5-4105|6-4106|7-4107|8-4120|9-4124|10-4127|11-4128|12-4129|13-4130|14-4131|16-4132|17-4133|18-4134|1,width:0-0-250-112-107-71-250-105-128-84-150-104-151-159-154-108-153-0-0,sort:STRING-INT-STRING|ASC|0-INT|ASC|1-INT-INT-INT-INT-INT-INT-INT-INT-INT-INT-INT-STRING-STRING-STRING-STRING,lines:20,filter:true">table</Type>
    </Measurement>
</Param>
As you can see, the column with "idx=1" is called temp. This is the column used to store the duplicated instance value that is created when this feature is used. As this means that the column order changes when you implement this feature, make sure you start a new range of the connector. All the other columns follow the same definition as in a regular SNMP table.
Note that this "temp" column needs to specify an OID in order for the subtable filtering to work correctly. This can be any OID from the table.
Another thing to consider is the SNMP definition of the table, which in our example contains "id=4682". This ID is the parameter ID of the SAP Table Filter that was either filled in manually or filled in via step 1.3.
Keep in mind that only certain types of polling are allowed when you use this feature. For more information, see Retrieving tables.
In this example, our SAP Base Info table, instead of having more than 20 rows, will only contain 2 rows, as illustrated below.

SAP Base Info Table after filtering
Once you have implemented the logic mentioned above, there are some other things you can add:
- A toggle button to switch between filtered or full tables. You can then retrieve the table partially or fully depending on this button.
- Triggering polling of the table every time the filter is changed, to make the solution more customizable.
To check these possibilities in more detail, check out the Alcatel SR Manager connector.