How to integrate RabbitMQ with DataMiner
RabbitMQ is popular messaging software used to exchange messages between different applications. It is similar to other tools like Apache Kafka or NATS. Below, we will explain how RabbitMQ works and how it can be integrated with DataMiner.
What is RabbitMQ?
The purpose of RabbitMQ is to collect incoming messages and store them in message queues. Applications that send messages to RabbitMQ are called producers. Applications that read the messages from the queues are called consumers.
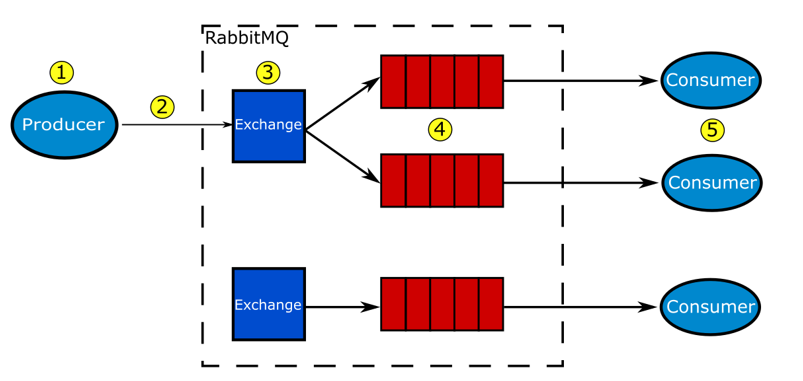
To help you understand how RabbitMQ works, we will explain step by step how a message is processed by RabbitMQ. The process is illustrated in the figure below.

The producer creates a message.
RabbitMQ does not impose any constraints on the format of the message: the payload simply consists of raw bytes. A message can also contain headers that describe the content of the message. For instance, we can use a header Content-Type with value "application/json" to specify that the message must be interpreted as JSON.
The producer sends the message to RabbitMQ.
The message is not sent directly to the queue, but to a component called exchange. The role of the exchange is to forward the message to the appropriate queue. Multiple kinds of exchanges are available, each implementing a different routing mechanism: direct, headers, topic, etc. In this example, we will use the simplest one: fanout.
The exchange routes the message to the appropriate queue.
An exchange can be connected to multiple queues. A connection between an exchange and a queue is called a binding. The exchange must decide to which queue the message will be forwarded. Since we are using a fanout exchange, this is simple: the message will be broadcast to all connected queues.
The queue stores the message.
Multiple options are available to manage the queue size. The queue can be limited to a maximum number of messages or a maximum number of bytes.
The consumer receives the message.
To read messages from the queue, RabbitMQ supports both a Push and a Pull mechanism.
- For the pull mechanism, the consumer must pull data from the queue.
- For the push mechanism, the consumer must first send a message to subscribe to the queue. Then, as soon a message arrives in the queue, it will be pushed towards the consumer. The push mechanism is recommended because it offers better performance.
Monitoring RabbitMQ
You can monitor a RabbitMQ Node using its HTTP API. The API exposes extensive information about the configuration of the system as well as real-time metrics such as the rate of messages arriving in a queue.
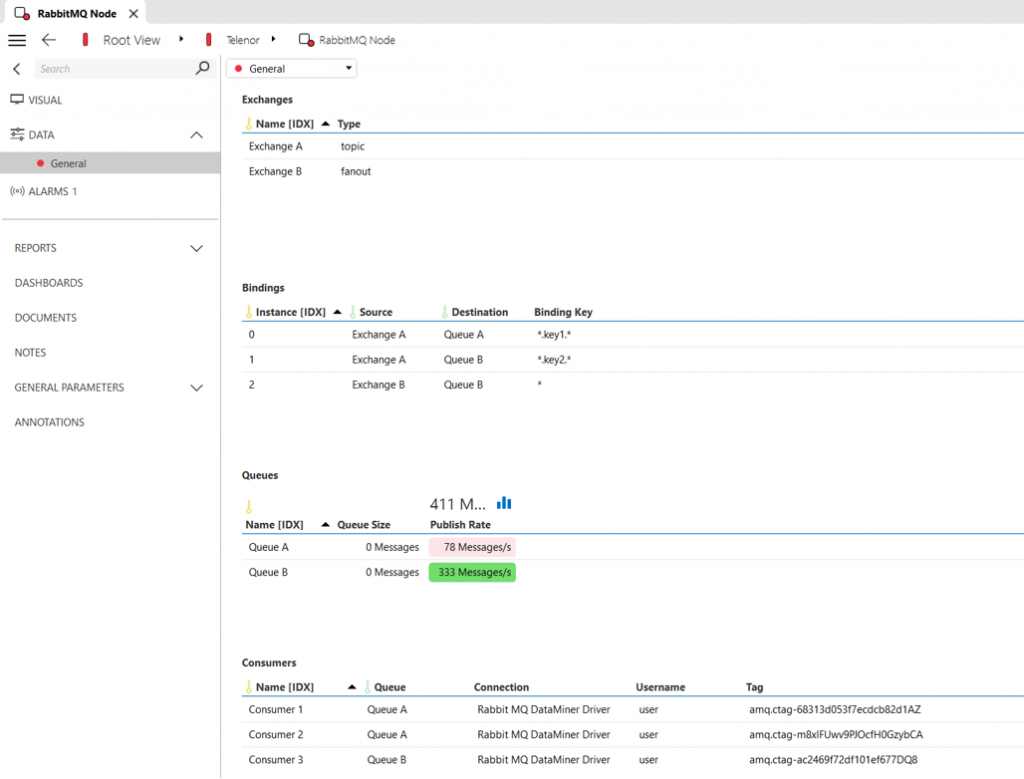
Using the built-in HTTP communication of DataMiner, you can easily create a protocol monitoring a simple RabbitMQ system. For instance, here is a screenshot of protocol listing all the exchanges, queues, bindings, and consumers present in the node:

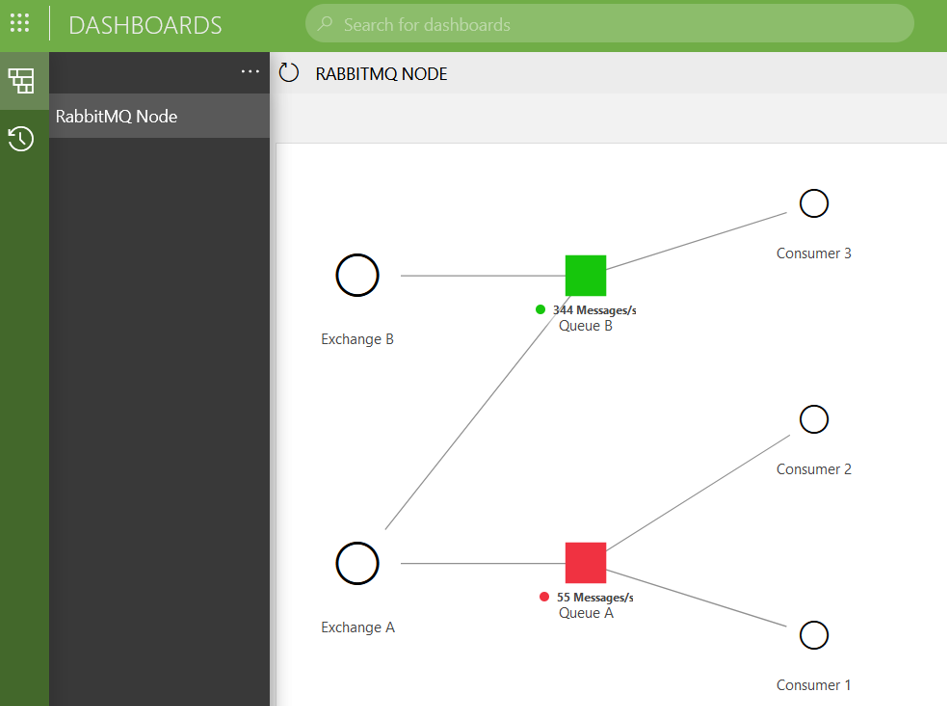
You can even use a node edge graph component in the DataMiner Dashboards app to generate a nice overview of the system:

Setting up DataMiner as a consumer or a producer
DataMiner can also exchange messages with RabbitMQ. The communication between RabbitMQ and consumers or producers is based on the AMPQ protocol. An official RabbitMQ C# library is available, which implements that protocol and takes care of all the low-level details. This library can be imported in a QAction to send or receive messages.
The following code snippet demonstrates how easy it is to send a message.
using System;
using System.Text;
using RabbitMQ.Client;
using Skyline.DataMiner.Scripting;
public static class QAction
{
    public static void Run(SLProtocol protocol)
    {
        try
        {
            var factory = new ConnectionFactory { HostName = "[HOST]", UserName = "[USER NAME]", Password = "[PASSWORD]" };
            using (var connection = factory.CreateConnection())
            using (var channel = connection.CreateModel())
            {
                // Create message
                string message = "Test message";
                var body = Encoding.UTF8.GetBytes(message);

                // Send message
                string exchangeName = "demo-exchange";
                channel.BasicPublish(exchangeName, "", null, body);
            }
        }
        catch (Exception e)
        {
            protocol.Log("Exception while sending message:" + e);
        }
    }
}
First, you need to connect to RabbitMQ by specifying the host name, username and password. Then you send the message to an exchange using the BasicPublish() method. In this example, we send the message "Test message" towards the exchange called demo-exchange.
Let's assume this exchange is connected to a queue called demo-queue. To consume this message from DataMiner, we will use the push mechanism because it offers better performance.
The following code snippet shows how to connect as a consumer.
using System;
using System.Text;
using RabbitMQ.Client;
using RabbitMQ.Client.Events;
using Skyline.DataMiner.Scripting;
public class QAction
{
    public void Run(SLProtocol protocol)
    {
        try
        {
            var factory = new ConnectionFactory { HostName = "[HOST]", UserName = "[USER NAME]", Password = "[PASSWORD]" };
            var connection = factory.CreateConnection();
            var channel = connection.CreateModel();

            var consumer = new EventingBasicConsumer(channel);
            consumer.Received += MessageReceived;

            channel.BasicConsume("demo-queue", false, consumer);
        }
        catch (Exception e)
        {
            protocol.Log("Exception while sending message:" + e);
        }
    }

    private static void MessageReceived(object sender, BasicDeliverEventArgs e)
    {
        var bytes = e.Body;
        var message = Encoding.UTF8.GetString(bytes);

        // Process message
    }
}
In this snippet, first the connection towards RabbitMQ is created. Contrary to the previous example, we did not use a using statement. This is necessary because we want the connection to stay open even after the QAction has stopped running. It is important to close the connection when the element stops, but to keep things simple the required code is not shown in the snippet.
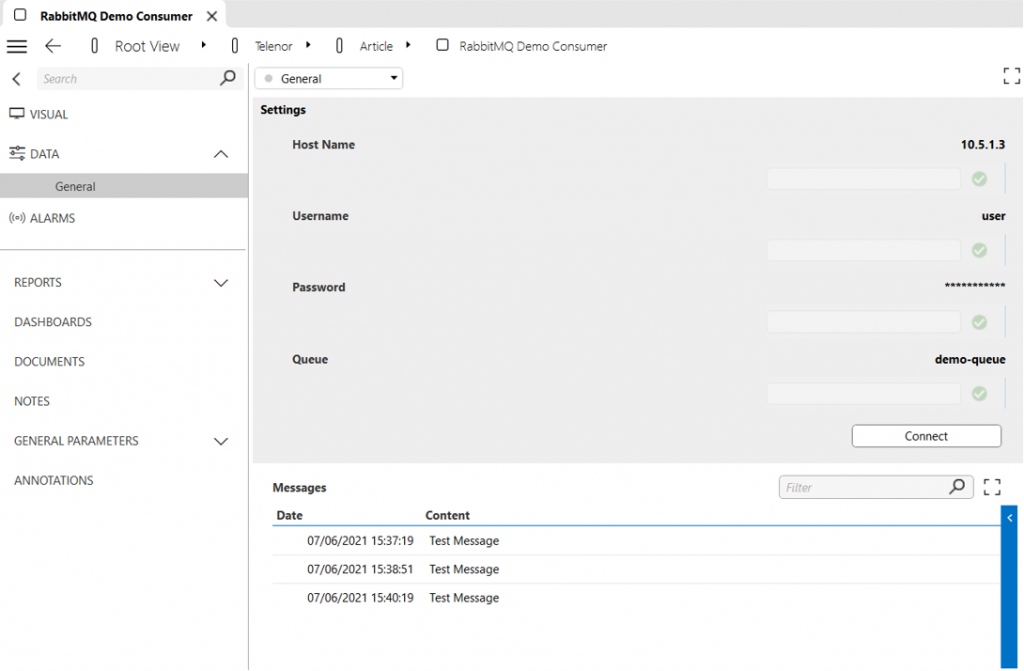
Once the connection is established, you can create a consumer and connect it to the queue using the BasicConsume() method. As soon as a message arrives in a queue, the MessageReceived() method will be called. With that method, you can extract the content and the headers of the message and process this. For instance, here is a screenshot of a connector that saves all the received messages in a table:
