Migrating the SQL general database to Cassandra
Important
This feature is obsolete. The migration wizard is no longer supported from DataMiner 10.3.0 [CU6]/10.3.6 onwards.
In legacy DataMiner Systems, a MySQL or MSSQL general database (also known as "local" database) can be used. However, with such a setup you will not have access to many recent DataMiner features. In addition, while older features will continue to work with MySQL up to DataMiner 10.6.0, MSSQL is no longer supported as from DataMiner 10.3.0.
To have access to all the latest DataMiner features, switching to Storage as a Service (STaaS) is highly recommended. For this, you first need to migrate to Cassandra. If you choose to keep using self-managed storage even though this is not recommended, you will also need to migrate to Cassandra and then migrate to a dedicated clustered storage setup in order to have access to all the latest features.
In System Center, you can migrate the general database from MySQL or MSSQL to Cassandra using a wizard. The wizard will first check if your system is ready for the migration. It checks both if the DMS is compatible and if the system requirements are met. If the system does not meet the necessary requirements, you can exit the wizard and then open it later to check again, before actually starting the migration.
Note
Cassandra is free to use, so no additional license is required for the migration. Though a commercial version of the database software is also available, this is not necessary.
Tip
See also: Cassandra - Migrating to Cassandra on DataMiner Dojo 
Prerequisites
The migration procedure has the following prerequisites:
Access to the server with administrator rights. This requires a connection dedicated completely or partially to this procedure, via VPN or local network.
A sufficiently large disk for the database size.
A sufficiently large time window for the migration. On average, this takes 1 hour per 5 GB of the database. For large systems it can take up to 48 hours.
The DataMiner Agents did not restart in the last 48 hours.
Before you start the migration wizard
Before you start the Cassandra migration wizard, we recommend that you check the following things:
Make sure that the following Trending tags in the file MaintenanceSettings.xml are all set to a large interval (e.g. 10 years). If the following tags are set to small intervals or if they are set to 0, you risk losing trend data during the migration: TimeSpan1DayRecords, TimeSpan1HourRecords, TimeSpan5MinRecords. See also: Alphabetical overview of settings.
Make sure you have the DataMiner permissions System configuration > Database > Configure local DB or Configure general DB (depending on your DataMiner version), and System configuration > Agents > Upgrade / restore, as otherwise you will not be able to run the wizard.
Do not specify the loopback IP address (127.0.0.1) as the first IP address for an Agent that is to use Cassandra.
Preparing for the Cassandra migration
Before the migration to Cassandra can begin, the migration wizard has to check if your system is ready:
In System Center, go to the Database tab and click the button Cassandra preparation/migration.
Note
This button is only available if there is still a general database left in the DMS that has not yet been migrated.
Click Check system requirements.
This check may take a few minutes depending on the size and complexity of your system. Once it is complete, the results of the check will be loaded in the wizard window.
Note
To ensure optimal performance, the Cassandra database should be located on a different drive than DataMiner. See also: Moving the Cassandra database to a different disk drive.
Under Protocol System Requirements, check if any protocols are indicated. The wizard will list all protocols that may not be compatible with Cassandra. Incompatible protocols that are in use are indicated with a warning icon, as the migration cannot continue so long as they remain in use unchanged.
Note
- The detection follows very strict rules, so it is possible that some of the indicated protocols may be compatible after all.
- The detection should ignore WMI queries, but in some cases these may cause a protocol to be interpreted as incompatible, even though it is in fact compatible.
- SQL queries on other databases outside of DataMiner may also cause a protocol to be interpreted as incompatible.
- If any incompatibilities are found during the check, detailed info can be found in the file ProtocolCache.txt, in the folder
C:\Skyline DataMiner\System Cache. For each protocol, this file lists the protocol name followed by "true" or "false" depending on whether the protocol is compatible. If it is incompatible, this is then followed by the QAction ID and line number. If there are several incompatible lines, the line numbers are separated by semicolons.
To deal with protocols that are indicated as incompatible, you can do the following:
Update the protocol to a more recent, compatible version.
Stop any elements using the protocol, and upgrade it as soon as possible after the migration.
If you believe the protocol to be compatible after all, tag it as compliant in the protocol XML, using the following syntax:
<Compliancies>
  <CassandraReady>true</CassandraReady>
  <CassandraRequired>true</CassandraRequired>
  <MinimumRequiredVersion>8.5.8.5</MinimumRequiredVersion>
</Compliancies>
Note
- The version number specified in the MinimumRequiredVersion element must have the following syntax:
- major.minor.month.week, e.g. 10.3.3.7, or
- major.minor.month.week-xxxx (in which xxxx is the four-digit build number), e.g. 10.3.3.7-5687.
- To have incompatible protocols that are managed by Skyline upgraded for use with Cassandra, contact your Technical Account Manager.
- The version number specified in the MinimumRequiredVersion element must have the following syntax:
- The detection follows very strict rules, so it is possible that some of the indicated protocols may be compatible after all.
Under Automation Script System Requirements, check if any Automation scripts are indicated. If there are, the scripts may need to be updated to be compatible with Cassandra.
Note
- The check looks for any SQL query expressions that might cause the script to be invalid. However, it could be that such expressions in a script are used to query a different database, in which case the script is compatible even though the wizard cannot see this. In that case, add the following comment line in the first block of C# code of the script to indicate that it is compliant:
//[CassandraReady=true] - When Automation scripts are checked for compliance, and incompatibilities are found, the line numbers where these occur are stored in the file ScriptCache.txt, in the folder
C:\Skyline DataMiner\System Cache. For each script, the file lists the name followed by "true" or "false" depending on whether the script is compatible. If the script is incompatible, this is then followed by the number of the invalid script action (with the first action being 0) and the line number of the invalid line. If there are several incompatible lines, the line numbers are separated by semicolons. - If a script is tagged as
[CassandraReady=false], it is considered incompatible and not checked further. As such, no information about such a script is included in ScriptCache.txt.
- The check looks for any SQL query expressions that might cause the script to be invalid. However, it could be that such expressions in a script are used to query a different database, in which case the script is compatible even though the wizard cannot see this. In that case, add the following comment line in the first block of C# code of the script to indicate that it is compliant:
Under DataMiner Agent System Requirements, check whether your system has adequate resources available for the migration. If not, you may need to upgrade your system before the migration is possible. There are also several options available. You may need to click the More options button in the lower right corner to see some of these options.
Migrate average trending/Migrate real-time trending: By default, only average trending information for a period of one year up to now is migrated. However, you can select not to migrate any trending, or to also migrate real-time trending (which is by default for the last 24 hours).
Note
- The following system requirements apply for the migration to Cassandra:
- Your server needs a 64-bit version of Windows 2008 or higher.
- One fourth of the installed RAM must be available, with 1 GB of additional free RAM.
- The CPU load and disk busy time must be less than 80% during the last hour.
- On the disk where the Cassandra data will be located, there should be enough free space for twice the size of the legacy database, plus an additional 20 GB of free space.
- On the C drive, where the Cassandra software itself will be installed, there should be at least 10 GB of free space.
- If you choose not to migrate average or real-time trending, both the legacy database and the Cassandra database may be active after the migration, which can cause CPU, RAM and disk usage to increase.
- If the migration of real-time trending is estimated to take little time, it is advisable to select this option. However, if the migration of real-time trending takes 24 hours or more, selecting the option makes little sense.
- The following system requirements apply for the migration to Cassandra:
Migrate options: By default, the existing data in the legacy database is not deleted, but with Remove migrated data from [legacy database], you can select to remove it once the migration is done.
Note
Regardless of which option you select, the legacy database does keep running once the migration is complete, because it may still be used for some applications, e.g. Asset Manager or third-party applications. If you no longer need the legacy database after the migration, shut it down manually (see After the migration).
Online/Offline: By default, the migration happens while the DMA is online, which means that for example monitoring will not be affected by the ongoing migration. However, if you select Offline, the DMA will be stopped in order to carry out the migration.
Note
The migration options you selected will be logged to SLCassandraMigration.txt.
If your system does not meet the necessary requirements, you can exit the wizard to deal with the issues it pointed out, and then open it again later. You can also generate a report of the wizard’s findings with the Retrieve report button in the lower right corner.
Note
If only some Agents in a DMS meet the necessary requirements, it is possible to proceed with the migration for those Agents only, so that these can already benefit from the enhanced performance provided by the Cassandra database. However, note the following:
- If not all Agents in a DataMiner System have been migrated to Cassandra, DataMiner features that specifically rely on Cassandra will not yet be available.
- In a Failover setup, it will only be possible to migrate if both DMAs are ready for the migration. For more information on migrating a Failover DMS, see Switching to Cassandra in a Failover setup.
Migrating to Cassandra
After you have followed the procedure above and system requirements are met, you can carry out the migration to Cassandra as described below.
Note
Before you start the migration process, we strongly recommend that you first restart all DataMiner Agents in the DMS. Once this is done, make sure there are no further changes to the system (e.g. added elements) before the migration is started. This will ensure that all data is written to the database before the migration starts, so that any cached data is not lost. In a Failover setup, this can also prevent issues with the migration of the backup DMA.
In the Cassandra wizard, click Next to go to the migration process itself.
If you do not want the migration to start automatically after Cassandra has been downloaded, clear the selection from Automatically start migration after installation.
If you have internet access, click Download and install, and then enter your DCP credentials. If you do not have internet access, click I have no internet access, and browse to the location of the installation package on your system.
The progress of the download will then be indicated at the top of the window.
Note
- The file name of the download is expected to be in the format cassandra-binaries-*.dmupgrade.
- The Cassandra binaries package is also available on Dojo at https://community.dataminer.services/download/cassandra-installer/.
If you selected not to start the migration automatically, at this point you will need to start the migration manually. Otherwise it will start as soon as the package has been downloaded.
During the migration:
The migration process uses only one thread and takes approximately one hour per 5 GB. This way ongoing DataMiner real-time operations are minimally affected. However, if necessary, it is possible to pause the migration at any time with the Pause migration button.
Note
- When the migration is started, paused, or stopped, a notification is displayed in the Alarm Console.
- During the migration process, alarm states are not updated in the database. This could for instance cause an incorrect alarm state to be displayed in a trend graph for the period when the migration took place.
It is possible to restart a DMA while the migration is going on. In that case, when the DMA has started up again, the migration will be set to paused. You can then resume the migration process by clicking Resume migration in the wizard in System Center.
You can follow the progress of the migration in the progress table, which has several tabs:
Overview: Displays a short summary of the migration progress.
General: Displays all actions in the order in which they occur.
[DMA name]: Displays the progress for the DMA in question.
Note
- In order to monitor the migration progress of a DMA that is migrating while offline, browse to the DMA's IP and click the Monitor button. It is not possible to monitor the progress directly from another online DMA in the DMS.
- If something goes wrong during the migration for a particular DMA, a link to additional log information will be displayed in the details tab for that DMA. This additional information is recorded in the file FailedTablesMigration.txt in the folder
C:\Skyline Dataminer\Logging\. - If you close the migration window, you can still check the status of the migration in the log file
C:\Skyline DataMiner\Upgrades\Packages\cassandra-progress.dmupgrade-*\progress.log.
To view logging information related to the Cassandra migration, including the settings used for the migration, go to Apps > System Center > Logging > DataMiner, and select the Cassandra Migration log file. Additional useful logging can be found in the Database Connection log file.
When the migration is complete, restart DataMiner. This is required to make sure that the SLAnalytics process keeps working correctly.
Note
- To improve efficiency and scalability using Cassandra, after the migration, all trend data is stored in one table, instead of in a table per element.
- If an element with a logger table (e.g. an SLA) is stopped at the moment when the migration takes place, the data of that element will not be migrated.
- To ensure optimal performance, the Cassandra database should be installed on a different drive than DataMiner. If you migrated to a Cassandra database on the same drive as DataMiner, you can move the database afterwards. See Moving the Cassandra database to a different disk drive.
- When your system has a high load, it is strongly recommended to move the Cassandra database towards an external (Windows or Linux) machine. This way, DataMiner and Cassandra do not affect each other during heavy operations. The best way to do so is by adding one or more external nodes to the Cassandra cluster and then decommissioning the original node on the DataMiner machine. See Adding and removing nodes in a Cassandra cluster database.
After the migration
To improve the security of the Cassandra database, follow the procedures mentioned under Cassandra authentication.
Adjust the tombstone settings in the Cassandra.yml file:
tombstone_warn_threshold: Set this to 100000. Cassandra warns in the Debug.log file whenever there are more tombstones than this threshold. This provides a good indication of when the tombstone_failure_threshold might be exceeded.
tombstone_failure_threshold: Set this to 200000. Queries will fail if a record has more tombstones than the value set here. Increases of this value will slow down your reads but might be manageable depending on the use case.
To ensure that your Cassandra database does not run out of memory under load, configure the heap size for Cassandra.
Using the default "CMS" garbage collector, the heap space should ideally be between 8 and 16 GB.
In Windows, you can change the heap size as follows:
Stop Cassandra.
Open Regedit and go to the following key:
HKEY_LOCAL_MACHINE\SOFTWARE\WOW6432Node\Apache Software Foundation\Procrun 2.0\cassandra\Parameters\JavaRight-click Options and select Modify.
Add or update the entries containing Xms and Xmx with the heap size in megabyte, e.g. -Xms8192M and -Xmx8192M for 8 GB.
Make these same changes in
C:\Program Files\Cassandra\conf\jvm.options.Restart Cassandra.
Tip
For more information on how to tune the resources of Cassandra's Java Virtual Machine, including how to configure this on a Linux machine, see Tuning the Java heap.
If MySQL or MSSQL are no longer used on the DMA server, disable the relevant service:
Run services.msc.
In the Services window, right-click the service MySQL or SQL Server (MSSQLServer), depending on which kind of database you were using, and select Properties.
If the service is currently running, click the Stop button.
In the Startup type box, select Disabled.
Click OK.
Once you are sure you no longer need the old database data as a backup (e.g. a few months after the migration), remove the old database data folder (e.g. for MySQL:
C:\ProgramData\MySQL\MySQL Server 5.5\data\sldmadb).
Note
When this initial migration to Cassandra is complete, to have access to the latest DataMiner features, you will also need to migrate to dedicated clustered storage.
Switching to Cassandra in a Failover setup
A Failover setup will be migrated to Cassandra in the following way:
DataMiner Cube checks whether the two DataMiner Agents can be migrated to Cassandra. The migration of the Failover setup can only be started if both DMAs are ready.
Note
Failover switching will be disabled as soon as you start the migration, and you should not try to initiate a switch manually. Automatic switching will be enabled again when the migration is complete.
DataMiner Cube uploads the Cassandra installation package to both DMAs and launches the migration process.
Cassandra is first installed on the main DMA. Then a message is sent to the backup DMA saying that it can install Cassandra as well.
Note
Cassandra is not installed on both DMAs in parallel, as the main Cassandra instance needs to be up and running before the second instance can be started.
As soon as Cassandra has successfully been installed on both DMAs, the migration will start on the main DMA. The data will then be automatically synced with the Cassandra database of the backup DMA.
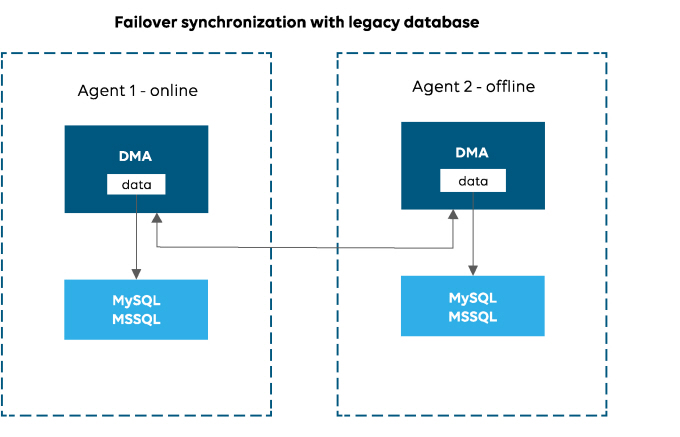
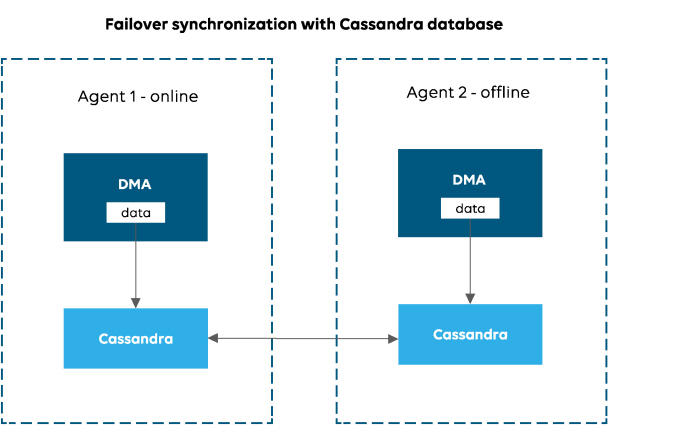
In a Failover DMS using Cassandra, the Cassandra instances on the two DMAs are clustered. This means that after the migration, the data will be automatically synchronized between the two databases directly. This is different from the way Failover synchronization works with a legacy database, where data is synchronized between the Agents themselves, and between each Agent and its respective database.