Getting started with basic shapes
This tutorial explains how to start from a blank Visio file and edit basic element info in an efficient way through shape grouping.
Expected duration: 15 minutes
Tip
See also: Kata #21: Visual Overview design basics on DataMiner Dojo 
Prerequisites
A DataMiner System that is connected to dataminer.services that has a Microsoft Platform element.
Tip
A new DataMiner as a Service system comes with a Microsoft Platform element out of the box, so it automatically meets this requirement.
Overview
- Step 1: Create a new blank Visio file for the element
- Step 2: Set up an element alarm color LED shape
- Step 3: Show more information efficiently
- Step 4: Clean up the drawing
Step 1: Create a new blank Visio file for the element
Open DataMiner Cube and connect to your system.
Tip
If you created a new DaaS system for this tutorial, refer to Accessing a newly created DMS for the first time for more information.
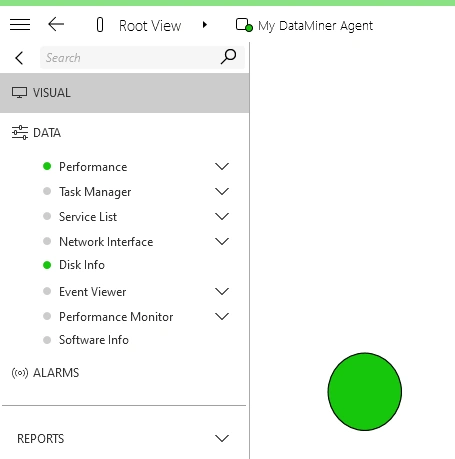
Open your Microsoft Platform element on the Visual page.
Right-click the Visual page and select Set as active <element name> element Visio file > New blank.
In the New Visio file pop-up window, click Yes.
At this point, your Microsoft Visio application should start up automatically, and you can start modifying your new Visio file.
Step 2: Set up an element alarm color LED shape
Press Ctrl+A followed by the delete button to remove all shapes from your Visio page.
Navigate to the Home tab of the ribbon and select the downward arrow next to the rectangle in the Tools section.
Select Ellipse from the dropdown list, and draw a circle on your page by clicking and dragging the mouse on it.

Right-click the newly created ellipse and select Data > Define Shape Data.
Set the Label field to
Element.Set the Value field to the name of your element.
Click OK.
Save your Visio file.
In DataMiner Cube, your Visual Overview should now be updated with your changes. You should see an interactive ellipse shape that is filled with the current alarm state color.
Step 3: Show more information efficiently
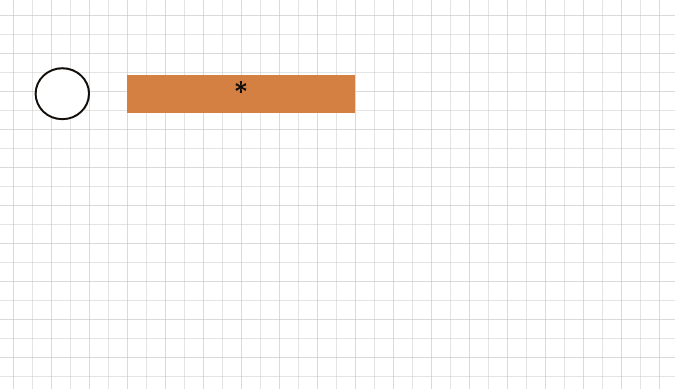
In the Tools section of the Home tab of the ribbon, select the rectangle.
Draw a rectangle on your page by clicking and dragging the mouse on it while this tool is selected.
Right-click the newly created rectangle and select Data > Define Shape Data.
Set the Label field to
Parameter.Set the Value field to
350.This is the parameter ID of the Total Processor Load parameter.
Click OK.
Double-click the rectangle shape and enter the shape text
*.Right-click the ellipse and select Shape Data to open the Shape Data panel.
In the Shape Data panel, set the value of the "Element" shape data to "*".
In the Tools section of the Home tab of the ribbon, select Pointer Tool.
Select both shapes on your page, right-click and select Group > Group.
Right-click the newly created shape group and select Data > Define Shape Data.
Add shape data with label
Elementand set its value to the name of your element.Save your Visio file.
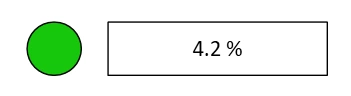
In DataMiner Cube, you should see two colored shapes, one of which displays the value of your parameter.

Step 4: Clean up the drawing
Right-click the shape group and select Data > Define Shape Data.
Click the New button to add shape data with label
Enabledand valuefalse, preventing the shape from being clicked and disabling the hover effect.Right-click the shape group and select Group > Open Group.
Right-click the ellipse shape and select Data > Define Shape Data.
Click the New button to add shape data with label
Enabledand valuetrue. This will override the earlier configuredEnabledstate for this child shape, enabling only the ellipse rather than the whole group.Right-click the rectangle shape and select Data > Define Shape Data.
Click the New button to add shape data with label
Optionsand valueNoAlarmColorFill.Make sure you have no shapes selected, click the "..." in the top-right corner of the Advanced Editing panel and select Add pretty hover.
Note
If you followed this tutorial, you should see the Advanced Editing in your Microsoft Visio application. The panel is created when you launch Microsoft Visio from DataMiner Cube by either creating a new blank Visio file or editing an existing one.
This hover effect ensures that when you hover the mouse pointer over the ellipse, the highlighted area moves with the ellipse, not its outer rectangle.

Save your Visio file.
In DataMiner Cube, only your ellipse will now be colored with the alarm state of the element, and only that shape will be clickable. The pretty hover option will ensure that the highlighted area of the ellipse moves with the ellipse, not its outer rectangle.