Installing DataMiner using the DataMiner Installer
With the DataMiner Installer, you can install DataMiner on premises, in a private cloud, or in a hybrid setup.
The core DataMiner software can only be installed on the C: drive. It is currently not possible to select another drive for this. The storage nodes for the DataMiner System can be hosted in the cloud by Skyline (Storage as a Service), or you can host them yourself. You will be able to select your preferred option for this during the installation.
You can follow the steps below or watch this short video, which shows you how to install a self-managed system using the DataMiner Installer v10.4 with the Storage as a Service storage type:
Important
- Avoid using duplicates of existing VMs to install a new DataMiner machine. Using cloned VMs can cause certain configurations from the previous DataMiner machine to linger and cause conflicts in the system.
- If you do not want to do a default installation, but you want to restore a backup, create a Failover Agent to pair with an existing Agent, or do an offline installation, you will need to follow a different procedure than shown in the video above. Please read the instructions below carefully to make sure you follow the correct procedure.
Tip
By default, a DataMiner System is deployed with a Community Edition license. For information on pricing and limitations for this license, see DataMiner Community Edition.
Before you run the Installer
Check the DataMiner Compute Requirements and make sure your system meets the necessary requirements.
If you do not intend to use the v10.6 or v10.5 Installer, make sure the necessary .NET and .NET Framework versions are installed, as mentioned in the requirements. With the v10.6 or v10.5 Installer, these will be included in the installation.
Note
If the .NET Framework is not installed, the v10.6 or v10.5 Installer will install it and prompt you to reboot the system before continuing the installation.
Make sure the server is synced with an NTP server. If you intend to install multiple DataMiner Agents in a cluster, make sure all servers are synced with the same NTP server.
Make sure that no anti-virus software will interfere with the DataMiner installation and with the DataMiner software once it is installed. See Regarding antivirus software.
Make sure you have a Windows account with administrator rights.
Verify in the network configuration that the network interface uses a static IP instead of DHCP, because DataMiner requires a static IP.
For more details, refer to Change TCP/IP Settings under Essential Network Settings and Tasks in Windows.
If you do not intend to use the v10.6 or v10.5 Installer, download and install the DataMiner Cloud Pack from DataMiner Dojo.
With the v10.6 or v10.5 Installer, this will be included in the installation.
Download the DataMiner Installer from DataMiner Dojo.
Note
- If you intend to install a DataMiner Agent that will be used in a Failover setup based on virtual IP, you will also need to install Npcap or WinPcap (deprecated) on the system. For a regular DataMiner Agent or a Failover setup based on hostname, this software will not be needed.
- The v10.5 Installer will install NATS, while the v10.6 Installer will install BrokerGateway. For details on these different setups, refer to Migrating to BrokerGateway.
Running the Installer
To install DataMiner using v10.6 or v10.5 Installer, follow the steps below:
Double-click the setup executable.
If elevated permissions are required, in case you are logged in with a user account with administrator rights, you will only need to confirm. In case you are logged in with a regular user account, you will need to provide credentials for a user account with administrator rights.
Click Install.
The progress of the installation will be displayed. A cancel button in the lower-right corner allows you to cancel the installation process if necessary.
When the installation is complete, do not immediately click the Run Configuration Tool button. First read the notes below.
Important
At this point, the DataMiner core software is fully installed. If you continue with the steps below, the Installer will also automatically take care of the license and data storage configuration. However, if you do not want a default installation, you may not want to use this automatic configuration:
- If you intend to restore a backup coming from another machine, for example, because of a hardware migration or during disaster recovery, skip the configuration below and follow the steps under Restoring a backup onto the new installed DataMiner Agent.
- If you are installing a Failover Agent, skip the configuration below, and follow the steps under Configuring the new DataMiner Agent as a new Agent in a Failover pair.
Note
If you have accidentally closed the configuration window, you can run it manually from
C:\Skyline DataMiner\Tools\FirstStartupChoice\FirstStartupChoice.exe. Make sure to run it with administrator privileges.If you want to proceed with the configuration of your DataMiner Agent, click Run Configuration Tool to start the DataMiner Configurator, and then click Next.
On the Storage page, select the desired database type:
STaaS (Storage as a Service) (recommended).
Self Managed - External: A regular dedicated clustered storage setup. If you select this option, you will also need to fill in the connection details for both Cassandra and OpenSearch.
Note
Make sure these clusters are active and reachable from the machine where you are installing DataMiner. You are responsible for the management of these external database clusters.
Click Next to proceed to the Registration page, and fill in the required details to connect your DataMiner Agent to dataminer.services:
- Organization API Key: Provide an organization key that has the necessary permissions to add DataMiner Systems in your organization. For more information on how you can add a new organization key to your organization on dataminer.services, see Managing dataminer.services keys.
- System name: This name will be used to identify the DataMiner System in various dataminer.services applications.
- System URL: This URL will grant you remote access to your DataMiner System web applications. You can choose to either disable or enable this remote access feature at any time.
- Admin Email: This email address must be associated with a dataminer.services account that is a member of your organization. It will become the owner of the DMS on dataminer.services.
- STaaS Region: If you have selected to use STaaS for data storage, select the region where your data should be hosted.
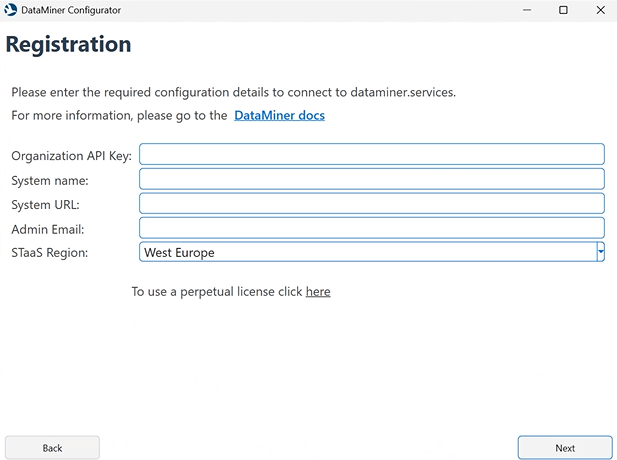
Example with registration details for a STaaS setupNote
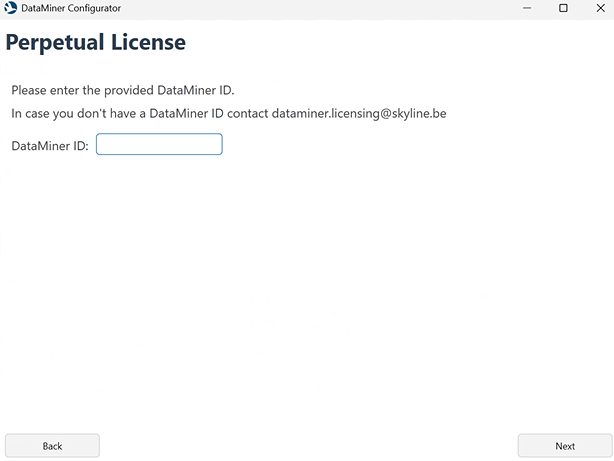
By default, if you install DataMiner while connected to the internet, DataMiner is deployed in subscription mode with a Community Edition license. However, if you want to do an offline installation or if you want to install DataMiner with a perpetual license, click the link below the registration fields and enter the DataMiner ID provided by Skyline. If you do not have a DataMiner ID yet, contact dataminer.licensing@skyline.be.
You can also deploy DataMiner in subscription mode first and switch to a perpetual license later.
Click Next, and verify the configuration settings you entered.
To start the configuration, click Configure.
The configuration progress will now be displayed.
When the configuration is complete, click Finish to close the installer.
DataMiner will automatically start up and connect to dataminer.services. DataMiner Cube will also be installed, so you can connect to DataMiner locally.
To be able to make full use of all available DataMiner features, upgrade to the latest feature or main release version.
Important
During the DataMiner installation, you are automatically added to the Administrator group by the installation wizard, giving you all Administrator rights in DataMiner. To grant others access to the newly installed DMA, log in to Cube using the same Windows account as was used to install DataMiner, and configure user permissions as described in Basic security configuration.
Note
- To view detailed log information on the installation process, in the last step of the installation, click the Open logs button.
- After the installation, if you have configured security so that there is at least one other user with full administrator rights, you can safely remove the account you used for the installation if necessary.