Creating a test package
In this tutorial, you create a basic low-code app, prepare a DataMiner test package to test it, and trigger a QAOps test run.
Expected duration: 15 to 25 minutes.
The content and screenshots for this tutorial were created using DataMiner 10.6.4 and DIS 3.1.20.
Prerequisites
Access to https://qaops-sandbox.skyline.be. This "QAOps Sandbox Environment" environment should be used for every QAOps tutorial.
Important
Contact support.boost@skyline.be to receive a username and password for access to the sandbox system.
DataMiner Integration Studio version 3.1.20 or higher.
Microsoft Visual Studio 2022 or higher, with the ASP.NET and web development workload enabled (see Troubleshooting).
Access to a DataMiner System with rights to create a low-code-app
Overview
Step 1: Create a new DataMiner test package project
Open Visual Studio and select Create new project.
Select the DataMiner Test Package Project template, and then click Next.
Enter a project name, for example,
MyFirstTestPackage.Choose a location, for example,
C:\DataMiner Testing.Make sure Place solution and project in the same directory is not selected.
Click Next.
Enter your name or initials in the Author field.
Verify that Create DataMiner Package options is selected.
For this tutorial, keep GitHub Workflows set to None.
Click Create.
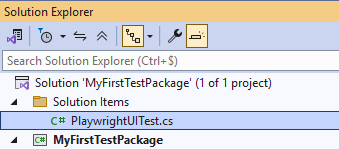
After the project opens, you should see the Getting Started Markdown file.
Step 2: Create a low-code app to be tested
Using a different DataMiner System than QAOps Sandbox where you have the necessary rights, create a low-code app for this test:
In a browser, go to the home page of your DataMiner system.
Click + Create app.
In the header bar, specify a name for your app, for example,
QAOps tutorial.Click Create page.
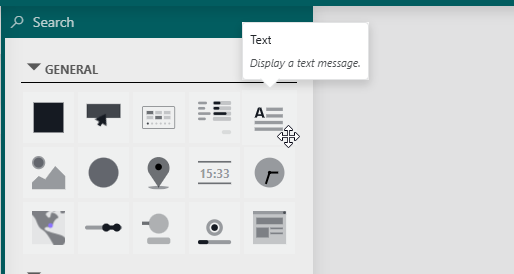
Hover the mouse pointer over the colored bar with + to open the visualizations panel.
From the General section of the visualizations panel, drag the Text visualization onto your page to create a component that will display text.
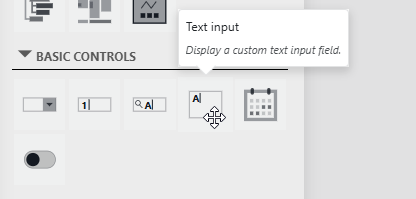
From the Basic Controls section of the panel, drag the Text Input visualization onto your page to create a component where users will be able to enter text.
Select your new Text component, go to Settings, and enter an expression similar to
Welcome {COMPONENT."Current view"."Text input 2".Value.Texts.Value}.You can begin by writing an open brace after the
Welcomeand follow the provided Intellisense, for example: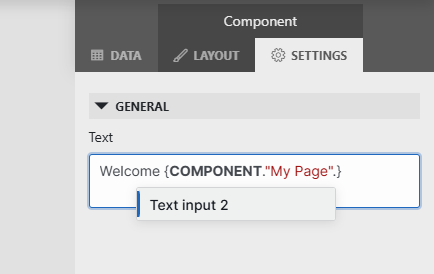
Select your new Text Input component, go to Settings, and enable Value Change.
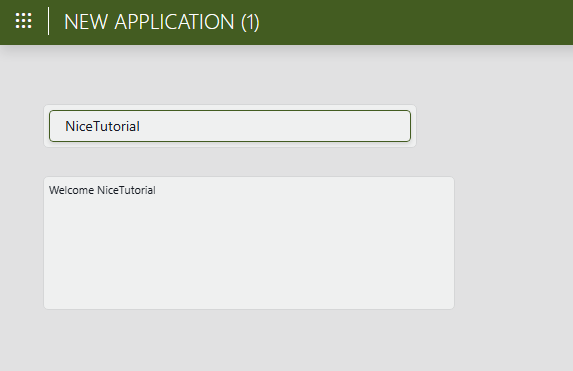
Publish the app and verify that text entered in the input box appears in the "Welcome" text box.
Copy the app identifier from the URL and save it in a text file.
For example, copy "991d7084-cd0a-412b-bffe-0ea176fc5430" from
https://localhost/app/991d7084-cd0a-412b-bffe-0ea176fc5430/Page.
Step 3: Create the DataMiner environment to be tested
In Visual Studio, connect DIS to the DataMiner System where you created the low-code app.
In the menu bar, select Extensions > DIS > DMA > Connect.
Open Solution Explorer (shortcut: Ctrl+Alt+L).
Expand Package Content.
Right-click LowCodeApps, select Add, and then click Import DataMiner Low-Code App.
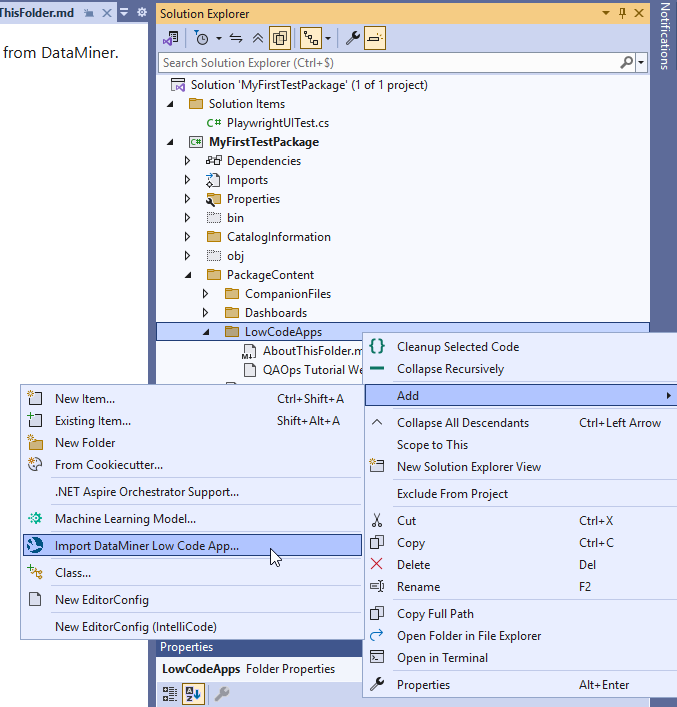
Select the app you have created in step 2.
Step 4: Write a test
Open Solution Explorer (shortcut: Ctrl+Alt+L).
Right-click
\TestPackageContent\, select Add New Folder, and add a folder with the name Tests if it does not exist yet.Right-click
\TestPackageContent\Tests, select Add, and then select New Item (shortcut: Ctrl+Shift+A).Select C# Class and name it "PlaywrightUITest.cs".
Double-check that the name matches exactly, as this is important for this specific tutorial.
Replace the file content with the following code:
#:property PublishAot=false
#:package Microsoft.Playwright@1.57.0
#:package Skyline.DataMiner.CICD.Tools.WinEncryptedKeys.Lib@2.1.0

using Microsoft.Playwright;

using Skyline.DataMiner.CICD.Tools.WinEncryptedKeys.Lib;

using System;
using System.IO;
using System.Linq;
using System.Text.RegularExpressions;
using System.Threading;
using System.Threading.Tasks;

const string Url = "https://localhost/app/991d7084-cd0a-412b-bffe-0ea176fc5430/Page";
const string InputValue = "Random Person Name";

try
{
    var playwrightFolder = Path.Combine(
    Environment.GetFolderPath(Environment.SpecialFolder.LocalApplicationData),
    "ms-playwright");

    var chromiumInstalled =
        Directory.Exists(playwrightFolder) &&
        Directory.GetDirectories(playwrightFolder, "chromium-*").Any();

    if (!chromiumInstalled)
    {
        Microsoft.Playwright.Program.Main(new[] { "install", "chromium" });
    }

    using var playwright = await Playwright.CreateAsync();

    await using var browser = await playwright.Chromium.LaunchAsync(new BrowserTypeLaunchOptions
    {
        Headless = false,
    });

    var context = await browser.NewContextAsync(new BrowserNewContextOptions
    {
        IgnoreHTTPSErrors = true,
    });

    var page = await context.NewPageAsync();

    await page.GotoAsync(Url, new PageGotoOptions
    {
        WaitUntil = WaitUntilState.NetworkIdle,
    });

    await page.WaitForLoadStateAsync(LoadState.DOMContentLoaded);

    await LoginLocally(page);

    Thread.Sleep(5000);
    await page.WaitForLoadStateAsync(LoadState.DOMContentLoaded);

    var textInputComponent = await FindFirstComponentByDataComponentNameRegexAsync(
        page,
        new Regex(@"^Text Input \d+$", RegexOptions.IgnoreCase));

    if (textInputComponent is null)
        throw new InvalidOperationException("Could not find a component with data-component-name matching '^Text Input \\d+$'.");

    var input = textInputComponent.Locator("input[type='text']").First;
    await input.WaitForAsync();
    await input.FillAsync(InputValue);

    var textComponent = await FindFirstComponentByDataComponentNameRegexAsync(
        page,
        new Regex(@"^Text \d+$", RegexOptions.IgnoreCase));

    if (textComponent is null)
        throw new InvalidOperationException("Could not find a component with data-component-name matching '^Text \\d+$'.");

    var expectedText = $"Welcome {InputValue}";
    await Assertions.Expect(textComponent).ToContainTextAsync(expectedText);
    Thread.Sleep(5000);
    Console.WriteLine($"PLAYWRIGHT_TEST_SUCCESS: Validated text component contains '{expectedText}'.");
    Environment.Exit(0);
}
catch (Exception ex)
{
    Console.Error.WriteLine($"PLAYWRIGHT_TEST_FAILURE: {ex}");
    Environment.Exit(1);
}

static async Task<ILocator?> FindFirstComponentByDataComponentNameRegexAsync(IPage page, Regex regex)
{
    var components = page.Locator("dma-db-component[data-component-name]");
    var count = await components.CountAsync();

    for (var i = 0; i < count; i++)
    {
        var component = components.Nth(i);
        var name = await component.GetAttributeAsync("data-component-name");

        if (!string.IsNullOrWhiteSpace(name) && regex.IsMatch(name))
            return component;
    }

    return null;
}

static async Task LoginLocally(IPage page)
{
    if (!Keys.TryRetrieveKey("QAOpsDataMinerUser", out var userName) || string.IsNullOrWhiteSpace(userName))
        throw new InvalidOperationException("Could not retrieve QAOpsDataMinerUser.");

    if (!Keys.TryRetrieveKey("QAOpsDataMinerPassword", out var password) || string.IsNullOrWhiteSpace(password))
        throw new InvalidOperationException("Could not retrieve QAOpsDataMinerPassword.");

    await page.GetByPlaceholder("Username").Last.FillAsync(userName);
    await page.GetByPlaceholder("Password").Last.FillAsync(password);
    await page.Locator("dwa-cta-button").GetByText("Sign in").ClickAsync();
}
If Visual Studio has added spaces around the colons in the first three lines, make sure to remove those spaces.
Look up the following line:
const string Url = "https://localhost/app/991d7084-cd0a-412b-bffe-0ea176fc5430/Page";Replace the identifier in the URL with the identifier you saved in step 2.
Note
In this example, the test is written as a .NET 10 C# file-based app. You can also implement tests in another language or by using a different testing framework. C# file-based apps can be run directly from a CLI by using dotnet run.
Step 5: Write the test execution PowerShell script
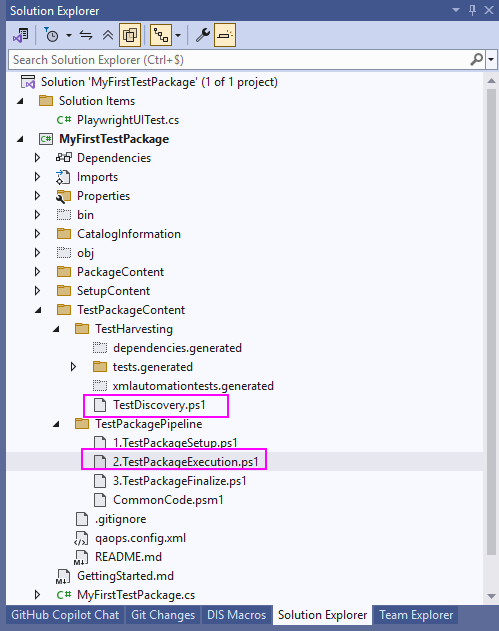
Open Solution Explorer (shortcut: Ctrl+Alt+L).
Expand TestPackageContent > TestPackagePipeline and open 2.TestPackageExecution.ps1.
Replace the existing content with the following content:
param (
    [Parameter(Mandatory = $true)]
    [string]$PathToTestPackageContent
)

$ErrorActionPreference = 'Stop'

# Import common code module
Import-Module -Name (Join-Path $PSScriptRoot 'CommonCode.psm1')

$pathToTestHarvesting = Join-Path $PathToTestPackageContent 'TestHarvesting'
$pathToGeneratedTests = Join-Path $pathToTestHarvesting 'tests.generated'
$pathToGeneratedDependencies = Join-Path $pathToTestHarvesting 'dependencies.generated'
$pathToTests = Join-Path $PathToTestPackageContent 'Tests'
$pathToDependencies = Join-Path $PathToTestPackageContent 'Dependencies'
$pathToPlaywrightUiTest = Join-Path $pathToTests 'PlaywrightUITest.cs'

# Track script start time
$scriptStart = Get-Date

try {
    Write-Host "Running Test Package tests..." -ForegroundColor Cyan
    Write-Host "Executing Playwright UI test: $pathToPlaywrightUiTest" -ForegroundColor Cyan

    if (-not (Test-Path $pathToPlaywrightUiTest)) {
        throw "Playwright UI test file not found: $pathToPlaywrightUiTest"
    }

    Write-Host "Checking NuGet sources..." -ForegroundColor Cyan

    $nugetSourcesOutput = & dotnet nuget list source 2>&1
    $nugetSourcesExitCode = $LASTEXITCODE

    if ($nugetSourcesExitCode -ne 0) {
        throw "Failed to list NuGet sources. Output: $($nugetSourcesOutput | Out-String)"
    }

    $nugetSourcesText = ($nugetSourcesOutput | Out-String)

    if ($nugetSourcesText -notmatch '(?im)^\s*\d+\.\s+nuget\.org\s*\[Enabled\]') {
        Write-Host "nuget.org source not found. Adding nuget.org..." -ForegroundColor Yellow

        $addNugetSourceOutput = & dotnet nuget add source 'https://api.nuget.org/v3/index.json' --name 'nuget.org' 2>&1
        $addNugetSourceExitCode = $LASTEXITCODE

        if ($addNugetSourceExitCode -ne 0) {
            throw "Failed to add nuget.org NuGet source. Output: $($addNugetSourceOutput | Out-String)"
        }

        Write-Host "nuget.org source added successfully." -ForegroundColor Green
    }
    else {
        Write-Host "nuget.org source already exists." -ForegroundColor Green
    }

    Write-Host "Starting Playwright test..." -ForegroundColor Cyan


    $playwrightOutput = & dotnet run $pathToPlaywrightUiTest 2>&1
    $playwrightExitCode = $LASTEXITCODE

    $playwrightMessage = ($playwrightOutput | Out-String).Trim()

    Write-Host "Playwright output:" -ForegroundColor DarkGray
    Write-Host $playwrightMessage

    if ($playwrightExitCode -eq 0) {
        if ([string]::IsNullOrWhiteSpace($playwrightMessage)) {
            $playwrightMessage = "Playwright UI test passed."
        }

        Write-Host "Playwright UI test SUCCEEDED." -ForegroundColor Green

        try { Push-TestCaseResult -Outcome 'OK' -Name 'pipeline_PlaywrightUITest' -Duration ((Get-Date) - $scriptStart) -Message $playwrightMessage -TestAspect Assertion } catch {}
    }
    else {
        if ([string]::IsNullOrWhiteSpace($playwrightMessage)) {
            $playwrightMessage = "Playwright UI test failed."
        }

        Write-Host "Playwright UI test FAILED." -ForegroundColor Red

        try { Push-TestCaseResult -Outcome 'Fail' -Name 'pipeline_PlaywrightUITest' -Duration ((Get-Date) - $scriptStart) -Message $playwrightMessage -TestAspect Assertion } catch {}

        throw "Playwright UI test failed with exit code $playwrightExitCode."
    }

    Write-Host "Test Package execution finished successfully." -ForegroundColor Green

    try { Push-TestCaseResult -Outcome 'OK' -Name 'pipeline_TestPackageExecution' -Duration ((Get-Date) - $scriptStart) -Message 'Test Package execution finished.' -TestAspect Execution } catch {}
}
catch {
    Write-Host "Test Package execution FAILED: $($_.Exception.Message)" -ForegroundColor Red

    try { Push-TestCaseResult -Outcome 'Fail' -Name 'pipeline_TestPackageExecution' -Duration ((Get-Date) - $scriptStart) -Message "Exception during Test Package execution: $($_.Exception.Message)" -TestAspect Execution } catch {}

    exit 1
}
Step 6: Download, install, and verify the QAOps tool
Open a Command Prompt, Bash, or PowerShell window.
Check if you have
nuget.orgas a known NuGet source:dotnet nuget list sourceVerify that the output contains
nuget.org [Enabled].Note
The first time you run a
dotnetcommand on a computer, you will see a welcome message. The output of your command is displayed below that message.If your sources do not contain
nuget.org, add it with the following command. Otherwise, skip this step.dotnet nuget add source https://api.nuget.org/v3/index.json -n "nuget.org"Install the QAOps tool:
dotnet tool install skyline.dataminer.qaops --globalVerify that the tool is available:
dataminer-qaops --helpThe command output will display a description of the tool and the available commands.
Note
If you see the exception "Unable to load the service index for source ...", one of your configured NuGet sources may be unreachable or may have expired credentials.
To continue this tutorial, you can temporarily remove the failing source and add it again later when needed:
dotnet nuget remove source "NameOfSource"
Step 7: Find the unique test and configuration identifiers
For more details about these entities, see QAOps configuration and QAOps test suite.
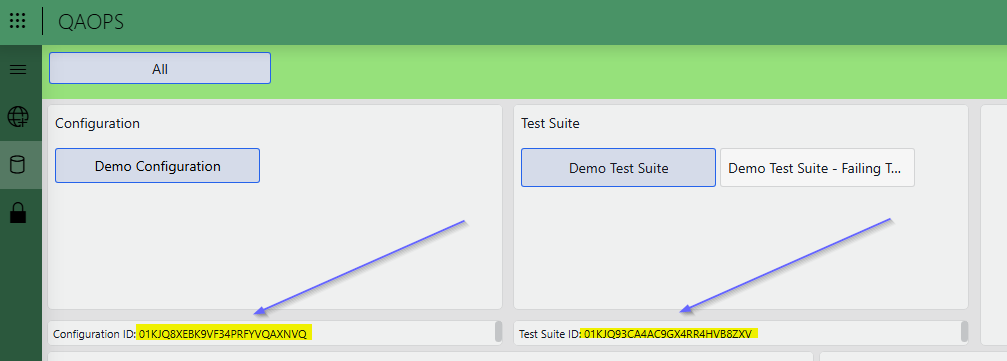
In the QAOps User app (i.e., the green QAOps app), go to the Configurations page.
Select Demo Configuration and Demo Test Suite.
Copy the configuration ID and save it in a text file.
Copy the test suite ID and save it in a text file.
Step 8: Create a token
In the QAOps User app, go to the Tokens page.
In the upper-left corner, click Create Token.
Enter a name for the token.
Select the scope that matches the ".execute" scope for your selected configuration.
Click Generate Token.
Wait until the token value is shown.
Copy the token value and save it in a text file.
For production environments, use a key vault solution.
Step 9: Create and find the test package
In Visual Studio, open Solution Explorer (shortcut: Ctrl+Alt+L).
Right-click the solution and select ReBuild Solution.
Right-click Solution 'MyFirstTestPackage' and select Open Folder in File Explorer.
In File Explorer, go to the
bin\Debug\net48\DataMinerBuildfolder of your project.Copy the generated QAOps test package .dmtest file path and save it in a text file.
Step 10: Trigger the test run
Open a Command Prompt, Bash, or PowerShell window.
Run the following command, after replacing the placeholders as indicated below, making sure to keep the double quotes around the TOKEN and TESTFILEPATH values:
dataminer-qaops test-run --token "TOKEN" -t TESTSUITE -c CONFIGURATION -tags MYNAME -san saqaopssandbox --test-packages "TESTFILEPATH"TOKEN: The token value you copied earlier. Make sure this value is enclosed in double quotes.TESTSUITE: The test suite ID you copied earlier.CONFIGURATION: The configuration ID you copied earlier.MYNAME: Your name, nickname, or another identifier that helps you find your request.TESTFILEPATH: The test package filepath you copied earlier. Make sure this value is enclosed in double quotes.
Note
For production systems, leave out the
-sanargument. This argument specifies which QAOps system receives the command. In this example, it targets the QAOps sandbox system. The default target is the production QAOps system.
Step 11: Verify that the request was received
In the QAOps User app, go to the Overview page.
Locate your tag in the list.
Use the filter at the top to find your request more quickly.
Track the test run life cycle.
Tip
To view and interpret test results, see Viewing test results.