How to create an HTTP connector (CoinMarketCap use case)
Below, you can learn how to create a new DataMiner connector that uses an HTTP connection.
Prerequisites
You will need the following software for the procedures in this article:
- The current minimum supported version of DataMiner or a later version.
- Microsoft Visual Studio 2017 or later, with DataMiner Integration Studio.
Related articles
We recommend that you also read the following articles:
About HTTP
The Hypertext Transfer Protocol (HTTP) is an application layer protocol in the internet protocol suite model for distributed, collaborative, hypermedia information systems. It is one of the most used internet protocols to support Application Programming Interfaces (APIs) by many IP-enabled products such as container managers, cloud services, websites, network monitoring systems, etc.
HTTP functions as a request-response protocol in a client-server model. Typically, the communication is initiated by the client side requesting a connection to be established towards a server. HTTPS represents a more secure solution to enable HTTP communication. HTTPS uses TLS to encrypt the data instead of sending it in plain text.
HTTP defines request methods often described as "verbs". These request methods can be of type GET, POST, PUT, DELETE, PATCH, etc. For instance, when interacting with an HTTP endpoint to collect data, typically a GET HTTP request is issued to get data. More information on the HTTP verbs is available in the HTTP specification RFC7231.
Communicating with HTTP endpoints may sometimes require a set of steps or configuration to comply with authorization and authentication that may be required. Some examples are the basic authentication procedure, which requires that a username and a password are transferred along with the HTTP request, and token-based requests, where a client requests a token (with or without authentication) and all requests are signed with that token.
Once a request is sent by a client, a response is expected. HTTP response messages issued by servers are sent with an HTTP status code. Each HTTP status code informs a client of what the HTTP response content represents. There are 5 different types of HTTP status codes:
- 1XX – Informational Response
- 2XX – Success
- 3XX – Redirection
- 4XX – Client Errors
- 5XX – Server Errors
Understanding these status codes is key to properly handling response content received on the client side.
For more information, see HTTP connections.
About HTTP DataMiner connectors
DataMiner connectors support HTTP/HTTPS protocol natively to allow interaction with third-party APIs. A Protocol.xml will define the necessary steps for DataMiner to properly interact with the intended HTTP endpoint. When a Protocol.xml has been uploaded to a DataMiner System, an element can be created using that protocol, so that the connection to the HTTP endpoint can be established.
A typical HTTP connector consists of multiple groups and sessions that allow HTTP requests to be generated. You can find more details on how to set up a HTTP session in the next section of this article.
A group describes which session needs to be sent. Whenever a session faces an HTTP reply holding an HTTP status code of 4XX or 5XX, an element can go into timeout depending on the element's timeout settings. DataMiner elements using HTTP connectors automatically try to recover from a timeout based on the ping group. You can specify a ping group in a connector by creating a group with ID "-1". This group should always be an HTTP endpoint that can reply successfully independent from the element configuration if IP communication can be established.
It is important to keep in mind that when establishing communication with an HTTP endpoint, DataMiner will act as a client that makes requests to interact with the external product.
Sending HTTP requests in a DataMiner connector
In HTTP connectors, HTTP sessions must be defined using Session tags. These can be defined within Protocol.HTTP tags.
Session tags define where the requests are targeted, how they will be shaped and which parameters will store the HTTP response. The following code snippet illustrates an HTTP session defined in a connector:
<Session id="6" Name="Get Containers List">
   <Connection id="1">
      <Request verb="GET" url="/containers/list" />
      <Response statusCode="100">
         <Content pid="200"></Content>
      </Response>
   <Connection>
</Session>
Every session must be identified by its ID and optionally by its name.
A session needs a connection that defines the request/response pair. Multiple connections may be defined with the same session.
A request is defined by the HTTP verb and a URL. The URL may be defined text-based using the
urlattribute or, alternatively, through a parameter value using thepidattribute. Note that you only need to define the last part of the URL, as DataMiner automatically concatenates the beginning of the URL with the segmenthttp://<Element IP Address>/, where<Element IP Address>represents the element IP address configuration.Optionally, a request can contain:
- Parameters: Mostly used for query data.
- Headers: To further decorate the request with additional data.
The
Responsetag indicates where the received HTTP data, namely the HTTP status line and the response content, should be stored for further processing by QActions.
To send the request through DataMiner, a group is required. The group must be defined with the session used to generate the HTTP request. For example:
<Group id="6">
   <Name>Get Container List</Name>
   <Description>Get Container List</Description>
   <Type>poll</Type>
   <Content>
      <Session>6</Session>
   </Content>
</Group>
For more information, see Implementing HTTP communication.
Example of how to create an HTTP connector: CoinMarketCap
This section will explain how to create a DataMiner connector with a publicly available API provided by CoinMarketCap. CoinMarketCap is a web platform that provides cryptocurrency market cap rankings, charts, and more. It tracks capitalization of various cryptocurrencies by listing prices, available supply, and trade volume over the last 24 hours.
Note that in this example we are interfacing with a website API. Other use cases could feature a physical device, or a virtualized product.
Step 1 – Gathering information and requirements
Whenever you need to work with an API, it is important that you first check all available documentation.
For our example, the CoinMarketCap API Documentation is available via coinmarketcap.com. To access this API, you will need to register. You will then get a key that should be used for all requests.
For the sake of simplicity, we will only implement one call from the API, i.e., Get Crypto Currency Listings.
Step 2 – Creating a new protocol solution in Visual Studio
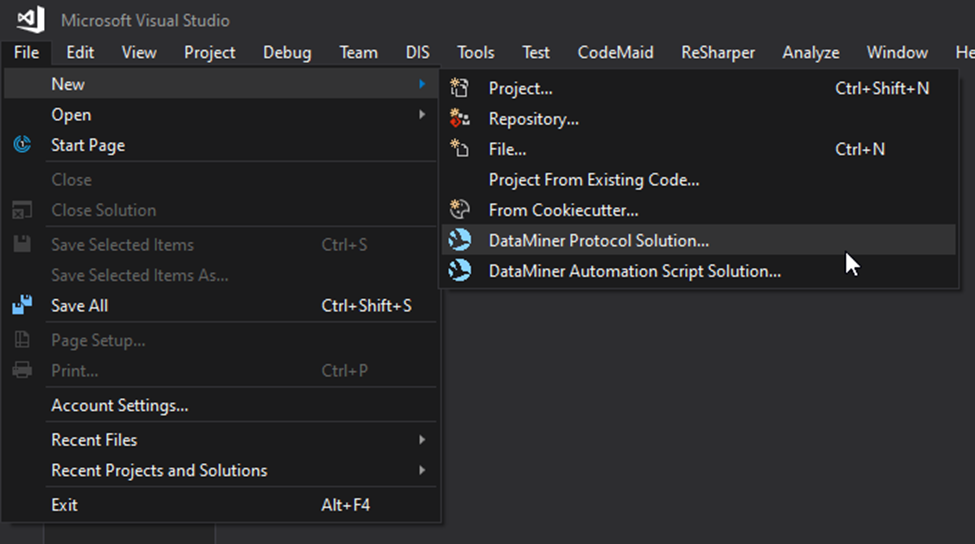
In Visual Studio, go to File > New > DataMiner Protocol Solution to create a new protocol solution.
In your new protocol, add the Type element, and set its value to "http". For example:
<Protocol xmlns="http://www.skyline.be/protocol">
    <Name>HTTP Simple Use Case Article</Name>
    <Description>HTTP Simple Use Case Article DataMiner connector</Description>
    <Version>1.0.0.1</Version>
    <IntegrationID>DMS-DRV-1234</IntegrationID>
    <Provider>Skyline Communications</Provider>
    <Vendor>CoinMarketCap</Vendor>
    <VendorOID>1.3.6.1.4.1.8813.2.11</VendorOID>
    <DeviceOID>1</DeviceOID>
    <ElementType>Crypto Currency Tracker</ElementType>
    <Type relativeTimers="true">http</Type>
Step 3 – Creating parameters
We will need to add several parameters to the protocol to build logic and collect the request details. Here is the list of the parameters that should be created for this example:
- Access Key (Read/Write): Holds information about your CoinMarketCap API key.
- Status Code: Will receive the status code of the session.
- Response Content: Will receive the reply content of the HTTP reply received in DataMiner.
For more information, see Parameters.
Step 4 – Sending requests
To send an HTTP request, you can either execute the session via a timer or via a push of a button defined in the connector. For the sake of simplicity, in this example we will send the HTTP request via a push of a button. To do this, you will need to set up the following elements:
Parameter: A parameter of type write with measurement type "button".
<Param id="54"> <Name>SendRequest</Name> <Type>write</Type> <Information> <Subtext>Manually send out the request.</Subtext> </Information> <Interprete> <RawType>other</RawType> <Type>string</Type> <LengthType>next param</LengthType> </Interprete> <Display> <RTDisplay>true</RTDisplay> <Positions> <Position> <Page>General</Page> <Column>0</Column> <Row>2</Row> </Position> </Positions> </Display> <Measurement> <Type width="110">button</Type> <Discreets> <Discreet> <Display>Send Request</Display> <Value>Send Request</Value> </Discreet> </Discreets> </Measurement> </Param>Trigger: A trigger on change of the Request parameter with an associated action.
<Trigger id="54"> <Name>On Button Press 'Send Request'</Name> <On id="54">parameter</On> <Time>change</Time> <Type>action</Type> <Content> <Id>3</Id> </Content> </Trigger>Action: An action to execute the group that will execute the session.
<Action id="3"> <Name>Execute Group</Name> <On id="1">group</On> <Type>execute one now</Type> </Action>Group: A group bearing the session as content.
<Group id="1"> <Name>Latest Crypto Currencies Listing</Name> <Description>Latest Crypto Currencies Listing</Description> <Type>poll</Type> <Content> <Session>1</Session> </Content> </Group>Session: A session describing where to retrieve data.
<HTTP>
    <Session id="1" name="Get Crypto Currency Listing">
        <Connection id="1" name="Get Crypto Currency Listing">
            <Request verb="GET" url="v1/cryptocurrency/listings/latest">
                <Headers>
                    <Header key="X-CMC_PRO_API_KEY" pid="3"></Header>
                </Headers>
            </Request>
            <Response statusCode="100">
                <Content pid="200"></Content>
            </Response>
        </Connection>
    </Session>
</HTTP>
Notice the extra header added to the Headers element. A header is typically a key/value combination, so in this case we aim to add a header to our HTTP request that has as key "X-CMC_PRO_API_KEY" and as value the content of the parameter with ID 3. The purpose of this parameter with ID 3 is to hold the CoinMarketCap API access key value. You need to make sure the CoinMarketCap API access key is properly set in this parameter before sending the request; otherwise you will not authenticate successfully.
Step 5 – Setting default port settings (optional)
As a best practice, we recommend that a PortSettings tag is added to the protocol markup. This restricts the number of possibilities when the HTTP connection is set during element creation.
Here is an example.
<PortSettings name="HTTP Connection - CoinMarketCap API Endpoint">
    <BusAddress>
        <Disabled>true</Disabled>
    </BusAddress>
    <IPport>
        <DefaultValue>443</DefaultValue>
        <Disabled>true</Disabled>
    </IPport>
    <Type>
        <DefaultValue>ip</DefaultValue>
    </Type>
    <PortTypeUDP>
        <Disabled>true</Disabled>
    </PortTypeUDP>
    <PortTypeSerial>
        <Disabled>true</Disabled>
    </PortTypeSerial>
</PortSettings>
For detailed information on the PortSettings element, see Protocol.PortSettings.
Step 6 – Creating a new DataMiner element
In the DataMiner Cube Surveyor, navigate to the view where you want to add the element. Right-click the view and select Create element. For more information on element creation, see Adding elements.
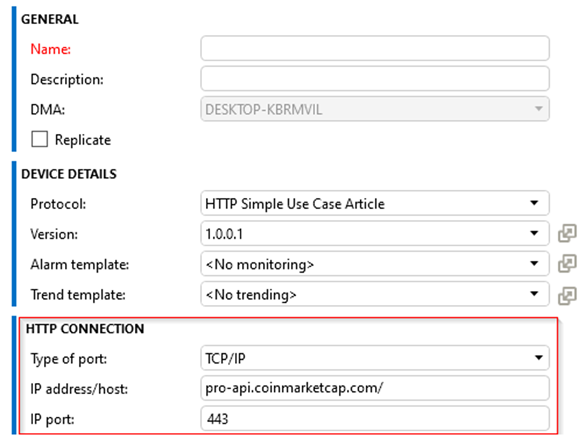
If no default port settings were specified, make sure to set Type of port to TCP/IP, and specify the correct IP address and IP port.
Step 7 – Observing requests
When developing an HTTP connector, make sure to use the Stream Viewer application so you can identify whether the group has been sent and the reply has been received.
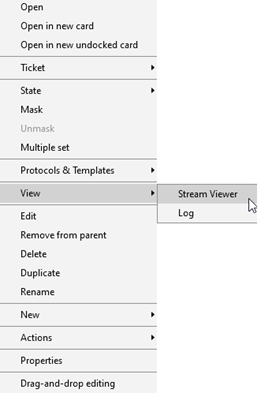
Stream Viewer is an application that is built into DataMiner Cube and that allows you to immediately check the result of an HTTP request/response pair. To access Stream Viewer, in the DataMiner Cube Surveyor, right-click an element and select View > Stream Viewer.
When you have defined an access key in our example element and clicked the Send Request button, a request should be sent, the Status Code parameter should be automatically populated with the respective HTTP status code, and the Response Content parameter should show the actual HTTP response content in JSON format.
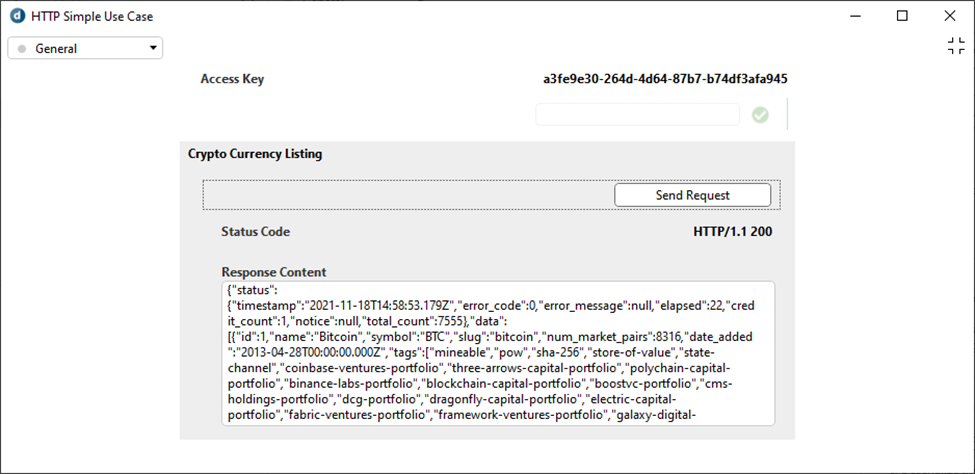
If you open Stream Viewer for the example element, you will see a window like illustrated below, which will immediately start capturing all groups that are being sent and received from the element.
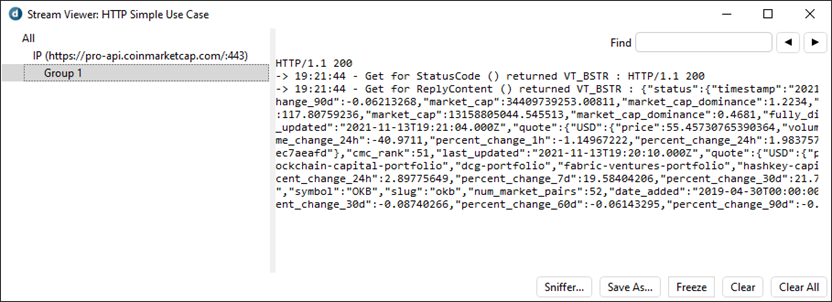
The image above shows an example of a Stream Viewer capture for Group 1. On the left, all connections and groups are identified. This provides confirmation that a group was executed. In this case, since our group contains an HTTP session, it confirms that the HTTP request was sent. On the right, you can see the HTTP response with the status code and content. You can see that we have received an HTTP/1.1 200 OK with a reply bearing JSON content.
Note
From DataMiner 10.1.0 [CU22]/10.2.0 [CU10]/10.3.1 onwards, the Stream Viewer tree view supports more levels. This allows for more detailed information. For example, in case of HTTP communication, there will be extra levels for sessions, connections, requests/responses, parameters, status codes, and error codes.
Step 8 – Processing the Response
When a group is executed, data is automatically set in the response status code parameter and the response content parameter defined in the Protocol.HTTP.Session.Connection.Response tag.
You can further process the data by triggering a QAction (using C#). Data is typically received in well-known formats like XML or JSON. In this case, a JSON format is detected. For more information on how to handle this format in C#, see How to handle XML and JSON data in QActions.