Taking and restoring snapshots
Important
- This configuration requires advanced knowledge of Elasticsearch. If you have any doubts, ask Skyline for assistance. However, note that this is not covered by the standard DataMiner Support Services.
- Elasticsearch is only supported up to version 6.8, which is no longer supported by Elastic. We therefore recommend using Storage as a Service instead, or if you do want to continue using self-managed storage, using OpenSearch.
This procedure to configure an Elasticsearch backup focuses on setting up and using an Elasticsearch snapshot to back up and restore Elasticsearch data. It makes use of a source Elasticsearch cluster and a target Elasticsearch cluster and can be used for two purposes:
Making a simple backup:
- In this case, the source and target Elasticsearch cluster can be the same.
- For this, follow only the steps in Preparing the source Elasticsearch cluster, Taking the snapshot, and Restoring the snapshots in the order they occur on this page.
Migrating data from an existing Elasticsearch cluster to a new target Elasticsearch cluster
Examples:
Migrating data from an older Windows setup to a better performing Linux setup
Migrating data to different hardware
For this migration, follow each of the steps below, in the order they occur on this page.
Tip
For information on version compatibility, refer to the Elasticsearch Guide.
Requirements
You will need a client application that is able to communicate with the Elasticsearch rest API. This application must be able to send POST and PUT messages with a request body.
Examples:
Kibana: Kibana is often used together with Elasticsearch. If you are using Ubuntu or Debian as your operating system, this is the preferred client application.
CURL: Curl is a simple command line utility that allows messages with payload (e.g. POST and PUT messages) and is useful for scripting.
...
Preparing and configuring the repositories
Preparing the source Elasticsearch cluster
Important
To be able to restore a snapshot later, you must go through these steps first. Without a functional repository, you will run into issues that will delay the snapshot restore.
Set up a shared folder on the source Elasticsearch cluster to contain the snapshots. This folder must be shared across all machines in the Elasticsearch clusters in all directions.
Tip
If required, contact your IT department to follow the NFS server setup procedure, as this step may otherwise be challenging. Further input on networking infrastructure may also be required.
To set up the shared folder:
For Windows:
Use built-in sharing.
For Linux:
Use an NFS server and client as explained in How to Set Up NFS Server and Client on CentOS 8 and in Elasticsearch: Snapshot Backups on a Shared NFS. Follow this procedure on all machines in the Elasticsearch Cluster.
Note
- As this setup might be more challenging, we recommend that you set it up in advance.
- Be wary of read, write, and execute rights, firewall configurations, and the state of the NFS server service during the setup. For the machines that will act as NFS servers, make sure the firewall allows NFS traffic. You can use the following command for this: sudo ufw allow nfs. After this, you can for example mount the folder on the NFS Ubuntu clients referencing it using the command sudo mount ip-address:pathofyoursharedserverfolder pathofyourclientfolder.
- Make sure the Elasticsearch user has enough rights to the folder to read, write, and execute its contents.
Tip
It is also possible to set up an NFS share on Windows and share it with the destination Linux system. See Windows Server 2016 as an NFS server for Linux clients.
On the source Elasticsearch cluster, navigate to the Elasticsearch.yml file. Open the file and set path.repo as your previously created shared folder.
Create a repository by executing the following PUT request in your client application:
PUT localhost:9200/_snapshot/my_fs_backup?pretty { "type": "fs", "settings": { "location": "/mount/backups/my_fs_backup_location", "compress": true } }/mount/backups/my_fs_backup_location: The path of the shared folder you created.
my_fs_backup: A repository name of your choice.
Tip
For more information, see Shared File System Repository.
Note
You can also use ElasticVue to create your repository: Go to Snapshots > Snapshot Repositories, and click the New repository button. Then fill in the name and the repository location, and leave the default settings untouched (i.e. Compress should be enabled, and Readonly should be disabled).
Search the Elasticsearch logging for exceptions.
For Windows:
C:\Program Files\Elasticsearch\logs\[cluster.name].logYou can find the cluster name in
C:\Program Files\Elasticsearch\config\Elasticsearch.yml.For Linux:
/var/log/elasticsearch/[cluster.name].logYou can find the cluster name in
/etc/Elasticsearch/Elasticsearch.yml.
If you do not have enough rights to the shared folder, use the
chmodandchowncommand.Note
It is possible you will need to contact your IT department to get more rights.
If the shares have not been set up correctly, return to step 1.
If there are no exceptions, move on to the next step.
Tip
For more information, see Logging configuration.
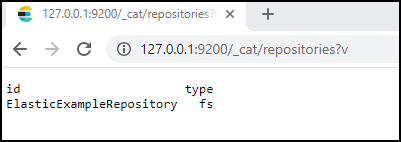
Verify whether the repository has been created correctly by entering
http://[IP address]:9200/_cat/repositories?vin your browser's address bar or in your chosen client application. Replace "[IP address]" with your IP address.If the repository was created correctly, the name of your repository should be visible on the page or in the client.
Preparing the target Elasticsearch cluster
Note
If you do not want to migrate data to a target Elasticsearch cluster but want to make a backup, you can skip this section and proceed to Taking the snapshot.
Ensure that the target Elasticsearch cluster is of a more recent version than the source Elasticsearch cluster by entering
http://[IP address]:9200in your browser's address bar and looking up the version number. Replace "[IP address]" with your IP address.Example:
{
  "name" : "537-0",
  "cluster_name" : "DMS",
  "cluster_uuid" : "mhEwvZl2QTyZSxsdS1714w",
  "version" : {
    "number" : "6.8.23",
    "build_flavor" : "default",
    "build_type" : "zip",
    "build_hash" : "4f67856",
    "build_date" : "2022-01-06T21:30:50.087716Z",
    "build_snapshot" : false,
    "lucene_version" : "7.7.3",
    "minimum_wire_compatibility_version" : "5.6.0",
    "minimum_index_compatibility_version" : "5.0.0"
   },
   "tagline" : "You Know, for Search"
}
Note
Snapshots can be restored from an older version of Elastic to a more recent version, but not the other way around.
Set up a shared folder on the target Elasticsearch cluster to contain the snapshots. This folder must be shared across all machines in the Elasticsearch clusters in all directions.
Tip
If required, contact your IT department to follow the NFS server setup procedure, as this step may otherwise be challenging. Further input on networking infrastructure may also be required.
To set up the shared folder:
For Windows:
Use built-in sharing.
For Linux:
Use an NFS server and client as explained in How to Set Up NFS Server and Client on CentOS 8 and in Elasticsearch: Snapshot Backups on a Shared NFS. Follow this procedure on all machines in the Elasticsearch Cluster.
Note
- As this setup might be more challenging, we recommend that you set it up in advance.
- Be wary of read, write, and execute rights, firewall configurations, and the state of the NFS server service during the setup.
- Make sure the Elasticsearch user has enough rights to the folder to read, write, and execute its contents.
On the target Elasticsearch cluster, navigate to the Elasticsearch.yml file. Open the file and set path.repo as your previously created shared folder.
Create a repository by executing the following PUT request in your client application:
PUT localhost:9200/_snapshot/my_fs_backup?pretty { "type": "fs", "settings": { "location": "/mount/backups/my_fs_backup_location", "compress": true } }/mount/backups/my_fs_backup_location: The path of the shared folder you created.
my_fs_backup: A repository name of your choice.
Tip
For more information, see Shared File System Repository.
Search the Elasticsearch logging for exceptions.
For Windows:
C:\Program Files\Elasticsearch\logs\[cluster.name].logYou can find the cluster name in
C:\Program Files\Elasticsearch\config\Elasticsearch.yml.For Linux:
/var/log/elasticsearch/[cluster.name].logYou can find the cluster name in
/etc/Elasticsearch/Elasticsearch.yml.
If you do not have enough rights to the shared folder, use the
chmodandchowncommand.Note
It is possible you will need to contact your IT department to get more rights.
If the shares have not been set up correctly, return to step 2.
If there are no exceptions, move on to the next step.
Tip
For more information, see Logging configuration.
Verify whether the repository has been created correctly by entering
http://[IP address]:9200/_cat/repositories?vin your browser's address bar or in your chosen client application. Replace "[IP address]" with your IP address.If the repository was created correctly, the name of your repository should be visible on the page or in the client.
Taking the snapshot
Execute the PUT request
http://[IP address]:9200/_snapshot/repositoryname/snapshotname {“indices”: “dataminerprefix*”}in your chosen client application.Example, using Kibana as client application:
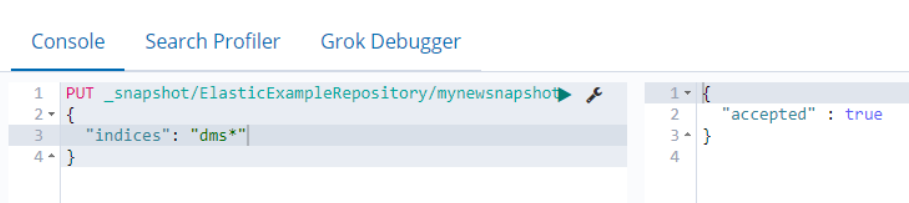
"[IP address]": Your IP address.
"repositoryname": The repository name you chose while preparing the source Elasticsearch cluster.
"snapshotname": The name of the chosen backup.
"dataminerprefix": The prefix DataMiner puts in front of an index name.
To find the prefix DataMiner puts in front of an index name, enter
http://[IP address]:9200/_cat/indicesin your browser's address bar. Replace "[IP address]" with your IP address.Take note of the prefixes used in the indices. The default prefix is "dms".

Verify that the snapshot was created successfully by entering the GET request
http://[IP address]:9200/_snapshot/repositoryname/snapshotnamein your browser's address bar or in your client application.The field next to "state": should display "SUCCESS".

You have now finished configuring an Elasticsearch backup. If you do not want to migrate data to a new target Elasticsearch cluster, you can move on to Restoring the snapshot.
Preparing the target machine
Copy the files generated in the backup location of the source (i.e. the location where the snapshot was generated) to the target Elasticsearch backup location.
You can do this by:
using an SFTP client, e.g. WinSCP,
setting up an FTP server on the destination Linux,
...
Initialize the repository on the target Elasticsearch cluster again by executing the following PUT request in your client application:
PUT localhost:9200/_snapshot/my_fs_backup?pretty { "type": "fs", "settings": { "location": "/mount/backups/my_fs_backup_location", "compress": true } } '/mount/backups/my_fs_backup_location: The path of the shared folder you created.
my_fs_backup: A repository name of your choice.
Restoring the snapshot
Ensure that the target Elasticsearch cluster is empty.
In the target Elasticsearch cluster, execute the following POST request:
[IP adress]:9200/_snapshot/repositoryname/snapshotname/_restore?pretty"[IP address]": Your IP address.
"repositoryname": The repository name you chose while preparing the source Elasticsearch cluster.
"snapshotname": The name of the chosen backup.
Verify whether the snapshot restore worked by comparing the indices for the local Elasticsearch cluster with those of the target Elasticsearch cluster.
To do so, enter
http://[IP address]:9200/_cat/indicesin your browser's address bar. Replace "[IP address]" with your IP address.These indices should be identical and take up the same amount of space.
Important
If you followed these steps in preparation of migrating your data from an existing Elasticsearch cluster to a new target Elasticsearch cluster, you can now run the migration as explained in Running the migration with bespoke Elasticsearch data.
Troubleshooting
Unable to access path.repo
If the error "Unable to access 'path.repo' (\[SERVER]]\FOLDER])" is generated in the Elasticsearch backup file, this means that the SYSTEM user does not have access to the network path.
Whether you are triggering the backup via DataMiner or using an Elasticsearch REST API client such as Kibana, you need to make sure that the backup path is accessible on all the nodes in the cluster. If the network path requires credentials, the SYSTEM user must be granted access in one of the following ways:
Following the instructions under Restrictions for the backup path.
Using the Sysinternals PSTools:
- Download PSTools.
- Open a command prompt as administrator and navigate to the folder containing the psexec tool.
- Execute
psexec -i -s cmd.exe. This way you will run the command prompt as the SYSTEM user instead of Administrator. - Execute the
net usecommand, e.g.net use \\DataMiner-01\ElasticBackup. - When prompted, enter the credentials to access the shared folder.
- Restart the Elasticsearch service.
- Verify whether the service indeed starts.