Installing an OpenSearch database
Compatibility
Supported versions:
- OpenSearch 1.X
- OpenSearch 2.X
Note
- We recommend using the latest version of Ubuntu LTS. However, OpenSearch also supports other Linux distributions. See Operating system compatibility.
- OpenSearch is supported on Windows from OpenSearch 2.4 onwards.
Setting up the OpenSearch cluster
See the official documentation on how to set up your OpenSearch cluster. The configuration is almost identical to that of an Elasticsearch cluster.
Important
- On production systems, the JVM Heap Space must be set to a value larger than the default. To configure this setting, see Important settings.
- The
indices.query.bool.max_clause_countsetting should be set to "2147483647" (i.e. the maximum integer value). Refer to the example below for more information.
Note
It is also possible to set up OpenSearch Dashboards, which is the equivalent of Kibana for Elasticsearch. However, this is optional and not required for DataMiner to function.
Tip
For troubleshooting information, see Common OpenSearch-related issues.
Example configuration
Below you can find an example of how to set up an OpenSearch cluster on premises on a Ubuntu system, in accordance with the Debian installation guide.
Main steps
These are the main steps of the setup:
Install OpenSearch as detailed under Install OpenSearch from an APT repository.
Important
For new installations of OpenSearch 2.12 and later, you must define a custom admin password in order to set up a demo security configuration. For more information, refer to Install OpenSearch from a package (step 2) in the OpenSearch documentation.
Follow Step 2: (Optional) Test OpenSearch from the installation guide. Remember to also query the plugins endpoint.
Follow Step 3: Set up OpenSearch in your environment and change the JVM Heap Space.
Set up a cluster as detailed under Creating a cluster. Take the sections below into account when you do so.
opensearch.yml configuration
For every node in your cluster, configure the opensearch.yml file as illustrated in the example below (the example uses three nodes):
# Use a descriptive name for your cluster:
#
cluster.name: NameOfYourCluster
#
# Identify initial cluster manager node:
  # If you are using OpenSearch 2, use cluster.initial_cluster_manager_nodes.
  # If you are using OpenSearch 1, use cluster.initial_master_nodes.
#
cluster.initial_cluster_manager_nodes: ["opensearchnode1"]
#
# ------------------------------------ Node ------------------------------------
#
# Use a descriptive name for the node(node.name can be anything you desire, but we recommend hostname of node):
#
# Make the node.name reflect the name of your node
node.name: opensearchnode1
#
# ----------------------------------- Paths ------------------------------------
#
# Path to directory where to store the data (separate multiple locations by comma):
#
path.data: /var/lib/opensearch
#
# Path to log files:
#
path.logs: /var/log/opensearch
# ---------------------------------- Network -----------------------------------
#
# Set the bind address to a specific IP (IPv4 or IPv6), best is to use the real-ip of the node:
#
network.host: 166.206.186.146

network.publish_host: 166.206.186.146
#
# Set a custom port for HTTP:
#
http.port: 9200
#
# For more information, consult the network module documentation.
#
# --------------------------------- Discovery ----------------------------------
#
# Pass an initial list of hosts to perform discovery when this node is started:
# The default list of hosts is ["127.0.0.1", "[::1]"]
#
discovery.seed_hosts: ["166.206.186.146","166.206.186.147","166.206.186.148"]

discovery.type: zen

indices.query.bool.max_clause_count: 2147483647
Note
As shown above, the
indices.query.bool.max_clause_countsetting should be set to "2147483647" (i.e. the maximum integer value).If you want a node to be only a data node, add the following configuration in opensearch.yml:
node.roles: [ data, ingest ]If you want a node to be only the cluster manager node (a.k.a. the master node), add the following configuration in opensearch.yml:
node.roles: [ cluster_manager ]If you want a data node to take the role of cluster manager in case the current cluster manager node goes down, add the following configuration in opensearch.yml:
node.roles: [ cluster_manager, data, ingest ]For a database consisting of a single node, discovery type must be set to single-node instead of zen:
discovery.type: single-node
TLS and user configuration
You should configure TLS in order to have a layer of security between your nodes and your DataMiner client. In addition, the default password of the admin user must be changed, and all the other users should be removed.
Remove the demo certificates that came with the default installation.
Remove the demo certificates
By default OpenSearch comes with .pem files with demo certificates. For security reasons, it is best to remove these demo certificates.
You can remove the demo certificates located in \etc\opensearch:
cd /etc/opensearch
sudo rm -f *pem
Generate p12 keystore and truststore p12 files
To configure TLS, instead of using .pem files, we recommend generating p12 keystore and truststore .p12 files. You will then need to reference these in the opensearch.yml file:
Note
It is also possible to use .pem certificates to secure OpenSearch. For more details, refer to X.509 Pem certificates in the OpenSearch documentation.
Generate the certificates using the Generate-TLS-Certificates script on GitHub.
This script will generate a .p12 file for every node and an .pem admin cert and key file that is used for security configuration settings. The GitHub script will provide you with the keystore and truststore password. A rootCA.crt can also be generated by the GitHub script, or you can select your own rootCA.crt during the configuration.
Create a config subfolder in the
\etc\opensearch\folder. Make sure this folder has read and write permissions on every node for the opensearch user.Place the correct .p12 file in the
\etc\opensearch\cert\folder on each corresponding node (making sure the .p12 name matches the node name).Update the opensearch.yml file so that keystore_filepath and truststore_filepath refer to the location of the .p12 files. (For an example, see Set up TLS in the opensearch.yml file.)
Add the password to the keystore and truststore password fields in opensearch.yml. (For an example, see Set up TLS in the opensearch.yml file.)
Update the trusted root certificates with rootCA.crt
Note
The commands shown below are specific for Ubuntu. The folder to store the certificate can change between different Linux versions.
Navigate to the location where the generated rootCA.crt file is stored, and copy it using the following command:
sudo cp rootCA.crt /usr/local/share/ca-certificates/On every Linux OpenSearch node, update the trusted root certificates:
sudo update-ca-certificatesVerify the rootCA.crt using the following command. It should return the status OK.
openssl verify rootCA.crt
Set up TLS in the opensearch.yml file
Configure the opensearch.yml file as illustrated in the example below.
plugins.security.disabled: false

#Transport layer TLS
plugins.security.ssl.transport.keystore_type: PKCS12
plugins.security.ssl.transport.keystore_filepath: /etc/opensearch/cert/FQDNOfYourNode-node-keystore.p12
plugins.security.ssl.transport.keystore_password: ReplaceMeByGeneratedPasswordByGithubScript
plugins.security.ssl.transport.truststore_type: PKCS12
plugins.security.ssl.transport.truststore_filepath: /etc/opensearch/cert/FQDNOfYourNode-node-keystore.p12
plugins.security.ssl.transport.truststore_password: ReplaceMeByGeneratedPasswordByGithubScript

#REST Layer TLS
plugins.security.ssl.http.enabled: true
plugins.security.ssl.http.keystore_type: PKCS12
plugins.security.ssl.http.keystore_filepath: /etc/opensearch/cert/FQDNOfYourNode-node-keystore.p12
plugins.security.ssl.http.keystore_password: ReplaceMeByGeneratedPasswordByGithubScript
plugins.security.ssl.http.truststore_type: PKCS12
plugins.security.ssl.http.truststore_filepath: /etc/opensearch/cert/FQDNOfYourNode-node-keystore.p12
plugins.security.ssl.http.truststore_password: ReplaceMeByGeneratedPasswordByGithubScript

plugins.security.allow_default_init_securityindex: true
plugins.security.nodes_dn:
  - 'CN=FQDNOpenSearchNode1,OU=NameOfYourCluster,O=OpenSearch,C=BE'
  - 'CN=FQDNOpenSearchNode2,OU=NameOfYourCluster,O=OpenSearch,C=BE'
  - 'CN=FQDNOpenSearchNode3,OU=NameOfYourCluster,O=OpenSearch,C=BE'
# it is also possible to use wildcards in the CN field, as long as plugins.security.authcz.admin_dn does not match the wildcard expression:
#  - 'CN=*OpenSearchNode*,OU=NameOfYourCluster,O=OpenSearch,C=BE'

plugins.security.authcz.admin_dn:
  - CN=Admin,OU=NameOfYourCluster,O=OpenSearch,C=BE

plugins.security.audit.type: internal_opensearch
plugins.security.enable_snapshot_restore_privilege: true
plugins.security.check_snapshot_restore_write_privileges: true
plugins.security.restapi.roles_enabled: ["all_access", "security_rest_api_access"]
plugins.security.system_indices.enabled: true
plugins.security.system_indices.indices: [".plugins-ml-model", ".plugins-ml-task", ".opendistro-alerting-config", ".opendistro-alerting-alert*", ".opendistro-anomaly-results*", ".opendistro-anomaly-detector*", ".opendistro-anomaly-checkpoints", ".opendistro-anomaly-detection-state", ".opendistro-reports-*", ".opensearch-notifications-*", ".opensearch-notebooks", ".opensearch-observability", ".opendistro-asynchronous-search-response*", ".replication-metadata-store",".opendistro-anomaly-detection-state", ".opendistro-reports-*", ".opensearch-notifications-*", ".opensearch-notebooks", ".opensearch-observability", ".opendistro-asynchronous-search-response*", ".replication-metadata-store"]
Change the admin password and remove other users
The default password of the admin user should be changed and all the users except admin should be removed. To do this:
Choose a strong password for the admin user and generate the corresponding hash:
cd /usr/share/opensearch/plugins/opensearch-security/tools

OPENSEARCH_JAVA_HOME=/usr/share/opensearch/jdk ./hash.sh
Edit the internal_users.yml file, removing all the users except admin and replacing the old hash by the one generated:
sudo vi /etc/opensearch/opensearch-security/internal_users.ymlExample:
    ---
# This is the internal user database
# The hash value is a bcrypt hash and can be generated with plugin/tools/hash.sh

_meta:
  type: "internalusers"
  config_version: 2

# Define your internal users here

## Demo users

admin:
  hash: "$2y$12$EeAQpNRgrIccz2iUK7Fsqektv.qIbWCGnTs1NQYYyA9pgL8zdBxTy"
  reserved: true
  backend_roles:
  - "admin"
  description: "admin user"
Restart OpenSearch and apply the configuration
Restart OpenSearch:
sudo systemctl restart opensearchTo apply the settings in the files /etc/opensearch/opensearch-security/*.yml to the cluster configuration, run the script securityadmin.sh, which uses the super admin certificates generated earlier:
cd /usr/share/opensearch/plugins/opensearch-security/tools

OPENSEARCH_JAVA_HOME=/usr/share/opensearch/jdk ./securityadmin.sh -h <IPOfYourNode> -cd /etc/opensearch/opensearch-security \
   -icl \
   -nhnv \
   -cacert /path/to/rootCA.crt \
   -cert /path/to/admin.pem \
   -key /path/to/admin-key.pem
If the private key has a password, you can specify this with the -keypass option in the request above.
Important
The command above only needs to be executed on one of the nodes.
Note
For more information, including how to do this with .pem files, refer to Applying changes to configuration files in the OpenSearch documentation.
Check via the command line if data is returned (make sure to replace the placeholder data with the correct data):
curl --insecure -u admin https://[node_hostname_or_ip]:9200This should return something similar to this:
{
  "name" : "my-elasticsearch-node",
  "cluster_name" : "NameOfYourCluster",
  "cluster_uuid" : "7kj65asfjuu9a1vcf6e345asd65dfg",
  "version" : {
    "distribution" : "opensearch",
    "number" : "2.6.0",
    "build_type" : "deb",
    "build_hash" : "abcdef1234567890",
    "build_date" : "2021-03-18T06:04:15.345676Z",
    "build_snapshot" : false,
    "lucene_version" : "9.5.0",
    "minimum_wire_compatibility_version" : "7.10.0",
    "minimum_index_compatibility_version" : "7.0.0"
  },
  "tagline" : "The OpenSearch Project: https://opensearch.org/"
}
Install the rootCA.crt on the DataMiner server
To build trust between DataMiner and OpenSearch, so that DataMiner can connect to the OpenSearch database, install the rootCA.crt on the DataMiner server:
Stop the DataMiner Agent.
Double-click the rootCA.crt file on the DataMiner server.
Use Local Machine as Store Location when adding the certificate, and place the certificate in Trusted Root Certification Authorities.
Once the certificate has been imported, add the full HTTPS URL (including the port) in the DataBase.DBServer tag of the DB.xml file. Using the IP of the node with the cluster_manager role is preferable.
For example:
<DataBase active="True" type="Elasticsearch" search="true">
<DBServer>https://166.206.186.146:9200</DBServer>
<UID>UserNameToConnectToOpenSearch</UID>
<PWD>PasswordOfTheUserNameToConnectToOpenSearch</PWD>
<ConnectString></ConnectString>
<IntegratedSecurity>False</IntegratedSecurity>
</DataBase>
Important
The user and password provided should be defined in the
\etc\opensearch\opensearch-security\internal_users.ymlfile.Check the Microsoft Management Console (MMC) to make sure the root certificate has been installed correctly:
Press Win+R to open the Run dialog box, and enter
mmc.This will open the Microsoft Management Console. You may need to click Yes first to confirm that changes can be made from the console.
If the Console Root folder is empty, do the following:
In the File menu, select Add/Remove Snap-in.
In the Available snap-ins list, select Certificates, and click Add.
In the Certificates snap-in pop-up window, select Computer account, and click Next.
Leave Local computer selected, and click Finish.
Go to the Certificates (Local Computer) > Trusted Root Certification Authorities > Certificates folder, and make sure it contains the root certificate.
Test the connection from the DataMiner server to the new OpenSearch cluster by entering a URL in the following format in a browser:
https://[CLUSTERNODEIP]:9200/_cat/nodes?v.Restart the DataMiner Agent.
Check in the SLSearch.txt, SLDataGateway.txt, and SLDBConnection.txt log files (in the folder
C:\Skyline DataMiner\Logging) whether any errors have occurred.
Setting up OpenSearch Dashboards
Optionally, you can set up OpenSearch Dashboards, which is the equivalent of Kibana for Elasticsearch. To do so, follow the instructions under Installing OpenSearch Dashboards (Debian).
You can for example install this on a Ubuntu Server from an APT repository or using .deb-packages. You will then be able to connect to your server using http(s)://ipaddress:5601(example: http(s)://166.206.186.146:5601).
To configure TLS, instead of using .pem certificates as recommended in the OpenSearch documentation, we recommend using .p12 files for trust and keystore. You can generate these using the Generate-TLS-Certificates script maintained by the Skyline security team.
To configure OpenSearch Dashboards to use .p12 files, add the following to /etc/opensearch-dashboards/opensearch_dashboards.yml:
# OpenSearch Dashboards is served by a back end server. This setting specifies the port to use.
server.port: 5601

# Specifies the address to which the OpenSearch Dashboards server will bind. IP addresses and host names are both valid values.
# The default is 'localhost', which usually means remote machines will not be able to connect.
# To allow connections from remote users, set this parameter to a non-loopback address. Example: 166.206.186.146
server.host: 166.206.186.146

# The URLs of the OpenSearch instances to use for all your queries.
# Can be one ipAddress in case of a single node, but can also be multiple in case of an cluster, below is an example for a cluster consisting of three nodes
opensearch.hosts: ["https://166.206.186.146:9200","https://166.206.186.147:9200","https://166.206.186.148:9200"]

# This setting is for communication between OpenSearch Dashboards and the web browser. Set to true for HTTPS, false for HTTP.
server.ssl.enabled: true

# In below example, we created a cert folder in /etc/opensearch and copied the .p12 files over that were generated with the generate-tls-certificates scripts.
server.ssl.keystore.path: "/etc/opensearch/cert/FQDN-node-keystore.p12"
server.ssl.keystore.password: "KeyStorePasswordComesHere"

# This setting is for communication between OpenSearch and OpenSearch Dashboards. Valid values are full, certificate, or none. We recommend full if you enable TLS, which enables hostname verification. certificate just checks the certificate, not the hostname, and none performs no checks (suitable for HTTP). Default is full.
opensearch.ssl.verificationMode: certificate

# If opensearch.ssl.verificationMode is full or certificate, specify the full path to one or more CA certificates that comprise a trusted chain for your OpenSearch cluster. For example, you might need to include a root CA and an intermediate CA if you used the intermediate CA to issue your admin, client, and node certificates.

# Below is an example of the rootCA.crt certificate that was generated using the generate-tls-certificates from the Skyline public GitHub repository. See also "Update the trusted root certificates with rootCA.crt" topic further up in this help file.
opensearch.ssl.certificateAuthorities: ["/usr/local/share/ca-certificates/rootCA.crt"]


# If your OpenSearch is protected with basic authentication(using the /etc/opensearch/opensearch-security/internal_users.yml), these settings provide the username and password that the OpenSearch Dashboards server uses to connect to OpenSearch.
# More information can be found here: https://opensearch.org/docs/latest/install-and-configure/install-opensearch/debian/#configure-a-user and https://opensearch.org/docs/latest/security/authentication-backends/authc-index/#authentication-flow
opensearch.username: userName
opensearch.password: pwd
Tip
See also: OpenSearch Documentation
Connecting your DMS to an OpenSearch cluster
To configure the connection to an OpenSearch database:
If you are using a dedicated clustered storage setup, configure the settings as detailed under Cassandra database.
If you are using a setup with storage per DMA, manually connect your DMS to the OpenSearch database
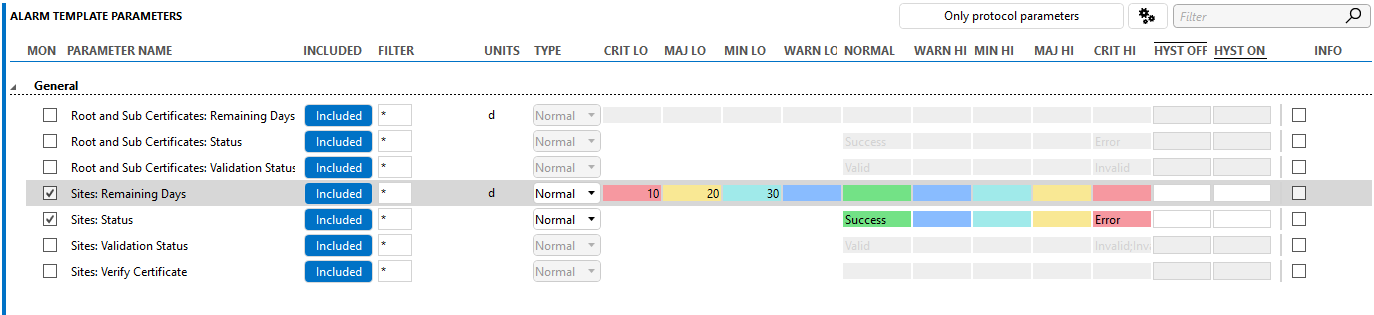
Monitoring the expiry dates of TLS certificates
Once DataMiner is connected to an OpenSearch database via TLS (see TLS and user configuration), it is important that the TLS certificates get renewed before they expire to prevent loss of connection to the database.
To monitor expiry dates, we recommend using the Skyline SSL Certificate Monitor connector:
Make sure the Skyline SSL Certificate Monitor connector is deployed in your DataMiner System.
Create an element, selecting Skyline SSL Certificate Monitor as the protocol.
On the General data page of the element, enter the full URL of the OpenSearch node in the New Site URL parameter, and click Add Site.
In the Sites table, enter your OpenSearch logon credentials in the User and Password fields.
Create an alarm template to monitor the parameter Remaining Days of the protocol, and assign it to the element.