Getting started with DOM
This tutorial shows how you can create a simple DOM model using the DOM Editor and then use it in a low-code app.
The content and screenshots for this tutorial were created in DataMiner version 10.4.1.
Expected duration: 20 minutes
Tip
See also: Kata #15: Getting started with DataMiner Object Models on DataMiner Dojo 
Prerequisites
- A DataMiner System using DataMiner 10.3.10 or higher, which is connected to dataminer.services.
- An indexing database or Storage as a Service.
Note
If you use a DaaS system, these prerequisites are automatically met.
Overview
- Step 1: Deploy the DOM Editor script
- Step 2: Create a DOM definition
- Step 3: Use the DOM definition in a low-code app
Step 1: Deploy the DOM Editor script
Go to https://catalog.dataminer.services/details/11674850-aeac-48c4-9f35-03c387ebcf18.
Click the Deploy button to deploy the DOM Editor script to your DMA.
Step 2: Create a DOM definition
Now that you have deployed the DOM Editor to your DMA, you can use it to create a DOM definition:
Open DataMiner Cube and go to Apps > Automation.
In the Automation module, search for a script called DOM Editor and select it.
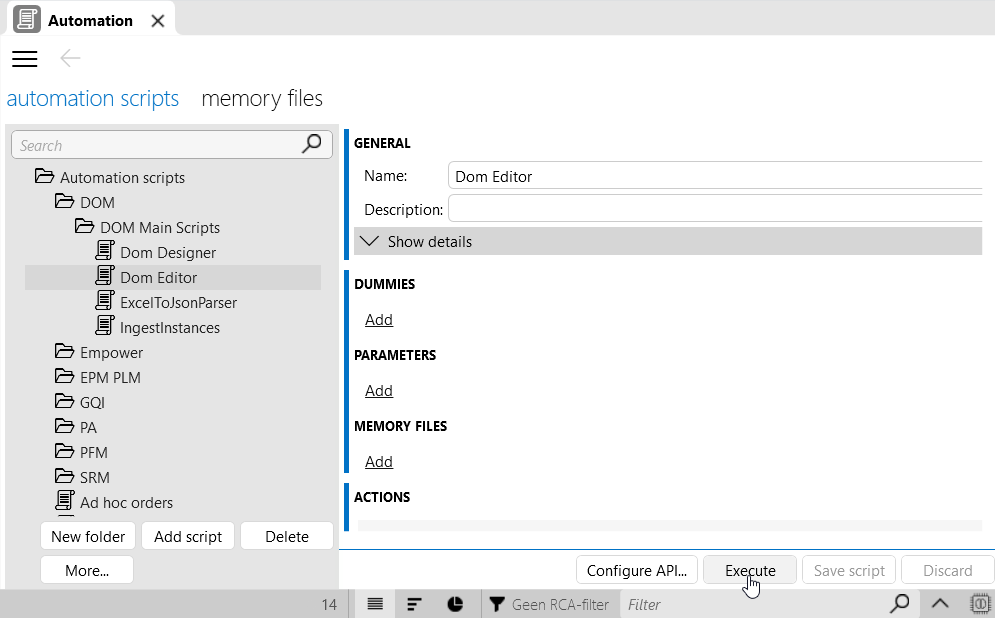
Click the Execute button in the lower right corner to launch this script, and then click Execute now.
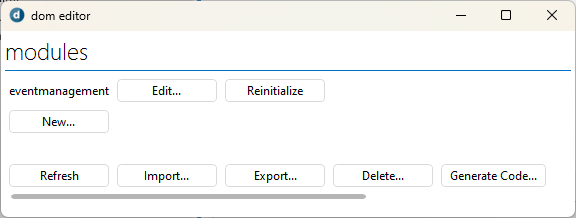
You should now see the following window:
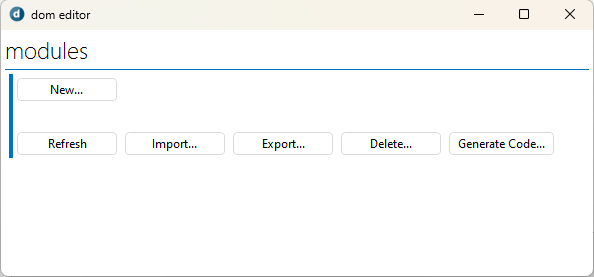
Click New to create a new DOM module.
In the Module ID box, enter
eventmanagement.This is the name of the module that you are creating.
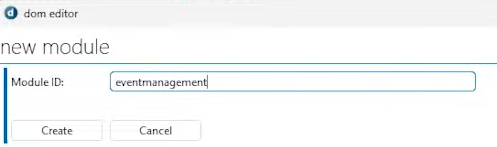
Click Create.
This should result a new module in the list of available DOM modules:
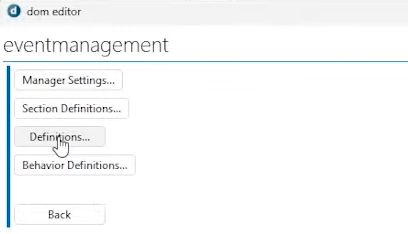
Next to the module name, click Edit to open the details of the module.
Click Definitions to go to the definitions overview for this module.
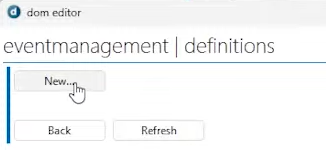
Click New to create a new DOM definition.
In the Name box, enter
Event.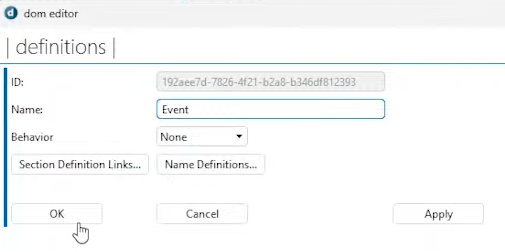
Confirm with OK, then click Back to go back to the main menu.
In the main menu, select Section Definitions.
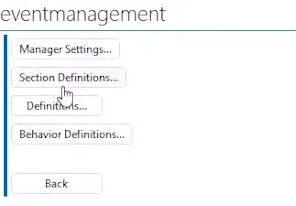
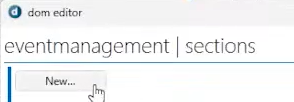
Click New to create a new section definition.
This section definition will allow you to group several fields to be used in your "Event" DOM definition.
In the Name box, enter
Event Info.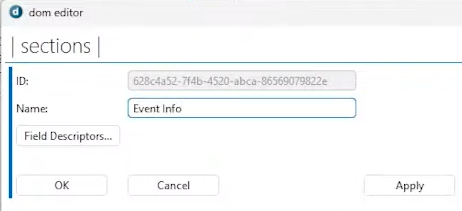
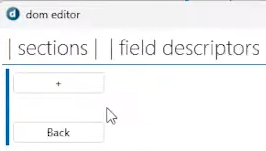
Click the Field Descriptors button to add fields to the section:
Click the + button to start adding a field to the section:
Configure the new field with the name
Event Name.In the Type box, select the type String.
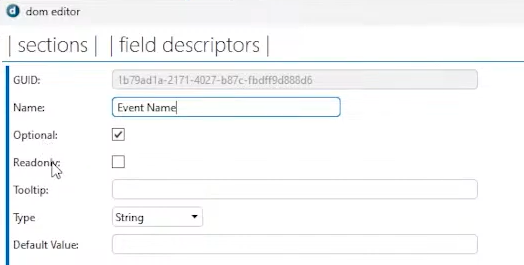
Click Back.
Repeat these steps to also add the following fields to the section:
Name Type Start DateTime End DateTime Notes String When all fields have been added, click Back, and then Apply and OK.
Click the Back button until you are back at the main DOM module menu.
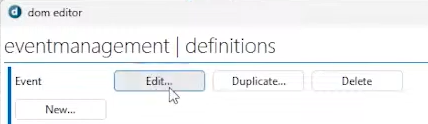
Click Definitions.
Next to the Event definition you have created, click Edit:
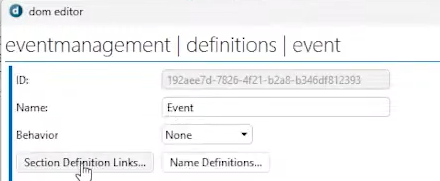
Click Section Definition Links.
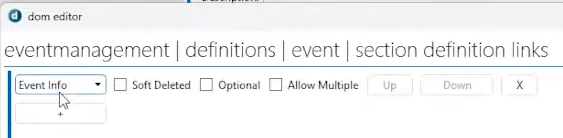
Click the + button to add a section.
This should automatically add the Event Info section to the definition.
Click Back and then Apply to confirm.
Close the DOM Editor.
Your DOM definition is now ready.
Step 3: Use the DOM definition in a low-code app
Either create a new low-code app or use an existing app where you will be able to add the DOM definition.
Tip
For info on how to make a low-code app, refer to the tutorial Creating and publishing an app
Add a new page to the app and edit it.
Tip
For info on how to add and configure pages in a low-code app, refer to the tutorial Managing the pages in an app.
In the Data tab on the right, look for the Object Manager Definitions section and make sure it is expanded.
This section lists the DOM modules and definitions created in the system, including the module eventmanagement, which you created earlier, and below this your DOM definition Event.
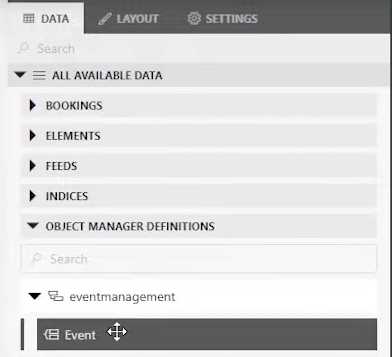
Drag and drop the Event DOM definition to the page to add a component using this data.
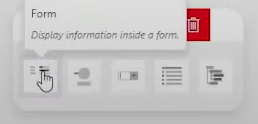
In the component, click the icon next to Pick a visualization.
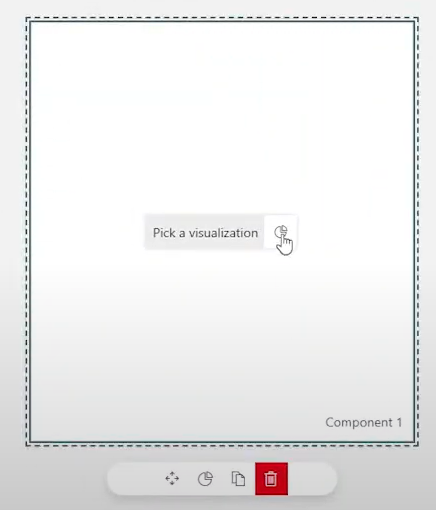
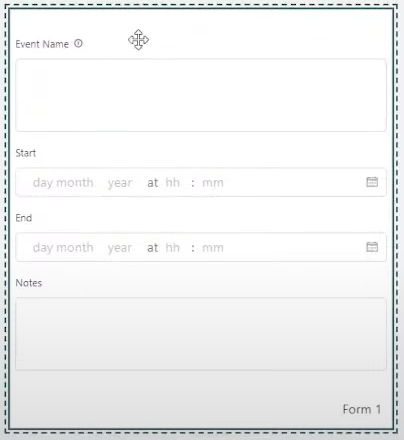
Select Form as the visualization for the component.
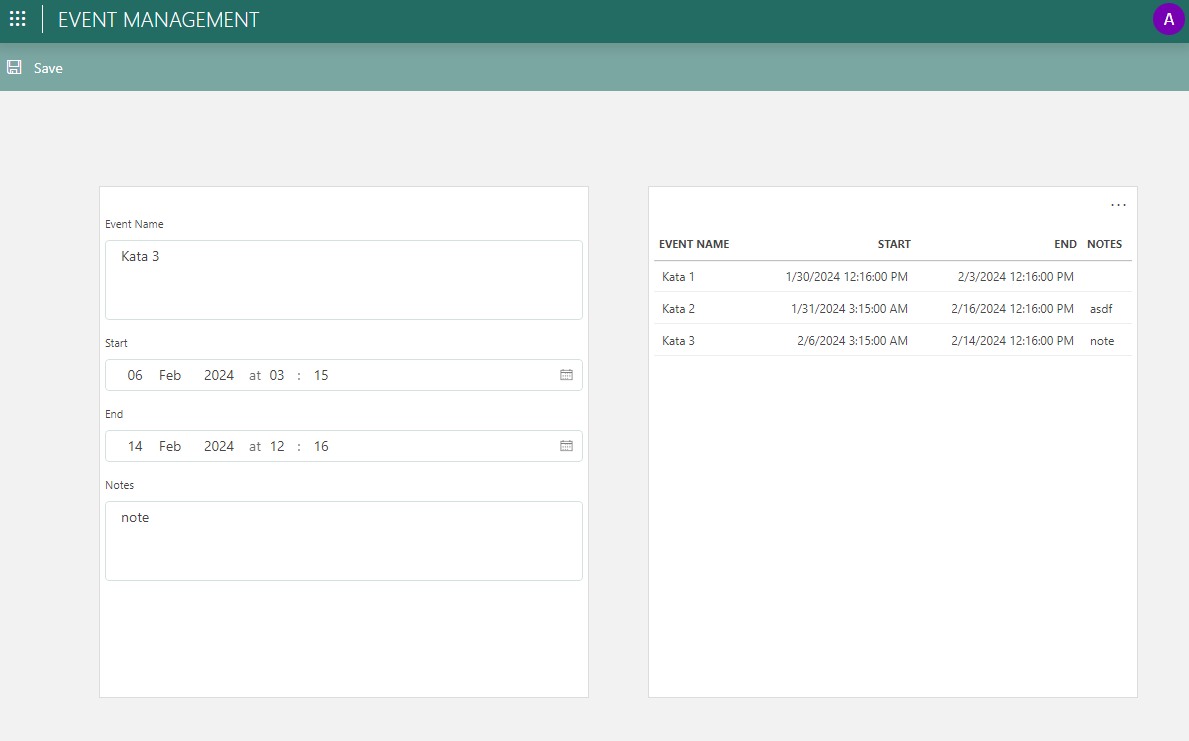
As a result, the app will show a form representing the fields you added to the Event DOM definition. This is where a user of the app can start entering data.
Add a Save button so users will be able to save the form:
In the pane on the left, enable the toggle button next to Header bar to display the header bar for the page.
Click the "+" icon in the header bar.
Enter the label
Savefor the button.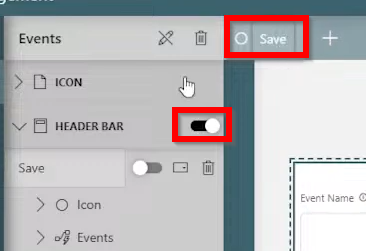
Optionally, add an icon to the button by selecting it under Icon in the pane on the left.
You can use the filter box at the top of the list of icons to quickly find a specific icon.
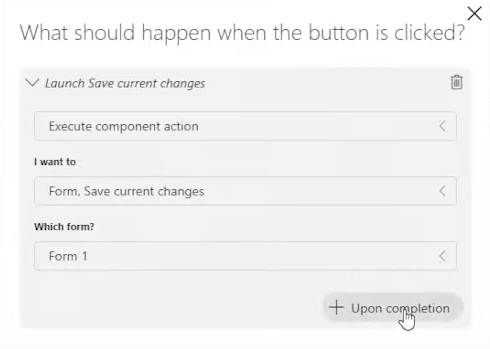
Under Events in the pane on the left, click the icon next to On click.
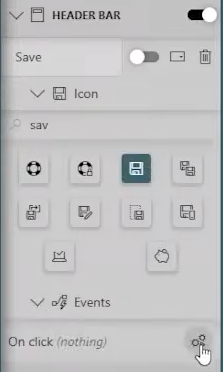
This will open a dialog where you can define what should happen when the button is clicked.
In the dialog, select Execute component action in the first box, Save Current Changes in the second box, and Form 1 in the third box.
"Form 1" refers to the form component you have just created by dragging and dropping the DOM definition on the page.
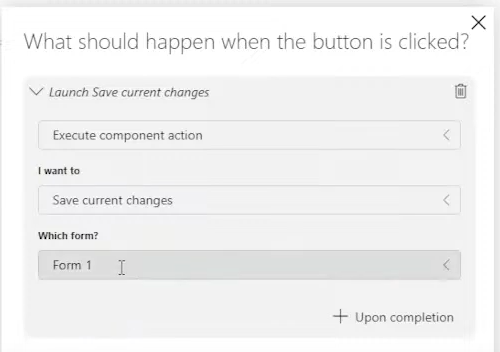
Click OK to finish adding the action.
Click the publish icon in the top right corner of the app.
You have now published a first version of the app, so you can take a look at what you have created so far.
In your low-code app, fill out the form and save it.
At this point, you cannot see the created event records yet. For this, you need to add a table listing all event records in the app. This table will use a GQI query.
Go back to edit mode, start editing the page again, and create a query:
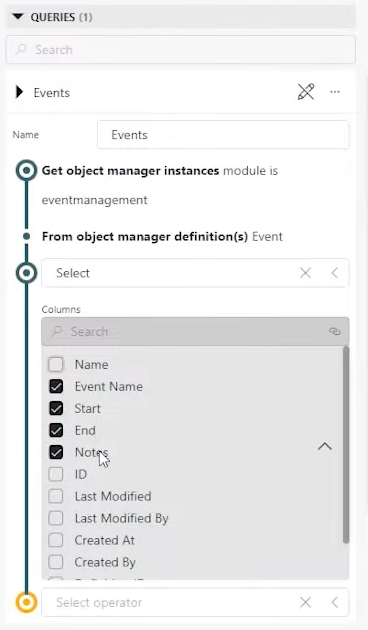
Expand the Queries section in the data pane.
Click the + icon to create a new query.
Enter
Eventsas the name of the query.In the Select data source box, select Get object manager instances.
Select the module eventmanagement, and the definition Event.
In the Select operator box, select Select.
This will allow you to pick which fields of the event you want to list in the app.
Select the Event Name, Start, End, and Notes fields.
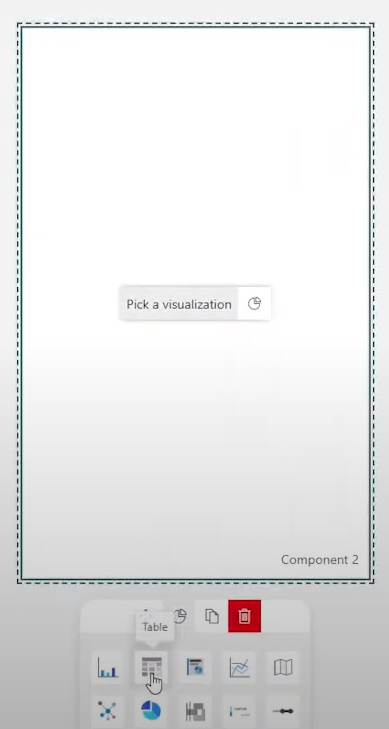
Drag and drop the newly created Events query on to the page next to the form to add a component using this data.
In the component, select Table as the visualization.
Click the publish icon in the top right corner of the app to publish the app again.
The app should now show a table containing the event record you created earlier.

At this point, if you add more records through the form, you will not immediately see the records showing up in the table. You will need to refresh the page manually first. To make the even records show up immediately as soon as they have been entered, another event has to be added to the page.
Go back to edit mode and add an event to the page to refresh after the Save action:
In the pane on the left, under Header bar > Events, click the icon next to On click.
This will open the dialog with the save action you configured earlier.
Click Upon completion.
Select Execute component action in the first box, Fetch the data in the second box, and Table 2 in the third box.
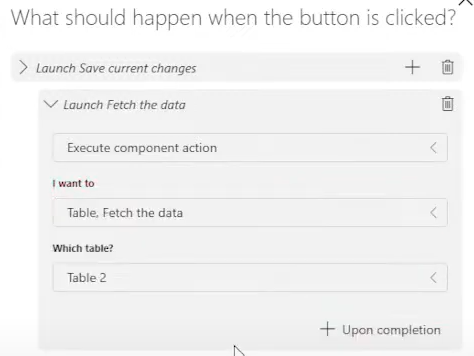
Click OK.
Publish the app again and try out creating new events again.
You should now have a fully functioning app where users can add records that will show up in the table as soon as they click the Save button.