Using a header bar
This tutorial explains how you can add a header bar to your pages and panels.
The content and screenshots for this tutorial were created in DataMiner version 10.3.11.
Expected duration: 5 minutes
Tip
See also: Kata #7: Pages, panels and headers in a low-code app on DataMiner Dojo 
Overview
- Step 1: Add a page header bar
- Step 2: Create a header button
- Step 3: (Optional) Create a panel header bar
Step 1: Add a page header bar
Make sure you are editing the app.
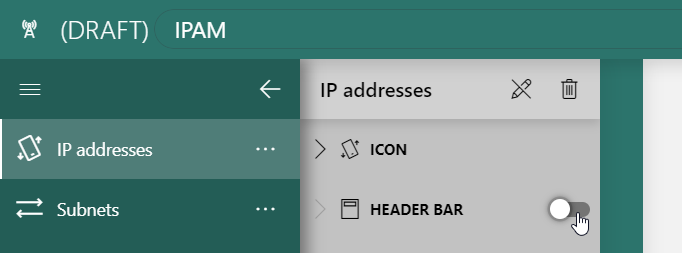
In the gray side panel on the left, next to Header bar, toggle the switch to the right.
This will add a header bar to your page.
Step 2: Create a header button
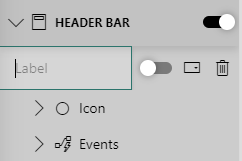
Click the "+" icon on the right side of the header bar.
This will add a header bar button on the right. There is also a "+" icon on the left, which can be used to add a button on the left.
Click the button you have added.
This will activate additional configuration options in the gray side panel, within the "Header bar" section.
Give the button a suitable icon.
You can search for "Dashboard" to find applicable icons for a "Metrics" panel.
Configure the button to open a side panel, similar to the way this was done in Creating and showing a panel.
Publish the app and check if clicking the button in the header bar opens the panel.
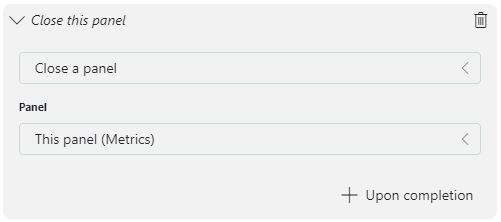
Step 3: (Optional) Create a panel header bar
Follow the same steps as outlined in the previous instructions to add a header bar to the "Metrics" panel.
Include a button on the right side of the panel header bar.
Use a "Close" icon for the button.
Do not specify a name for the button.
Configure the Close a panel action, so that the panel closes when a user clicks the header bar button.
Publish the app and check if clicking the new button in the panel header closes the panel.
Next tutorial
Now that you know how to create navigational controls, take a look at how you can execute actions:
Learning paths
This tutorial is part of the following learning path: