Using information templates for enhanced parameter presentation and monitoring
This tutorial will show you how to configure and use an information template to enhance the presentation and monitoring of satellite earth station parameters. You will learn to customize a table for quick data comprehension by adjusting the display name of columns, hiding unnecessary columns, and applying filters.
Because it is common to reuse information templates, you will also learn how to make a quick edit to it for one specific element only.
Although the primary focus of this tutorial lies on information templates, you will also learn to use an alarm template to visualize both minor and critical alarms for earth stations affected by potentially challenging weather conditions.
Expected duration: 20 minutes
Tip
See also:

Note
The content and screenshots for this tutorial have been created using DataMiner version 10.4.5.
Prerequisites
- A DataMiner System that is connected to dataminer.services.
Overview
This tutorial consists of the following steps:
- Step 1: Deploy the Info Template Quick Tips package from the Catalog
- Step 2: Create and configure a new information template
- Step 3: Hide the unnecessary table columns
- Step 4: Assign a customized alarm template
- Step 5: Override the 'Location' parameter description
Step 1: Deploy the 'Info Template Quick Tips' package from the Catalog
Go to https://catalog.dataminer.services/details/32274506-07a4-4ecb-98d3-bea773c3903e.
Deploy the catalog item to your DataMiner Agent by clicking the Deploy button.
Tip
See also: Deploying a Catalog item to your system
Open DataMiner Cube and check whether a view and element named "Info template quick tips" have been added to your DataMiner Agent.
If this is the case, the package has been successfully deployed.
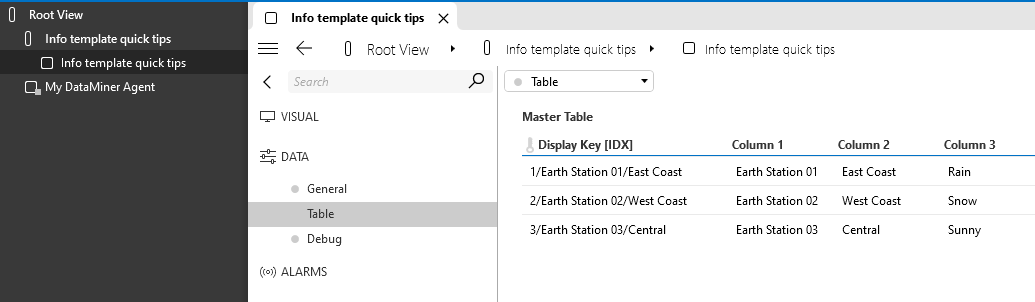
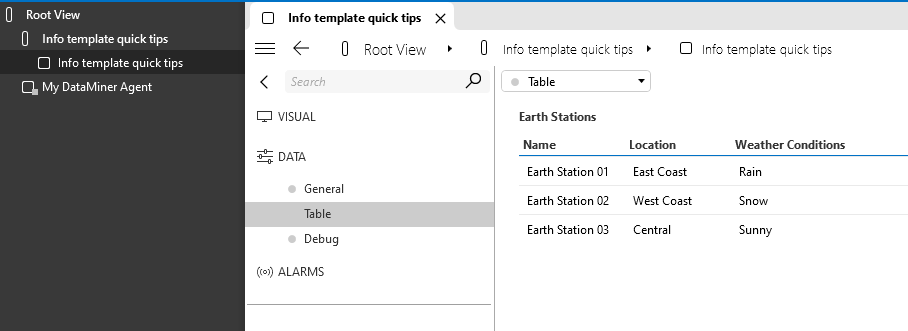
On the Data > Table page of the element, you will see that the Master Table of the element contains pre-provisioned data:
Step 2: Create and configure a new information template
In this step, you will configure an information template to change the way the parameters from the example element are displayed.
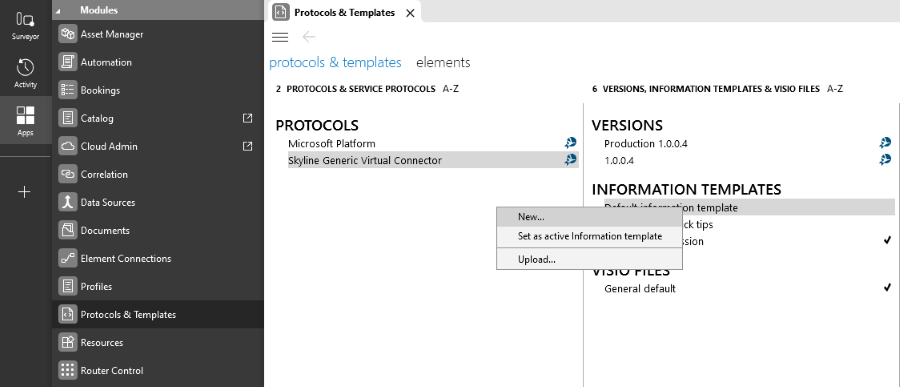
In Cube, select Apps in the sidebar and open the Protocols & Templates module.
Select Skyline Generic Virtual Connector in the list of protocols.
Under Information Templates, right-click the default information template and select New.
Specify a name for the template and select OK.
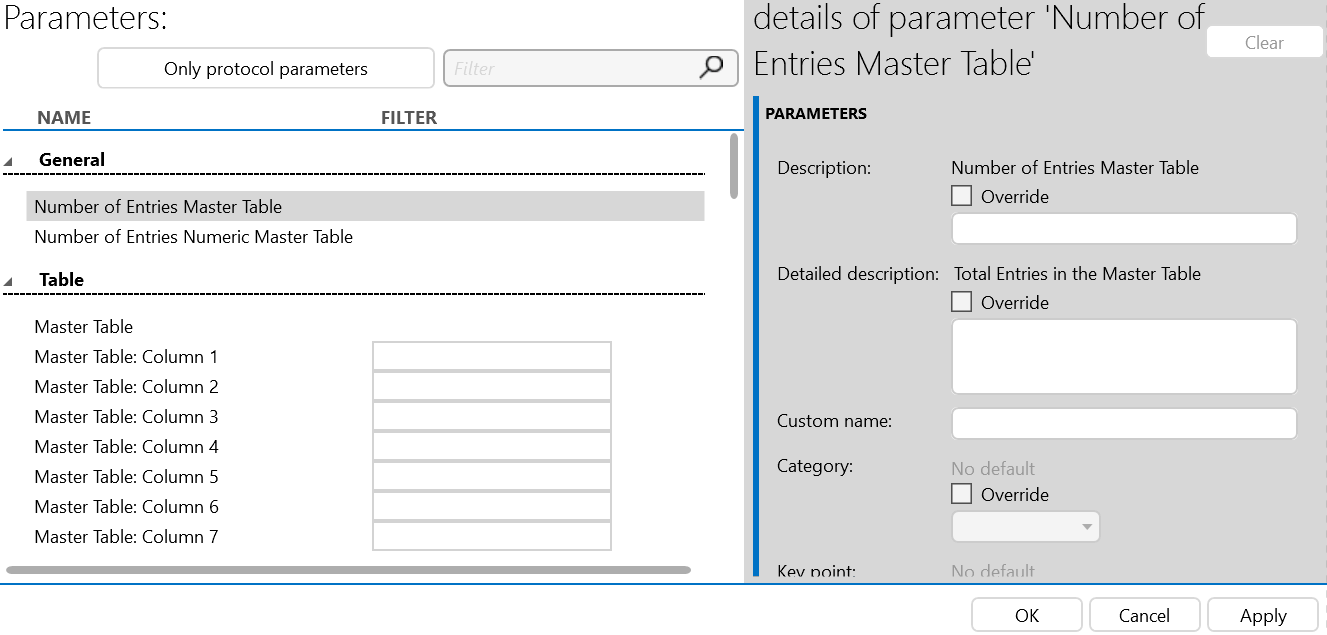
Change the display name of the parameters Master Table, Column 1, Column 2, Column 3, and Column 4:
Select the parameter in the parameter list on the left.
In the details of parameter section, under Description, select the Override checkbox.
Enter the new display name for the parameter.
Parameter name Display name Master Table Earth Stations Column 1 Name Column 2 Location Column 3 Weather Conditions Column 4 Hide Me
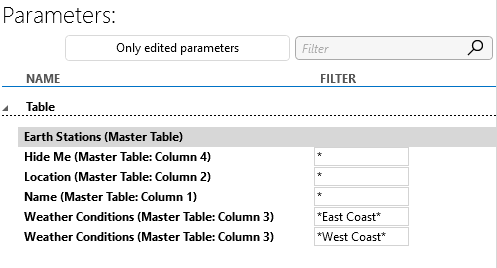
Click Only protocol parameters in the top-left corner, and select Only edited parameters.
The list of parameters will now be limited to the ones you have just edited.
Select the Hide Me parameter, and under Parameter access > Hide parameter on the right, select the Override checkbox.
Hover the mouse pointer over the Weather Conditions parameter and click the "+" button to duplicate the parameter entry.
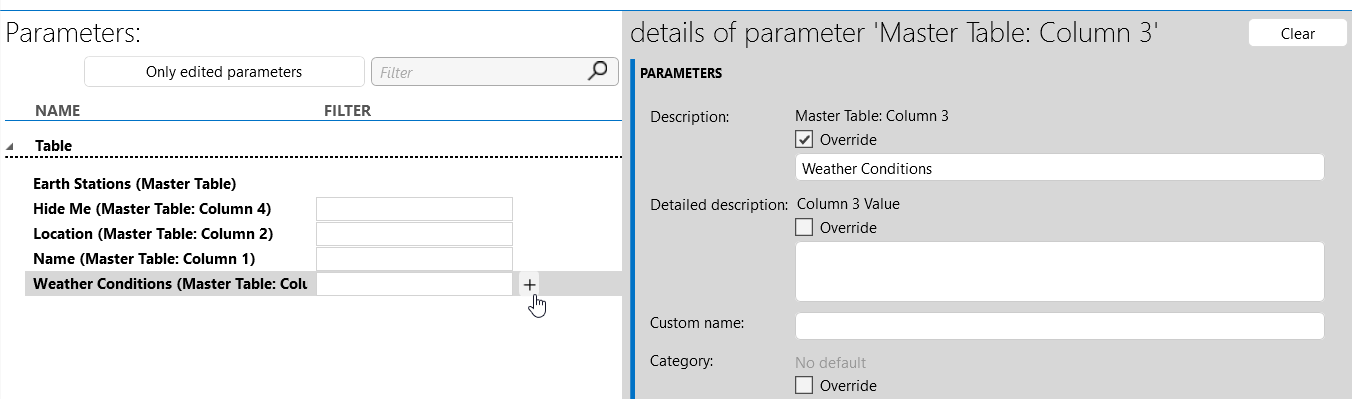
This way, there will be two entries for this same parameter, which can each be configured with their own filter.
In the filter boxes next to the parameter names, specify the following filters:
Parameter Filter Name * Location * Hide Me * Weather Conditions *East Coast* Weather Conditions *West Coast* The information template configuration will now only be applied to a filtered selection of available rows of the dynamic table.
Select the Weather Conditions parameter with the West Coast filter, and make changes to the following parameter data:
Parameters > Detailed description:
The weather at the location of the siteParameters > Custom name:
Weather ConditionsParameters > Category:
Signal faultParameters > Key point:
ReceptionParameters > Component info:
Entire serviceAlarm > Alarm description:
Weather impactAlarm > Corrective actions:
Rain, mask for 1 hour | Snow, mask for 2 hours
Tip
For more information about the different parameter data, see Creating an information template.
Select the Weather Conditions parameter with the East Coast filter, and make changes to the following parameter data:
Parameters > Detailed description:
The weather at the location of the siteParameters > Custom name:
Weather ConditionsParameters > Category:
Signal faultParameters > Key point:
ReceptionParameters > Component info:
Entire serviceAlarm > Alarm description:
Weather impactAlarm > Corrective actions:
Rain, mask for 2 hours | Snow, mask for 3 hours
In the lower right corner, select Apply to save your changes.
Click OK to close the information template.
Under Information Templates, right-click your new template and select Set as active Information template.
In the dialog, click Yes to confirm that the information template should be set.
Step 3: Hide the unnecessary table columns (optional)
By default, the table shows a lot of columns that are not useful for this tutorial. In this step, you will hide these to get a cleaner view on the data.
In the Surveyor, select the Info template quick tips element, and navigate to Data > Table.
Note
If the element card was still open from earlier, you may need to close and reopen it to see the changes from the information template.
Right-click the top row of the table and hover the mouse pointer over the Columns option until it expands to show all columns in the table.
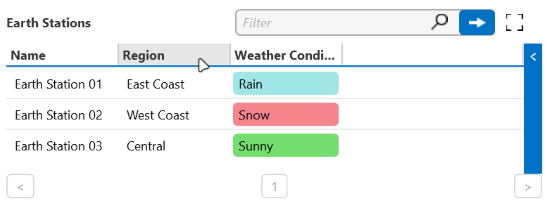
Clear the selection from all columns except Name, Location, and Weather Conditions.
At the bottom of the menu, select Save layout.
Only the Name, Location, and Weather Conditions columns will be displayed now.
Step 4: Assign a customized alarm template
To enhance the way the table data are shown, in this step, you will assign an alarm template to the element.
Navigate to Apps > Protocols & Templates.
Select Skyline Generic Virtual Connector in the list of protocols, and make sure the production version is selected under Versions.
Under Alarm, right-click Info template quick tips and select Open.
Next to the Earth Stations: Weather Conditions parameter, click Excluded to include the parameter in the alarm template.
Configure the alarm thresholds:
In the Normal column, enter
Sunny.In the MIN HI column, enter
Rain.In the CRIT HI column, enter
Snow.

Tip
See also: Configuring normal alarm thresholds
In the lower right corner, select Apply to apply your changes.
Click OK to close the alarm template.
Make sure the Info template quick tips alarm template is selected under Alarms, and select Assign elements at the top of the Elements section.
In the Assign Template window, use the Add >> button to apply the alarm template to the Info template quick tips element, and then select Close.
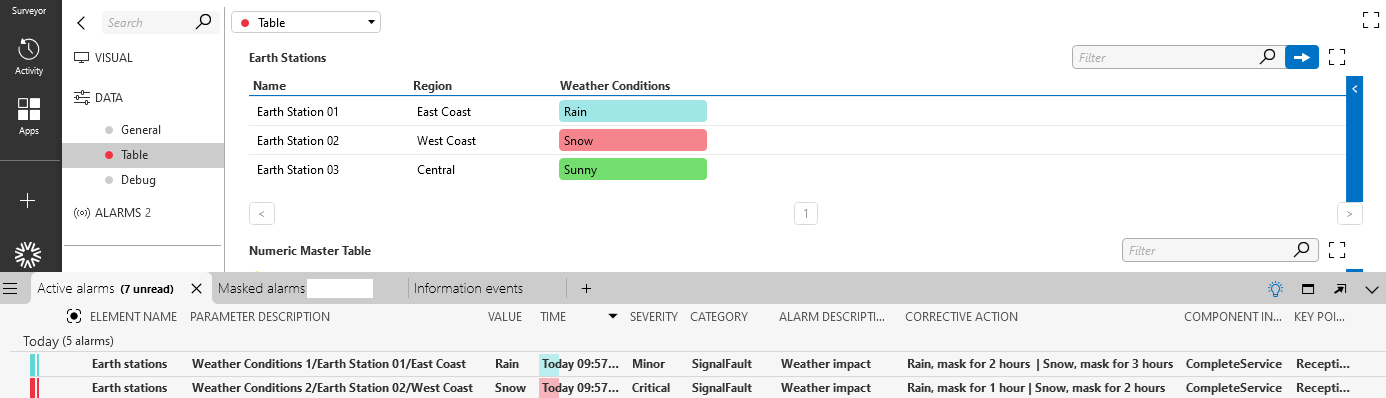
Now that you have applied the alarm template, you will find minor and critical alarms in the Alarm Console for the earth stations with weather conditions "Rain" and "Snow", respectively. Additionally, on the Data > Table page of the Info template quick tips element, the alarm severity will be shown with appropriate colors.
In the Alarm Console, add the following columns:
Category
Alarm description
Corrective action
Component info
Key point
Tip
See also: Adding or removing columns
Depending on whether an alarm is detected for an earth station on the East or West Coast, you will find the appropriate corrective action in the Alarm Console.
Step 5: Override the 'Location' parameter description
This step will show how you can make a quick edit to the information template for one specific element only.
Select the hamburger button in the top-left corner of the Info template quick tips element card and select Parameter names.
In the Element parameter names window, look up the "Location" parameter name in the Information template name column.
To quickly find this parameter, you can use the filter box in the top-right corner.
In the Custom name column for this parameter, enter the custom parameter name
Region.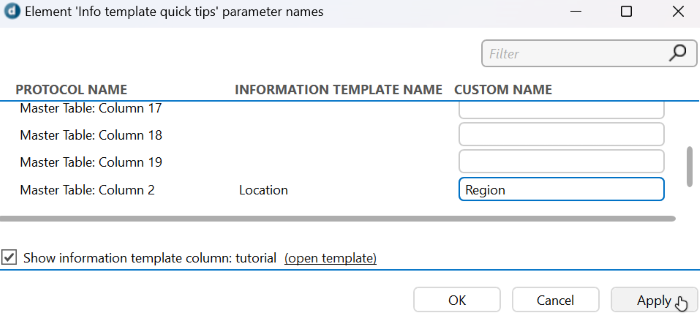
Click Apply to apply your changes and OK to close the Parameter names window.
On the Data > Table page, the column previously called "Location" will now be called "Region".