EPM xPON deployment
To deploy the xPON branch of the EPM Solution:
Make sure the following prerequisites are met:
The latest DataMiner Feature Release has been deployed in the DMS.
You have access to the latest EPM package. This is provided by your Skyline Technical Account Manager.
The latest Windows updates have been installed on the server.
The internet time configuration is enabled on the server, or it is synchronized with a local NTP provider.
You have access to the server with the built-in Administrator account. This is required to be able to install the solution.
Make sure the CPEIntegration soft-launch option is enabled.
Place the EPM package somewhere on the server (in a different folder than C:\Skyline DataMiner) and unzip it.
In DataMiner Cube, go to the Protocols & Templates module and upload the necessary connectors (called "protocols" in Cube) from the EPM package. See Uploading a Protocol.xml file.
Note
Depending on the technology you are using in your deployment, not all connectors may be needed.
Set the latest version of the installed connectors to the Production version. See Promoting a protocol version to production version.
If the EPM package contains any alarm and/or trend templates, upload these. See Uploading an alarm template and Uploading a trend template.
If this is the initial deployment of the EPM Solution, create the necessary views. See Creating a view.
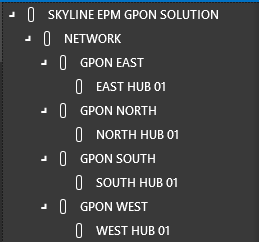
The solution expects the following view structure:
- Service Provider (single view at root level)
- Network (one or more views below the Service Provider level)
- Market (as many views as are needed below the Network level)
- Hub (as many views as are needed below the Market level)
- Market (as many views as are needed below the Network level)
- Network (one or more views below the Service Provider level)
For instance:

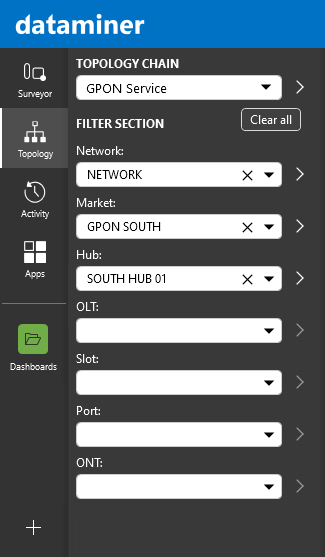
You can adjust the view names as you see fit, as long as the appropriate hierarchical structure is maintained. There will be a direct mapping between the views you created and the corresponding EPM topology. For example:

Service provider is usually your company's name
Network can be a geographical region, a state, or a logical association.
Market can be a city, a post code, or an element group.
Hub can be a neighborhood, a building, or an OLT.
- Service Provider (single view at root level)
In addition, within the Service Provider (top level) view, add the following set of views, structured as shown below:
- System
- DataMiner EPM
- EPM BE
- EPM FE
- DataMiner EPM
- System
If this is the initial deployment of the EPM Solution, create the necessary elements using the uploaded connectors. See Adding elements.
You need to create the following elements:
OLT Collector elements, as necessary. The solution expects these to be created within the hub-level views. For an overview of the supported collectors, see Supported technologies for xPON.
Important
The DataMiner element names must match the OLT names defined in SNMP. This is required to properly link the topology visuals to the elements. To rename an OLT Platform element, first change the user-defined OLT name in SNMP to the new name, then rename the element in DataMiner Cube to match the new name.
Back-end EPM elements, in the System > DataMiner EPM > EPM BE view.
A front-end EPM element, in the System > DataMiner EPM > EPM FE view.
System elements, as necessary, in the System view. You can name these elements as you see fit. If you add any MS/LX Platform elements, add these in a DMS subview of the System view.
Tip
Large deployments could greatly benefit from the use of DataMiner IDP, as it can automate the discovery process for large numbers of devices in a network.
In the Automation module in DataMiner Cube, import the Automation scripts from the EPM package. See Importing and exporting Automation scripts.
If the EPM package contains any dashboards, add these to the DMS. To do so, copy the dashboards to the folder
C:\Skyline DataMiner\Dashboardson the target DMA.If the EPM package contains Visio drawings (in the Visuals folder), add the Visio drawings to the DMS. To do so:
For a Visio drawing linked to a specific connector (e.g. EPM Platform), see Assigning a custom Visio file to a protocol.
For a Visio drawing linked to a view, upload the drawing to the view. See Set as active Visio file.
Add the Correlation rules from the EPM package to the DMS. To do so, copy the Correlation rules to the folder
C:\Skyline DataMiner\Correlationof the target DMA and restart the DMA.Important
As these Correlation rules require specific connectors and Automation scripts to function properly, make sure these have all been loaded properly before you add the Correlation rules. If you are deploying the EPM Solution for the first time, the necessary elements need to be created first before the Correlation rules can be deployed. We also recommend that you review the Correlation rules when you initially deploy them and after each upgrade.