Gaining insights using time-scoped relation learning
This tutorial showcases DataMiner's time-scoped relation learning features. You will learn how to select a time range where a parameter seems to be misbehaving and how DataMiner automatically guides you to identify the root cause of the problem.
This tutorial will make use of history sets to establish the parameters' normal behavior, enabling DataMiner to detect unexpected behavior. Trending is enabled on all parameters used in this tutorial.
The content and screenshots for this tutorial have been created in DataMiner 10.4.0.
Estimated duration: 20 minutes.
Tip
See also: Kata #28: Utilize automated relationship learning for seamless root cause analysis on DataMiner Dojo 
Prerequisites
DataMiner 10.3.8 or higher with Storage as a Service (STaaS) (recommended) or a self-managed Cassandra-compatible database and indexing database.
Behavioral Anomaly Detection is enabled (in DataMiner Cube: System Center > System settings > analytics config).
The time to live for trending is at least 1 day for real-time trending and 2 weeks for minute records.
Overview
The tutorial consists of the following steps:
Step 1: Install the example package from the Catalog
Go to https://catalog.dataminer.services/details/package/6057.
Deploy the Catalog item to your DataMiner Agent by clicking the Deploy button.
This will create a DataMiner element named "Relation Learning Tutorial - Kata Relation Learning" in your system, which will be used throughout the rest of the tutorial. The element will be located in the view DataMiner Catalog > Augmented Operations > Relation Learning Tutorial.
Step 2: Discover anomaly detection in trend graphs
In DataMiner Cube, select the element Relation Learning Tutorial - Kata Relation Learning in the Surveyor.
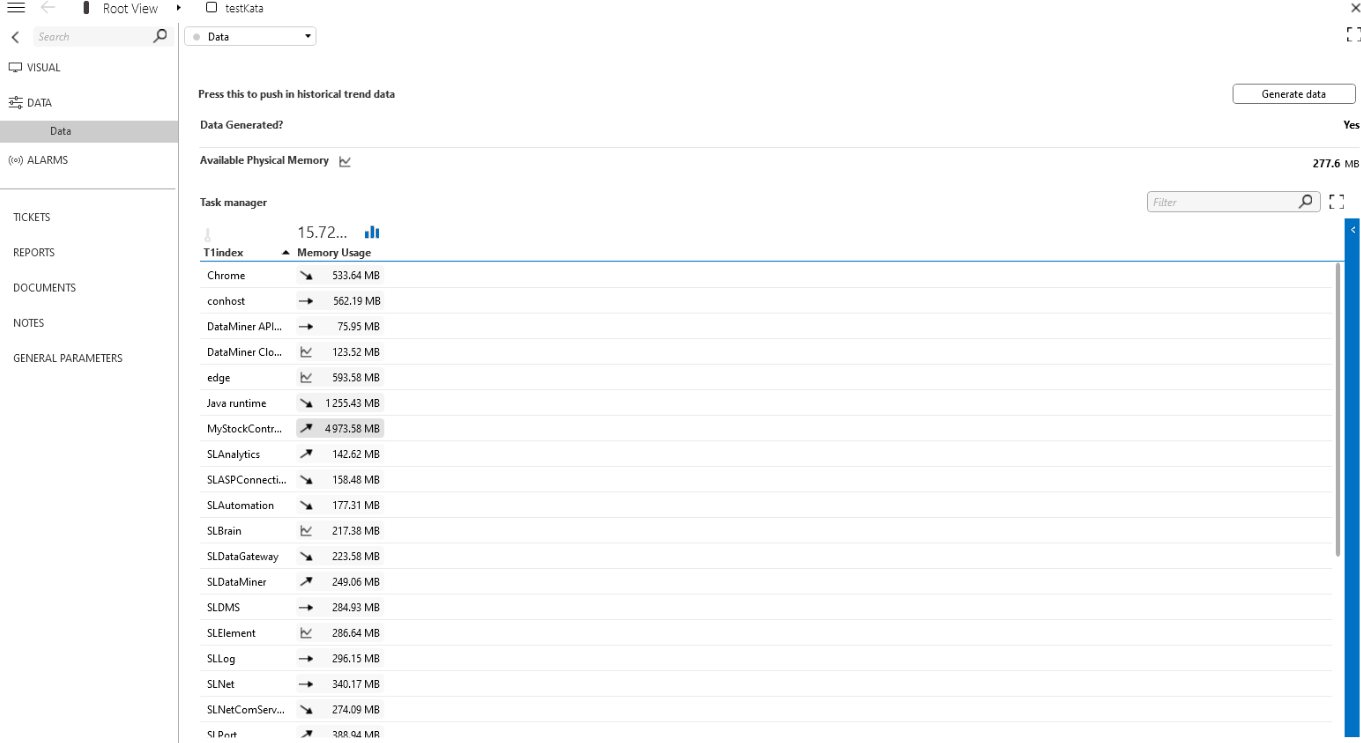
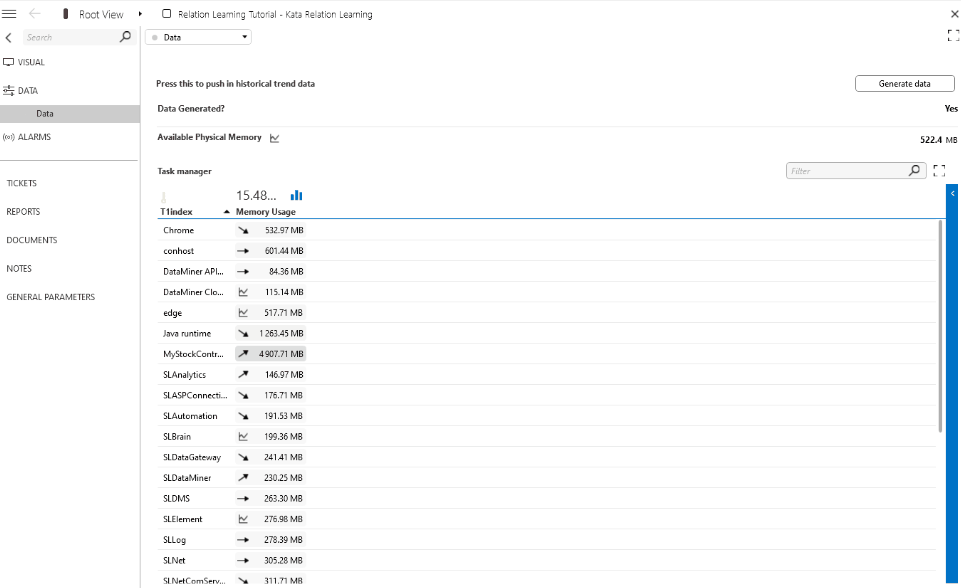
This element gives insights into the available physical memory of a fictional server and displays a Task manager table, showing the memory usage of various processes running on the server.
Click the Generate Data button to initiate the influx of historical trend data.
Within approximately 10 seconds, you will observe substantial historical trend data being pushed through DataMiner, undergoing real-time analysis.
Note
The protocols used in this tutorial can only load data for a parameter once. If you have made a mistake or want to retry an exercise, you can rerun the simulation by duplicating the element and generating the data again on the duplicated element.
Wait until the Data Generated? parameter displays Yes.
Click
 next to the Available Physical Memory parameter.
Select Month to date from the options available in the top-right corner of the trending page to inspect the trend data for the past month.
Initially, the available physical memory appears relatively stable. However, over the last 10 days, three anomalous events become apparent: a temporary decrease in memory (1), followed by a permanent decrease (2), and ultimately, a decreasing trend in the memory (3).
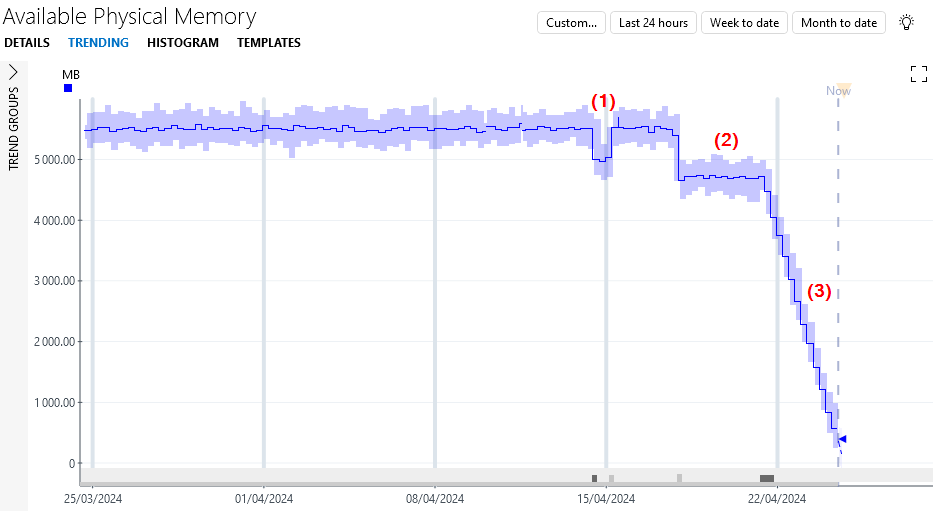
Under each of the behavioral changes, a gray block is displayed. These blocks indicate a detected change in behavior, or change point.
Hover the mouse pointer over a change point to see more detail about the type of change point (e.g. a level shift). If necessary, zoom in to see all details, such as the begin and end values of the change.
Tip
For more information on the possible types of change points, see Working with behavioral anomaly detection
Step 3: Discover proactive cap detection
Although the main focus of this tutorial is relation learning, it is important to note the proactive cap detection functionality at play. As you can see in the trend data, the available physical memory parameter approaches a critical level of 0MB. However, DataMiner knows that a free memory parameter is not allowed to dip below zero and proactively alerts you to this behavior without requiring any configuration.
Click the light bulb icon in the top-right corner of the Alarm Console.
This icon lights up in blue to indicate that DataMiner Analytics found something interesting. For more detailed info, see Working with the Alarm Console light bulb feature.
Click the menu item 1 alarm is predicted in the near future (this can be a higher number if your system has detected anomalies on other elements).
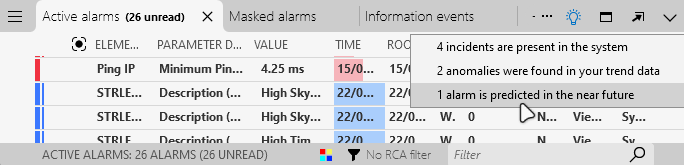
A new Predicted alarms tab will now be shown in the Alarm Console, listing the predicted issues.
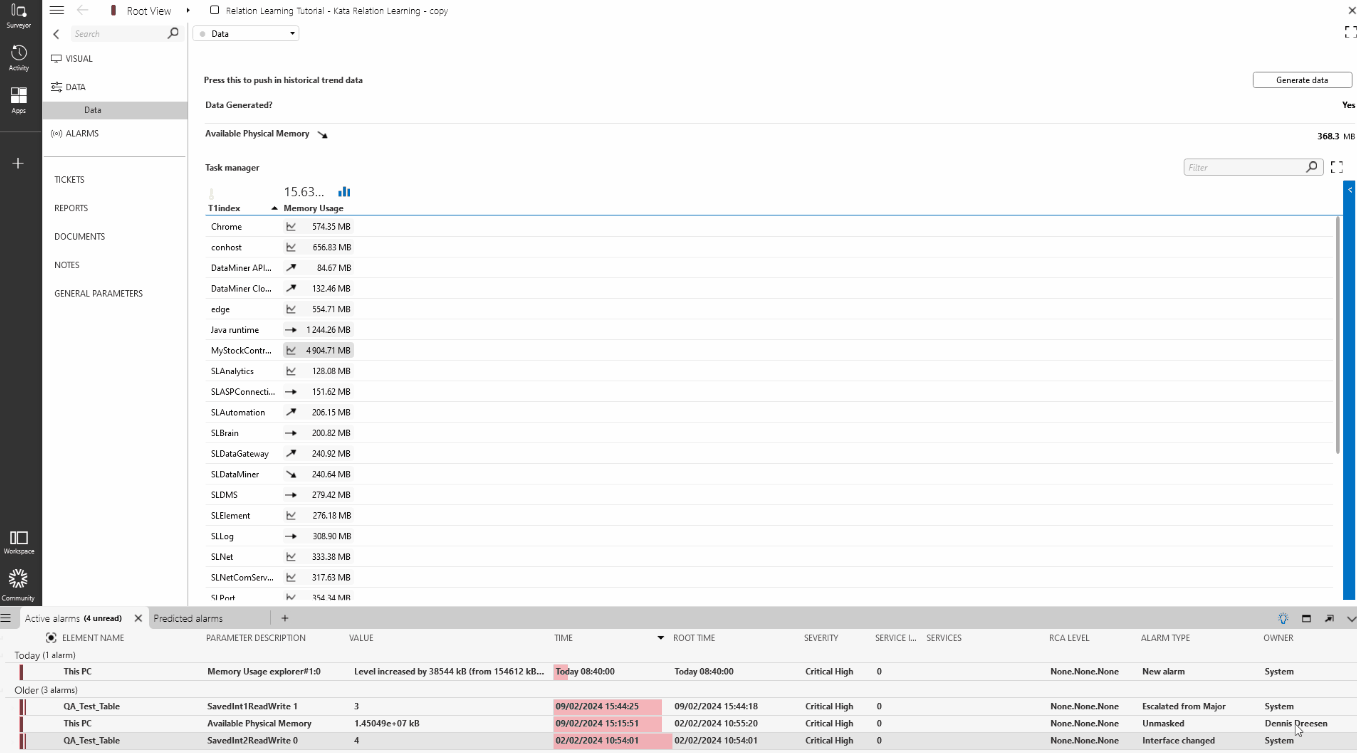
Find the predicted alarm for the element Relation Learning Tutorial - Kata Relation Learning.
In the Value column, you can find an estimate of when the system will reach the predicted minimum value of 0MB and is expected to run out of memory.
Double-click the predicted alarm to open the trend graph of that parameter.
Step 4: Find the root cause
Now that you have identified the memory leak problem, it is time to address it.
Click Up to Data Display in the top-left corner of the Available Physical Memory trending page.
To find the process consuming the most memory, double-click Memory Usage in the Task manager table.
The downward-facing arrow next to Memory Usage indicates that the column is sorted from highest to lowest. MyStockController emerges as the process using the most memory and appears to be the culprit.
Click
next to MyStockController.Select Week to date from the options available in the top-right corner of the trending page to inspect the trend data for the past week.
The MyStockController process started leaking memory approximately three days ago.
Compare this trend graph to the Available Physical Memory trend graph:
Click the upward arrow in the lower right corner of the trending page to open the parameter pane.
Select Add parameter in the lower left corner of the parameter pane.
Change the parameter to Available Physical Memory and click Show trend in the lower right corner of the parameter pane.
Tip
See also: Working with the parameter pane
The decreasing trend observed in the Available Physical Memory trend graph started simultaneously with the onset of memory leakage in the MyStockController process. The root cause has been successfully identified.

Step 5: Use time-scoped relation learning
Given the significant and ongoing nature of the memory leakage, identifying its root cause was fairly straightforward. Had the issue no longer been ongoing, the culpable process may not have revealed itself as the process currently consuming the most memory or, if the problem had been more subtle, pinpointing its root cause would have been considerably more challenging.
Finding the cause of the permanent decrease in available physical memory, which occurred approximately a week ago, could therefore prove more difficult.
Select Up to Data Display in the top-left corner of the trending page.
Click the trend icon next to Available Physical Memory to access the Available Physical Memory trending page.
Select Month to date from the options available in the top-right corner of the trending page to inspect the trend data for the past month.
Within the trend graph, select the section of the graph where the parameter exhibits a permanent drop by pressing Ctrl and dragging with the left mouse button at the same time.
Note
If you are unable to select a section of the graph, click the user icon in the Cube header, navigate to Settings > Trending > Graph actions, and verify the hotkey configured for alternate mouse button actions on a trend graph. See Trending settings.
Alternatively, you can select the gray block displayed under the behavioral change.
Click the light bulb icon.
DataMiner suggests adding the memory usage of the Java runtime to the trend graph.
Select Add 'Task manager: Memory Usage Java runtime' of 'Relation Learning Tutorial - Kata Relation Learning' to trend graph.
Thanks to DataMiner's assistance, you have again identified the culprit: the Java runtime began consuming more memory simultaneously with the Available Physical Memory decrease.
Step 6: Final exercise
In this final step, you will apply everything you have learned earlier in a practical exercise:
The Available Physical Memory parameter exhibits a temporary drop in memory (1).
Which process was responsible for this? Find the culprit and earn at least 75 DevOps Points.
Important
We want to keep improving our relation learning features, and your feedback is very helpful for this. That is why you can also earn DevOps Points by sending us examples of problems solved withe relation learning and/or situations where relation learning can be improved (e.g. the feature did not perform as well as you had hoped).
Use the following email format to send us your examples:
- Subject: Tutorial - Relation learning feedback
- To: ai@skyline.be
- Body:
- Dojo account: Clearly mention the email address you use to sign into your Dojo account, especially if you are using a different email address to send this email.
- Feedback: Provide a short explanation of what is shown in the examples you are sending us and why relation learning was useful or not.
- Attachment: a screenshot relevant to your use case
Skyline will review your submission. Upon successful validation, you will be awarded DevOps Points.