Connecting to dataminer.services with a DMZ setup
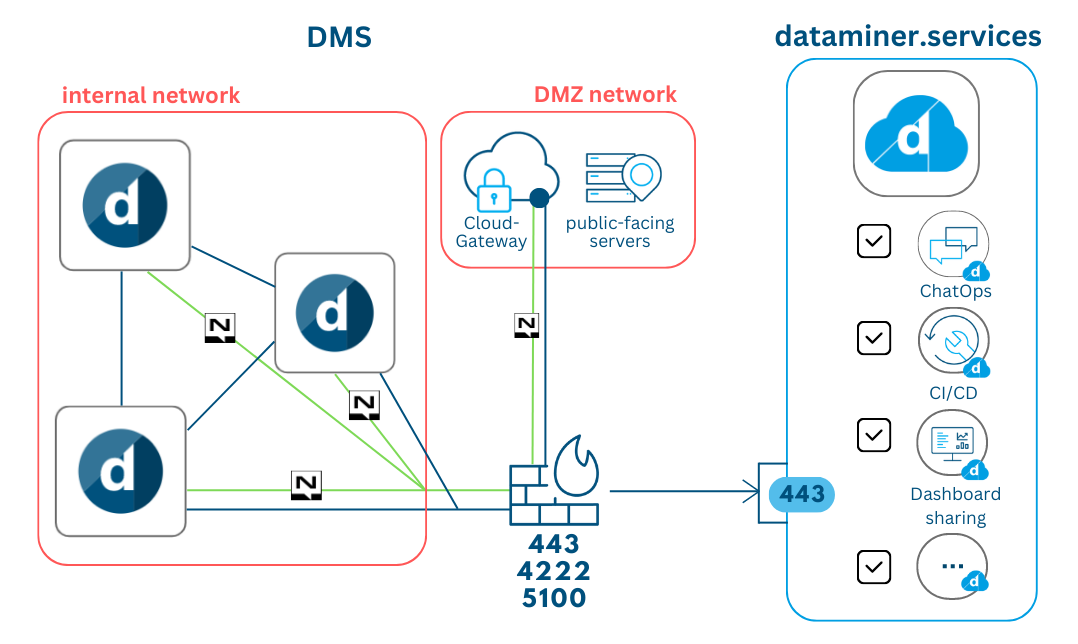
From version 2.7.0 of the CloudGateway DxM onwards, you can connect a DMS to dataminer.services using a DMZ (i.e. a perimeter network acting as an intermediate between the DMS and the internet). This way, the DMS can be connected to dataminer.services without exposing the entire DMS network to the public internet.
Verify that your DataMiner System meets all requirements.
Configure the firewall of the DMZ:
Make sure outbound communication is allowed to the endpoints mentioned in Connecting your DataMiner System to dataminer.services.
Make sure bidirectional communication between the DMZ and the DMS is possible over port 80, or through port 443 for a secure connection.
Make sure bidirectional communication between the DMZ and the DMS is possible through NATS on port 4222.
Make sure bidirectional communication between the DxMs on all servers and the DMZ is possible over TCP on port 5100.
Note
If communication through port 5100 is not possible, it is possible to configure a different port. See Customizing the dataminer.services endpoint configuration.
Install the DMZ Cloud Pack on the DMZ server.
On the DataMiner nodes, install the DxMs that need to connect with the DMA or do not require internet access. At present, these are CoreGateway, FieldControl, SupportAssistant, ArtifactDeployer and Orchestrator. For a Failover setup, you should install these DxMs on both Agents in the Failover pair.
Important
From DataMiner 10.3.7/10.4.0 onwards, a Cloud Pack containing these DxMs (but not DataMiner CloudGateway) is automatically installed when you upgrade or install DataMiner.
Note
For all DxMs (except the Cloud Gateway), it is advised to have an instance running on every node. This will create redundancy in case something goes wrong and allows for upgrades without any downtime.
On the DMZ server, in the folder
C:\Program Files\Skyline Communications\DataMiner CloudGateway, create an override appsettings.custom.json with the following contents:{ "DmzOptions": { "IsHttpsEnabled": <true/false>, "Domain": <IIS>, "DataMinerAgentName": <name of the DataMiner Agent the DMZ is connected to> } }IsHttpsEnabled: Indicates whether the communication between the DMZ and the DMA is encrypted. This can only be the case if the IIS is configured to support TLS.
Domain: The FQDN domain name of your DataMiner System, configured through the IIS settings. Example:
dma1.example.com.DataMinerAgentName: The name of the DataMiner Agent you are connecting to. This should be the same DMA as the one used for the domain setting. Example:
dma1.
Note
If you want to point the DMZ to a Failover pair, you will need to set up two DMZ servers, each pointing to one of the two Agents in the pair.
On a DataMiner node, copy
C:\Skyline DataMiner\SLCloud.xmlandC:\Skyline DataMiner\NATS\nsc\.nkeys\creds\DataMinerOperator\DataMinerAccount\DataMinerUser.creds, and paste these in theC:\Skyline DataMiner\andC:\Skyline DataMiner\NATS\nsc\.nkeys\creds\DataMinerOperator\DataMinerAccountfolder of the DMZ, respectively. Make sure that the credentials entry in SLCloud.xml points to the credentials file you copied over.Restart all DxMs in the DMZ so that they use the new settings.
Caution
Make sure the NAS & NATS firewall rules (on the DataMiner Agents) apply to the Public profile. DataMiner versions prior to 10.2.0 and 10.2.3 incorrectly applied these firewall rules to the Domain profile, and this is not automatically adjusted during updates.