About the alarm template editor
To configure an alarm template, usually the alarm template editor in the Protocols & Templates module is used.
Tip
It is also possible to quickly change the alarm range for one parameter without using the Protocols & Templates module.
Opening the alarm template editor
From the overview of all templates in the Protocols & Templates module:
- In the app, right-click the template and select Open, Open in new card, or Open in new undocked card.
From a particular element or service in the Surveyor:
To open an existing template, right-click the element or service in the Surveyor, and select Protocols & Templates > View alarm template '[template name]'.
To create and configure a new template, right-click the element or service in the Surveyor, and select Protocols & Templates > Assign alarm template > <New alarm template>. Then specify the name for the new template and click OK.
The alarm template editor user interface
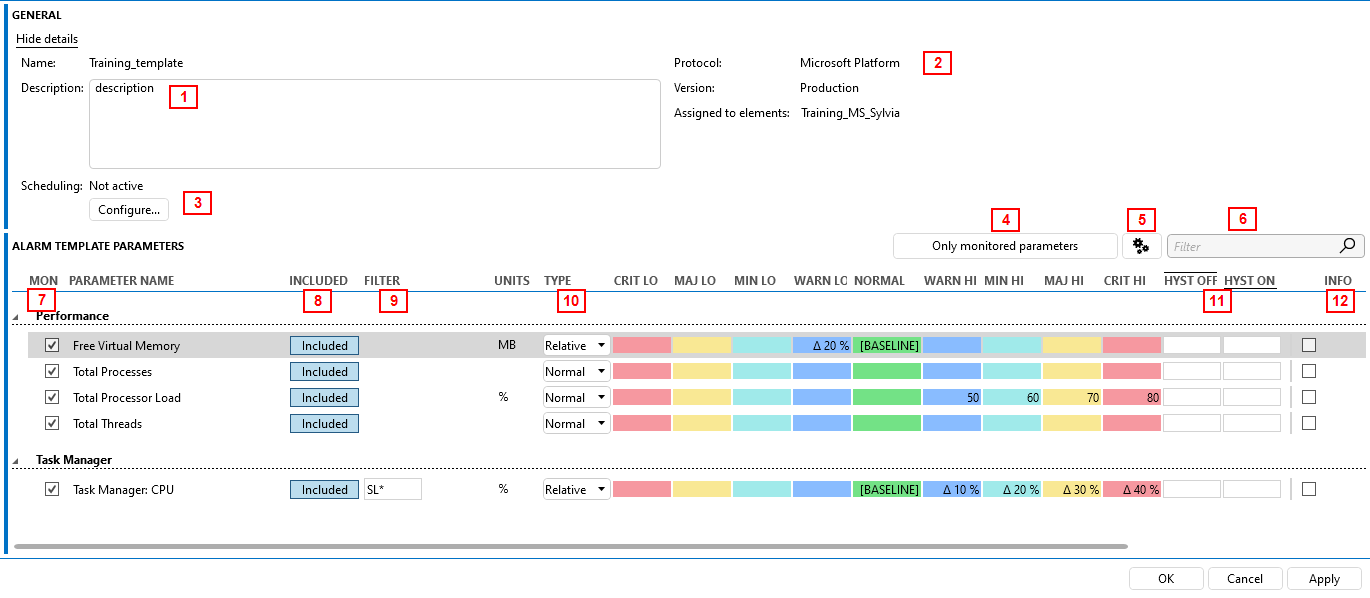
The example above shows the alarm template editor in DataMiner 10.3.6.
The alarm template editor consists of two main sections:
The General section at the top is collapsed by default, but you can expand it by clicking Show details.
At the top (1), you can specify a description for the template. This description is shown as a tooltip when users assign templates via the right-click menu and can help them select the correct template.
On the right (2), the General section shows the protocol and protocol version linked to the template, and a list of elements to which it has been assigned.
At the bottom of the General section (3), you can optionally schedule when the alarm template should be applied.
The Alarm template parameters section is where you can configure alarm thresholds and more.
By default, for a new alarm template, general parameters are not displayed. To configure monitoring for these, click the Only monitored parameters button (4), and select Only protocol parameters or All parameters (protocol + general).
If you open an existing alarm template, only the parameters for which thresholds have been set are shown. To see other parameters as well, click the Only monitored parameters button (4) and select Only protocol parameters or All parameters (protocol + general).
The settings button (5) opens a menu where you can select whether the option to include/exclude parameters (used for alarm template groups) and the option to override autoclear are displayed in the alarm template. Prior to DataMiner 10.3.12/10.4.0, you can also select whether the configuration of Augmented Operations alarm settings is displayed, but in later DataMiner versions this is displayed by default.
To quickly find a particular parameter, you can use the filter box in the top-right corner (6).
The checkboxes in the MON column (7) determine whether a parameter is monitored or not.
The INCLUDED column (8) is used to configure alarm template groups.
The FILTER column (9) is used to configure different alarm thresholds for the rows in a dynamic table.
The TYPE column (10) determines whether normal or dynamic alarm thresholds are used. These thresholds are then defined in the colored columns to the right of this.
The HYST OFF and HYST ON columns (11) are used to configure hysteresis.
The INFO column (12) is used to configure whether information messages are generated when a parameter gets a certain value.
The CONDITIONS column (not included in the example above) can be used to configure conditional alarm monitoring.
For some matrix parameters, alarm thresholds need to be configured in a dedicated matrix alarm level editor.